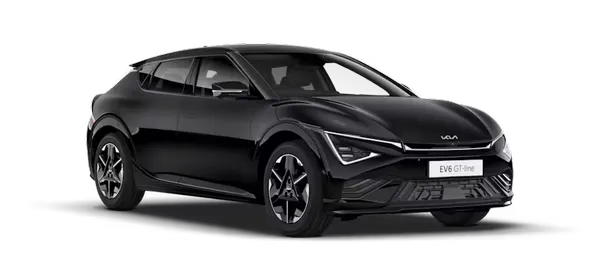
Contents:
Components and Components Location
|
•
|
This video was created using 3D graphics to help understand the vehicle
maintenance manual.
|
|
•
|
There may be some differences from actual vehicles.
|
|
•
|
The location and repair procedures of the parts may vary depending on vehicle
model, model year,
region, and specifications.
|
|
•
|
Check the KDS Guide for detailed information on how to use the KDS.
|
|
•
|
Check the manual for detailed maintenance procedures.
|
|
•
|
Unauthorized reproduction, distribution, or sharing of this video is
prohibited.
|
|
Advanced Driver Assistance System (Driving) Components
(Click to play)

Video: Advanced Driver Assistance System
(Driving)
Components
1. Front Camera
|
4. Driver Driving Assistance Switch
|
2. Front Radar
|
5. Front Corner Radar
|
3. ADAS Driving ECU (ADAS_DRV)
|
6. Rear Corner Radar
|
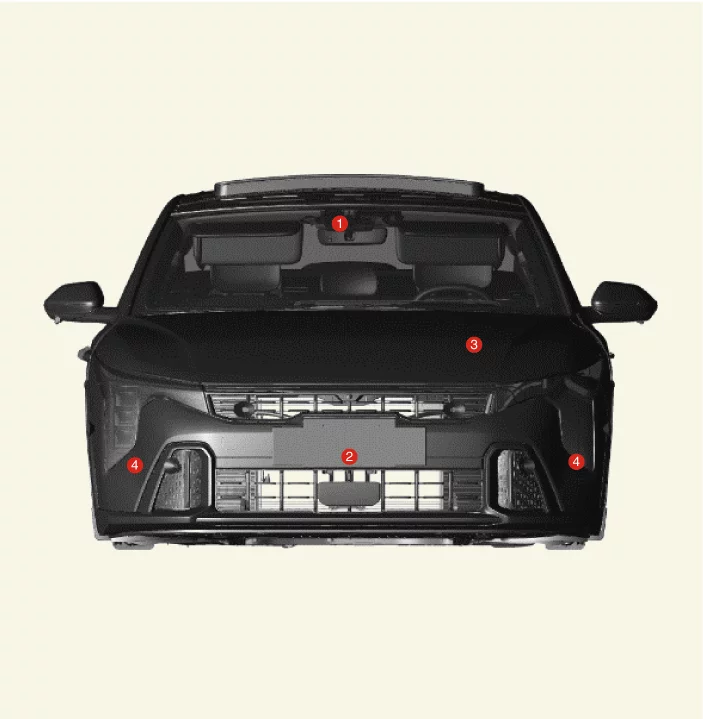
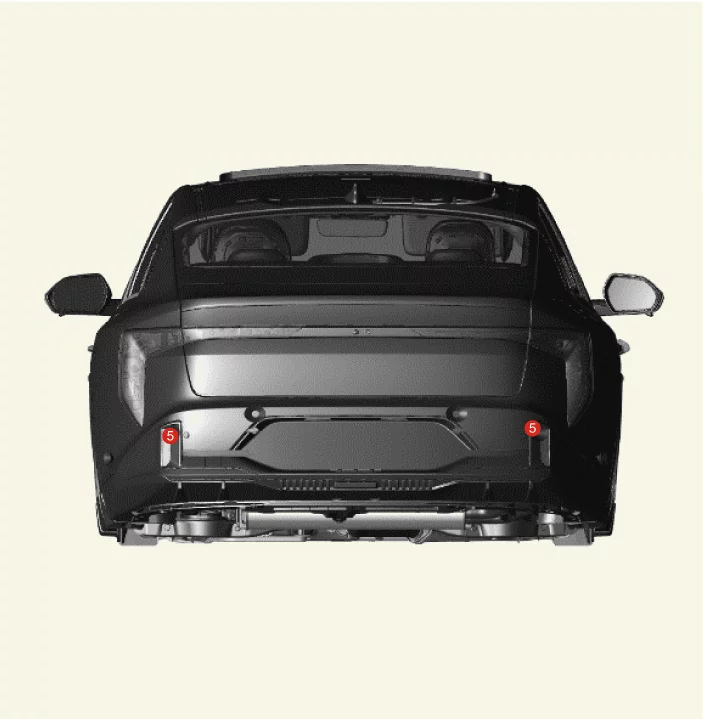
1. Front Camera
2. Front Radar
3. ADAS
Driving
ECU (ADAS_DRV)
|
4. Front Corner Radar
5. Rear Corner
Radar
|
ADAS Driving ECU (ADAS_DRV) Specifications
Item
|
Specification
|
Rated voltage (V)
|
12.0
|
Operation voltage (V)
|
9.0 - 16.0
|
Quantity
|
1
|
ADAS Driving ECU (ADAS_DRV) On Vehicle Inspection
Diagnosis with KDS
| 1.
|
The ADAS driving ECU can be more quickly diagnosed for problems with the KDS. (Refer to "DTC
guide")
| (1)
|
Self diagnosis : Inspect the Diagnostic Trouble Code (DTC) with the KDS.
(Refer to DTC guide when fault code is found)
|
| (2)
|
S/W Management : Controlling other features including system option setting and
zero point
adjustment.
(S/W Management → Advanced Driver Assistance System_Driving → System
Identification)
(S/W Management → Advanced Driver Assistance System_Driving → Variant Coding)
|
|
Refer to the KDS screen for operating conditions and details.
|
|
ADAS Driving ECU (ADAS_DRV) Removal and Installation
ADAS Driving ECU (ADAS_DRV)
| 1.
|
Perform the order below with the KDS before replacing the ADAS driving ECU.
(S/W Management → Advanced Driver Assistance System_Driving → System Identification)
|
Refer to the KDS screen for operating conditions and details.
|
|
| 2.
|
Remove the powernet domain controller.
(Refer to Body - "Junction Block")
|
| 3.
|
Disconnect the unit connector (A).
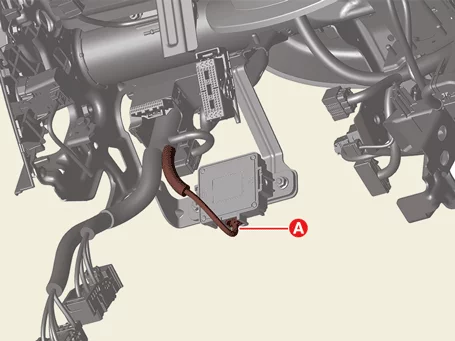
|
| 4.
|
Remove the unit (A) after removing the nuts.
|
Tightening torque :
6.8 - 7.5 N·m (0.69 - 0.76 kgf·m, 5.0 - 5.5 lb·ft, 59.9 - 66.0 lb·in)
|
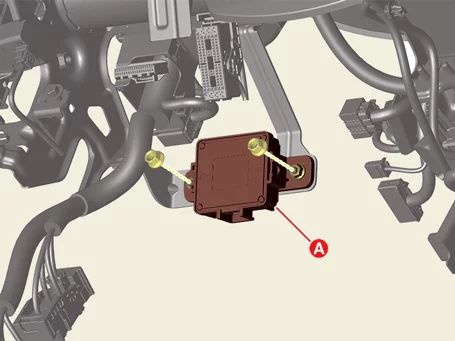
|
| 1.
|
Install in the reverse order of removal.
|
| 2.
|
Perform the order below with the KDS when replacing the ADAS driving ECU.
(S/W Management → Advanced Driver Assistance System_Driving → Variant Coding)
|
Refer to the KDS screen for operating conditions and details.
|
|
| 3.
|
Perform Over The Air (OTA) controller S/W update with KDS.
(Refer to Body - "Over The Air (OTA)")
|
Driver Driving Assistance Switch Removal and Installation
| Driver Driving Assistance Switch |
| 1.
|
Remove the steering wheel remote controller.
(Refer to Steering System - "Steering Wheel")
|
| 1.
|
Install in the reverse order of removal.
|
Front Camera On Vehicle Inspection
Visual Inspection
If the function of FCA, LKA, BCA, ISLA, DAW, HBA, LFA, HDA or HDA2 is not operable or DTC occurs, check the
following below.
| 1.
|
Check if the windshield is clean.
|
–
|
Snow, dust, or stickers around the camera lens may result in poor performance.
|
|
–
|
Damaged or cracked glass around the camera lens may result in poor performance.
|
|
–
|
Any tinting or coatings around the camera lens may result in poor performance.
|
|
| 2.
|
Check the condition of the crash pad.
|
–
|
Any objects on the crash pad under the camera may result in poor performance.
|
|
| 3.
|
Check the cover, coupler or front camera when a diagnostic trouble code occurs.
|
–
|
Cover : Installation status and foreign substance entrance.
|
|
–
|
Coupler : Installation status, foreign substance entrance and coupler
deformation.
|
|
–
|
Front view camera : Damages and contamination on the front camera lens.
|
|
| 4.
|
Check the switch operation status.
|
–
|
Press the lane driving assistant button (A) and see if the indicator light (B)
illuminates.(Check
the LKA system if the indicator light does not illuminates.)
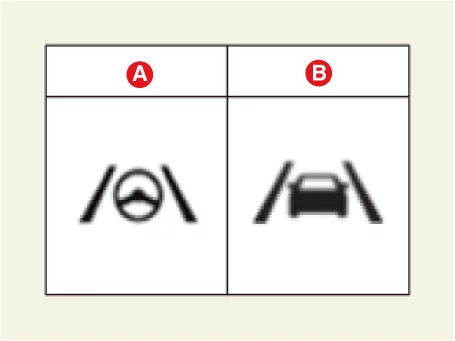
|
|
–
|
Press the lane driving assistant button (A) and see if the indicator light (B)
illuminates.
(Check the LFA system if the indicator light does not illuminates.)
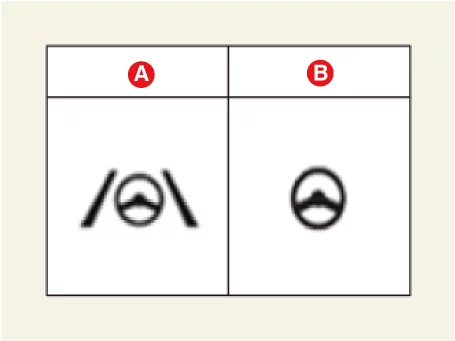
|
|
Diagnosis with KDS
| 1.
|
The front view camera can be more quickly diagnosed for problems with the KDS. (Refer to "DTC
guide")
| (1)
|
Self diagnosis : Inspect the Diagnostic Trouble Code (DTC) with the KDS.
(Refer to DTC guide when fault code is found)
|
| (2)
|
S/W Management : Controlling other features including system option setting and
zero point
adjustment.
(S/W Management → Front View Camera → System Identification)
(S/W Management → Front View Camera → Variant Coding)
(S/W Management → Front View Camera → SPTAC Calibration)
|
|
Refer to the KDS screen for operating conditions and details.
|
|
Front Camera Removal and Installation
|
The indication below represents the location of a clip or fastener.

|
| 1.
|
Perform the order below with the KDS before removing the front camera.
(S/W Management → Front View Camera → System Identification)
|
Refer to the KDS screen for operating conditions and details.
|
|
| 2.
|
Disconnect the battery negative (-) terminal.
|
| 3.
|
Remove the multi sensor cover.
(Refer to Body - "Multi Sensor Cover")
|
| 4.
|
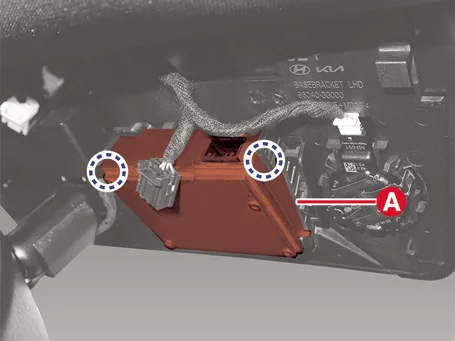
Disconnect the front camera connector (A).
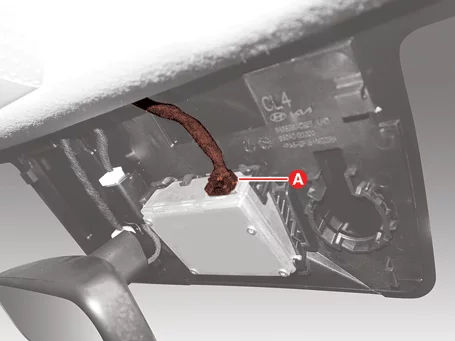
|
| 5.
|
Remove the camera (A).
|
| 1.
|
Install in the reverse order of removal.
|
Check that the front camera mounting area (windshield glass) is clean before
installing the front
camera.
|
|
| 2.
|
Perform the order below with the KDS when replacing the front view camera.
(S/W Management → Front View Camera → Variant Coding)
(S/W Management → FR_CMR - Front Camera → Software Information)
|
Refer to the KDS screen for operating conditions and details.
|
|
| 3.
|
Enter the specification value read from the existing camera into the new front camera.
|
| 4.
|
Perform the front camera calibration.
(Refer to Front Camera - "Adjustment")
|
Front Camera Adjustment
|
•
|
This video was created using 3D graphics to help understand the vehicle
maintenance manual.
|
|
•
|
There may be some differences from actual vehicles.
|
|
•
|
The location and repair procedures of the parts may vary depending on vehicle
model, model year,
region, and specifications.
|
|
•
|
Check the KDS Guide for detailed information on how to use the KDS.
|
|
•
|
Check the manual for detailed maintenance procedures.
|
|
•
|
Unauthorized reproduction, distribution, or sharing of this video is
prohibited.
|
|
Front Camera Calibration
(Click to play)
Video: Front Camera Calibration
Tool Name / Number
|
Illustration
|
Description
|
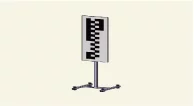
Front view camera calibration target
09890 - 3V100
|
|
Used to calibrate the front camera
|
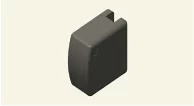
SCC setting beam
09964 - C1200
|
|
Used to calibrate the front radar
Used to calibrate the front camera
|
Front radar setting tripod
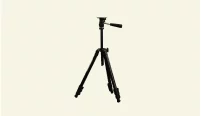
09964 - C1300
|
|
Used to calibrate the front radar
|
Front view camera calibration is necessary for the following
cases
|
•
|
When the front view camera is reinstalled.
|
|
•
|
When the front view camera is replaced.
|
|
•
|
When the front view camera bracket is deformed.
|
|
•
|
When the windshield glass is replaced.
|
|
•
|
When the DTC occurs for the front view camera.
|
Check the items below before performing the camera
calibration.
|
•
|
Align the tires in a straight direction.
|
|
•
|
Inspect the tire pressure.
|
|
•
|
Check the wheel alignment.
|
|
•
|
Check the suspension for damage.
|
|
•
|
Check that the windshield glass is clean.
|
|
Service Point Target Auto Calibration (SPTAC)
| 1.
|
Mark the center point (A) after measuring the distance on top of the windshield glass.
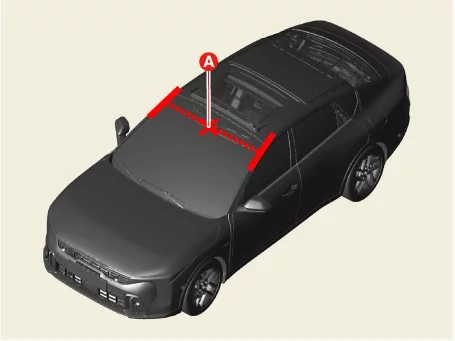
|
| 2.
|
Mark the center point of emblem (B).
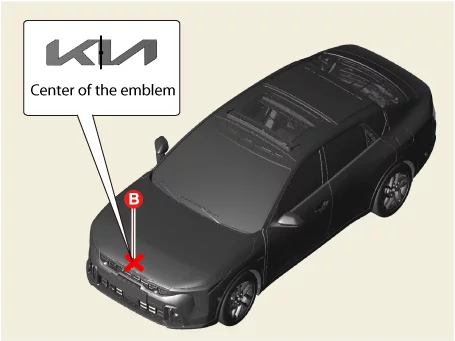
|
| 3.
|
Mount the SCC setting beam (09964 - C1200) on the front radar setting tripod (09964 - C1300).
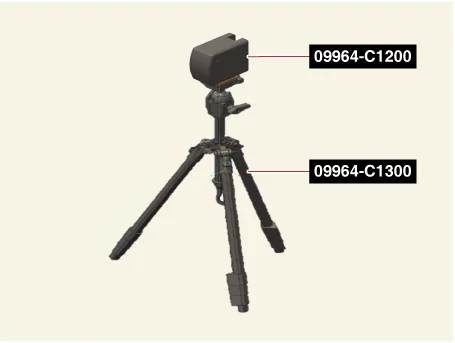
|
| 4.
|
Place the SCC setting beam (09964 - C1200) more than 2.5 m (8.2 ft) away from the front of the
vehicle.
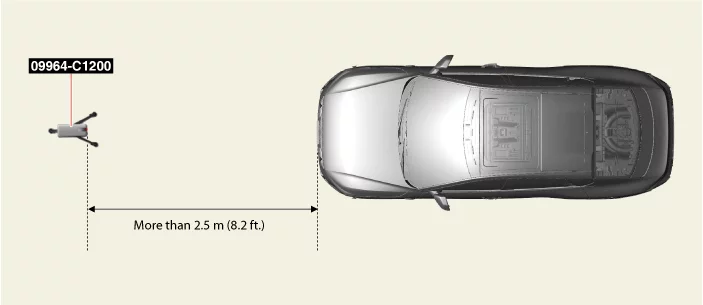
|
| 5.
|
Match the vertical laser line to points (A) and (B) using the SCC setting beam (09964 - C1200).
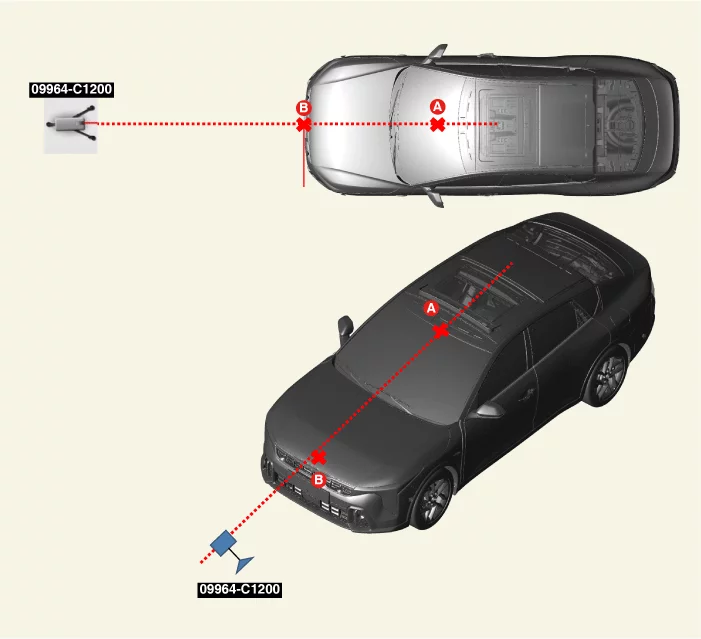
|
| 6.
|
Mark the center point (C) of the hood using the laser vertical line.
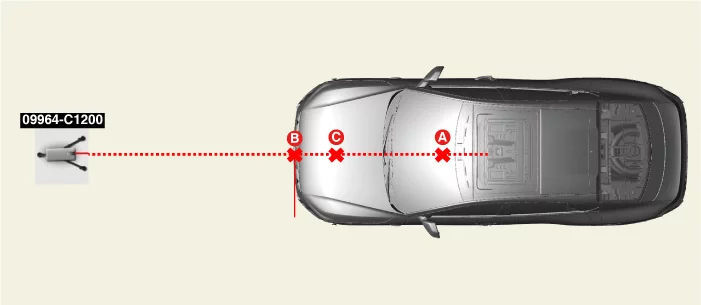
|
| 7.
|
Remove the SCC setting beam (09964 - C1200) from the front radar setting tripod (09964 -
C1300).
|
| 8.
|
Install the SCC setting beam (09964 - C1200) in the center of the roof.
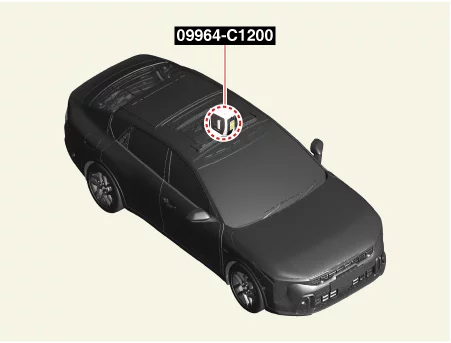
|
| 9.
|
Allow the laser of the SCC setting beam (09964 - C1200) to pass through the center point (C).
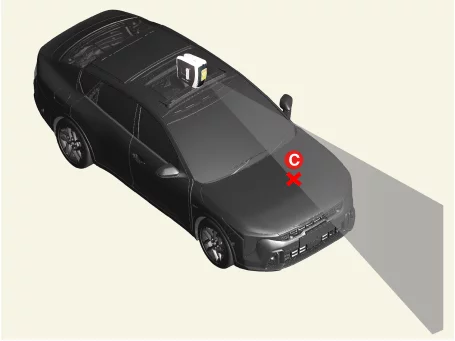
|
The SCC Setting Beam (09964 - C1200) must be set to 'ON' and the holding
(locking) function is
not used.
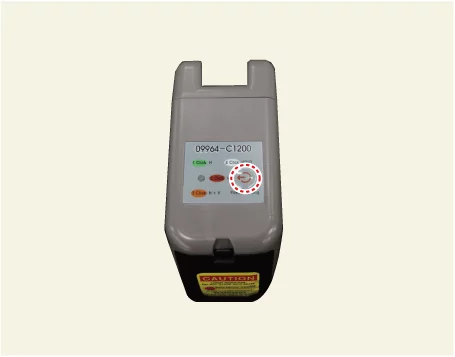
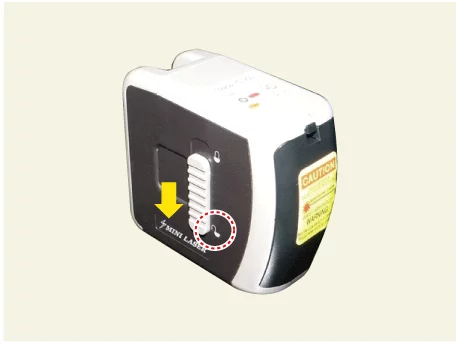
|
|
| 10.
|
The height of the front camera calibration target (09890 - 3V100) is adjusted to be 88 - 92 cm
(35.2 -
36.8 in.) from the ground.
|
| 11.
|
Place the front camera calibration target (09890 - 3V100) so that it maintains a distance of 0
cm (0
in.) from the bumper. [Maximum tolerance : 10 cm (4 in.)]
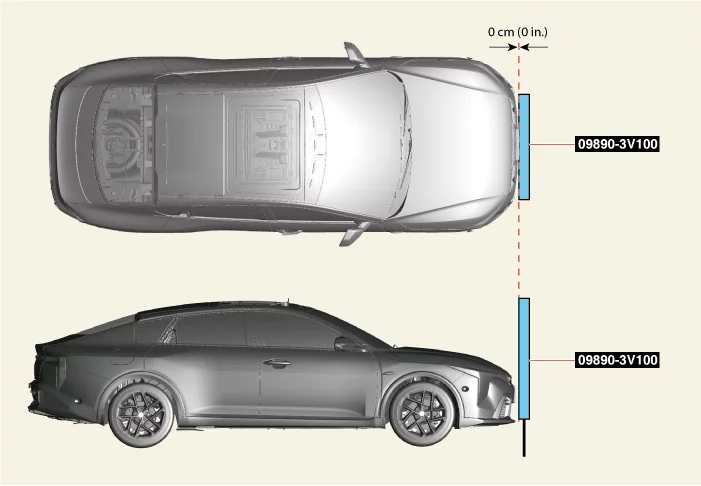
|
| 12.
|
Install the front view camera calibration target (09890 - 3V100) center (A) in line with the
laser
vertical line of the SCC setting beam (09964 - C1200). [Maximum tolerance : 5cm (2 in.)]
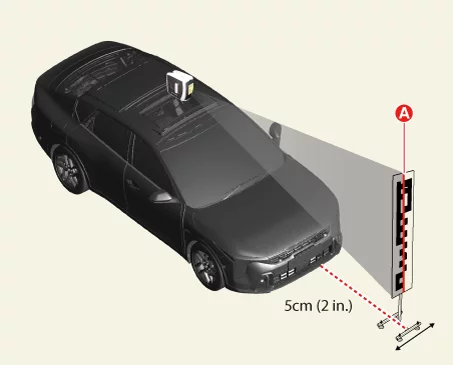
|
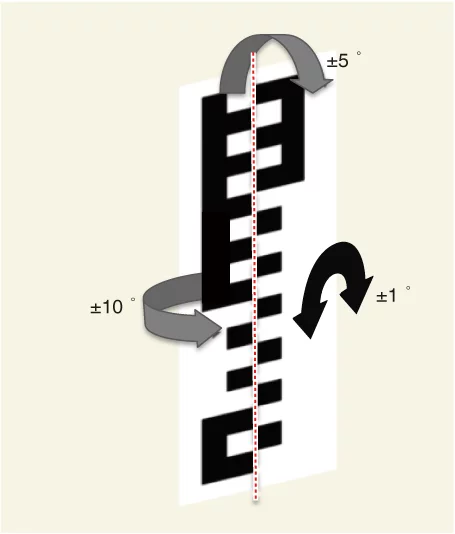
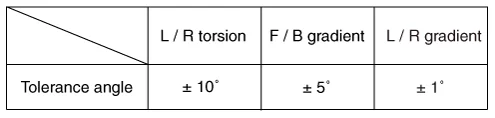
•
|
Align the front view camera calibration target (09890 - 3V100)
referring to the tolerance
angle below.
|
|
•
|
The vehicle horizontal plane shall be completely parallel to
the target horizontal plane
(± 1°).
|
|
–
|
The left and right tilt tolerance (±1°) is very important and
is sensitively affected by
the flatness of the floor.
|
|
|
| 13.
|
Perform the order below with the KDS.
(S/W Management → Front View Camera → SPTAC Calibration)
|
Refer to the KDS screen for operating conditions and details.
|
|
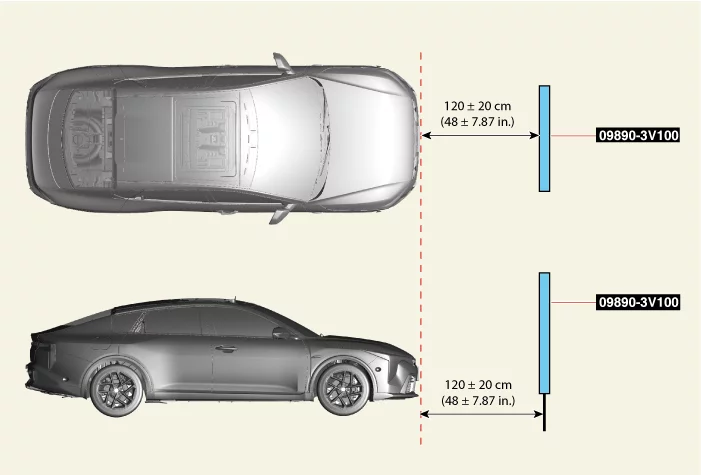
| 14.
|
Place the front view camera calibration target (09890 - 3V100) so that it maintains a distance
of 120 cm
(48 in.) from the bumper. (Maximum tolerance : 20 cm (8 in.))
|
| 15.
|
Install the front view camera calibration target (09890 - 3V100) center (A) in line with the
laser
vertical line of the SCC setting beam (09964 - C1200). [Maximum tolerance : 5cm (2 in.)]
|
•
|
Align the front view camera calibration target (09890 - 3V100)
referring to the tolerance
angle below.
|
|
•
|
The vehicle horizontal plane shall be completely parallel to
the target horizontal plane
(± 1°).
|
|
–
|
The left and right tilt tolerance (±1°) is very important and
is sensitively affected by
the flatness of the floor.
|
|
|
| 16.
|
Perform the order below with the KDS.
(S/W Management → Front View Camera → SPTAC Calibration)
|
Refer to the KDS screen for operating conditions and details.
|
|
| 17.
|
Check the DTC and warning lamp after erasing the DTC with the KDS.
|
Front Corner Radar Specification
Item
|
Specification
|
Rated voltage (V)
|
11.5 - 12.5
|
Operation voltage (V)
|
9.0 - 16.0
|
Quantity
|
2
|
Front Corner Radar On Vehicle Inspection
Visual inspection
If the function of FCA, SCC, NSCC, or HDA 2 is not operable or DTC occurs, check the following below.
| 1.
|
Checking bumper cleanliness : If the bumper is contaminated with snow or dust, may be disable
during
operation.
|
| 2.
|
Check the condition around the bumper : Warning lights may occur if metal stickers or foreign
substances
are attached to the radar.
|
| 3.
|
Checking bumper geometry or mounting status : Warning lights may occur if bumper or radar is
not properly
installed after an accident.
|
Diagnosis with KDS
| 1.
|
The front corner radar can be more quickly diagnosed for problems with the KDS. (Refer to "DTC
guide")
| (1)
|
Self diagnosis : Inspect the Diagnostic Trouble Code (DTC) with the KDS.
(Refer to DTC guide when fault code is found)
|
| (2)
|
S/W Management : Controlling other features including system option setting and
zero point
adjustment.
(S/W Management → Front Corner/Rear Corner Radar → System Identification)
(S/W Management → Corner Radar → Variant Coding)
(S/W Management → Corner Radar → Front Corner / Rear Corner Radar Calibration)
|
|
Refer to the KDS screen for operating conditions and details.
|
|
| 2.
|
Check the bumper, bracket, or radar when a diagnostic trouble code occurs.
|
•
|
Bumper : Installation status, bumper deformation.
|
|
•
|
Radar Bracket : Installation status, radar bracket deformation.
|
|
•
|
Radar : Faulty radar bolt or nut tightening, radar surface contamination.
|
|
Front Corner Radar Removal and Installation
|
The indication below represents the location of a clip or fastener.
|
Standard
| 1.
|
Perform the order below with the KDS before replacing the front corner radar.
(S/W Management → Front Corner/Rear Corner Radar → System Identification)
|
Refer to the KDS screen for operating conditions and details.
|
|
| 2.
|
Remove the front bumper assembly.
(Refer to Body - "Front Bumper Assembly")
|
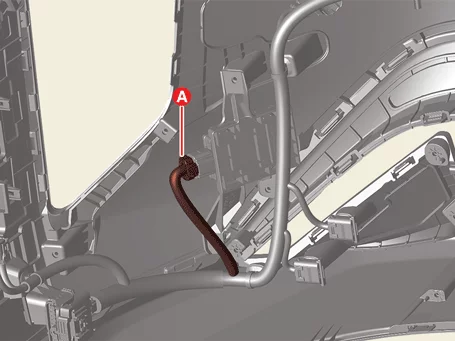
| 3.
|
Disconnect the front corner radar connector (A).
|
| 4.
|
Remove the radar (A) after removing the screws.
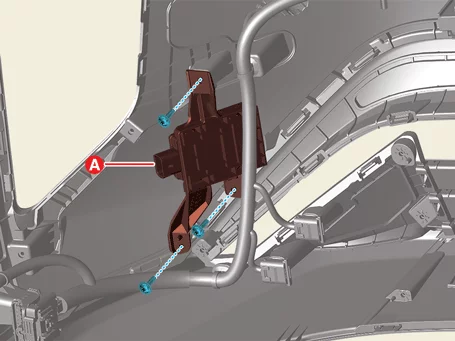
|
If the bracket is deformed or damaged, the front corner radar will not operate
normally.
|
|
Option
| 1.
|
Perform the order below with the KDS before replacing the front corner radar.
(S/W Management → Front Corner/Rear Corner Radar → System Identification)
|
Refer to the KDS screen for operating conditions and details.
|
|
| 2.
|
Remove the front bumper assembly.
(Refer to Body - "Front Bumper Assembly")
|
| 3.
|
Disconnect the front corner radar connector (A).
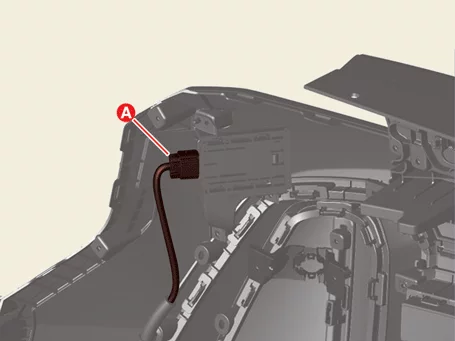
|
| 4.
|
Remove the radar (A) after removing the screws.
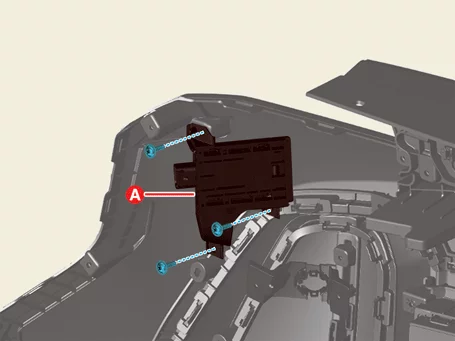
|
If the bracket is deformed or damaged, the front corner radar will not operate
normally.
|
|
| 1.
|
Install in the reverse order of removal.
|
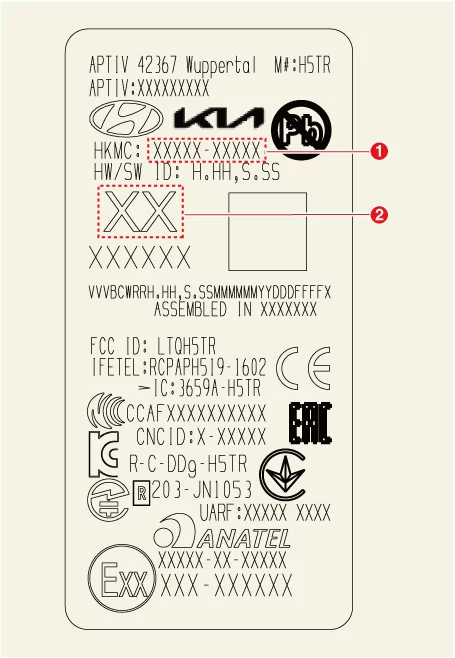
1) Parts number
2) FL, FR, RL, RR
|
|
| 2.
|
Perform the order below with the KDS when replacing the front corner radar.
(S/W Management → Corner Radar → Variant Coding)
|
Refer to the KDS screen for operating conditions and details.
|
|
| 3.
|
Perform the order below with the KDS.
(S/W Management → Corner Radar → Front Corner/ Rear Corner Radar Calibration)
Check the items below before performing the
front corner radar
calibration.
|
•
|
Inspect the tire pressure.
|
|
•
|
Check the wheel alignment.
|
|
•
|
Check the suspension for damage.
|
|
•
|
Check the front bumper assembly for damage and deformation.
|
|
|
Refer to the KDS screen for operating conditions and details.
|
|
Front Radar Specification
Item
|
Specification
|
Rated voltage (V)
|
11.5 - 12.5
|
Operating voltage (V)
|
9.0 - 16.0
|
Mounting angle (°)
|
Horizontal
|
-0.8 to 0.8
|
Vertical
|
-0.4 to 0.4
|
Front Radar On Vehicle Inspection
Visual inspection
If the function of FCA, SCC, NSCC, or HDA 2 is not operable or DTC occurs, check the following below.
| 1.
|
Checking bumper cleanliness : If the bumper is contaminated with snow or dust, may be disable
during
operation.
|
| 2.
|
Check the condition around the bumper : Warning lights may occur if metal stickers or foreign
substances
are attached to the radar.
|
| 3.
|
Checking bumper geometry or mounting status : Warning lights may occur if bumper or radar is
not properly
installed after an accident.
|
Diagnosis with KDS
| 1.
|
The front radar can be more quickly diagnosed for problems with the KDS. (Refer to "DTC guide")
| (1)
|
Self diagnosis : Inspect the Diagnostic Trouble Code (DTC) with the KDS.
(Refer to DTC guide when fault code is found)
|
| (2)
|
S/W Management : Controlling other features including system option setting and
zero point
adjustment.
(S/W Management → Front Radar → System Identification)
(S/W Management → Front Radar → Inspection/correction of the front - radar
mounting angle)
(S/W Management → Front Radar → Inspection/correction of the front - radar
mounting angle → C1
(Stop mode))
(S/W Management → Front Radar → Inspection/correction of the front - radar
mounting angle → C2
(Driving mode))
|
|
Refer to the KDS screen for operating conditions and details.
|
|
| 2.
|
Check the bumper, bracket, or radar when a diagnostic trouble code occurs.
|
•
|
Bumper : Installation status, bumper deformation.
|
|
•
|
Radar Bracket : Installation status, radar bracket deformation.
|
|
•
|
Radar : Faulty radar bolt or nut tightening, radar surface contamination.
|
|
Front Radar Removal
|
The indication below represents the location of a clip or fastener.
|
| 1.
|
Perform the order below with the KDS before replacing the front radar.
(S/W Management → Front Radar → System Identification)
|
Refer to the KDS screen for operating conditions and details.
|
|
| 2.
|
Remove the front bumper assembly.
(Refer to Body - "Front Bumper Assembly")
|
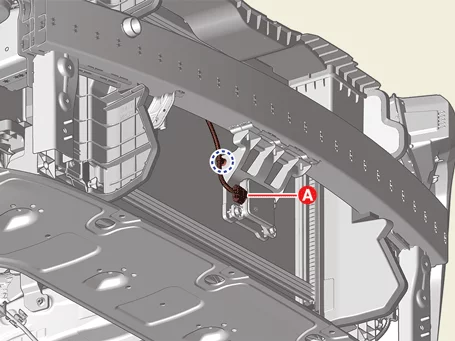
| 3.
|
Disconnect the front radar connector (A).
|
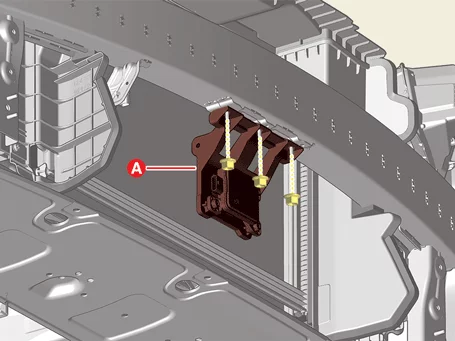
| 4.
|
Remove the radar (A) after removing the nuts.
|
Tightening torque:
9.0 - 11.0 N·m (0.92 - 1.12 kgf·m, 6.7 - 8.1 lb·ft)
|
|
Front Radar Installation
|
•
|
This video was created using 3D graphics to help understand the vehicle
maintenance manual.
|
|
•
|
There may be some differences from actual vehicles.
|
|
•
|
The location and repair procedures of the parts may vary depending on vehicle
model, model year,
region, and specifications.
|
|
•
|
Check the KDS Guide for detailed information on how to use the KDS.
|
|
•
|
Check the manual for detailed maintenance procedures.
|
|
•
|
Unauthorized reproduction, distribution, or sharing of this video is
prohibited.
|
|
Front Radar Installation and Angle Adjustment
(Click to play)
Video: Front Radar Installation and Angle
Adjustment
Tool Name / Number
|
Illustration
|
Description
|
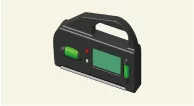
Digital inclinometer
09958 - 3T100
|
|
Used to calibrate the rear corner radar
Used to calibrate the front radar
|
|
The indication below represents the location of a clip or fastener.
|
Check the items below before performing the front radar
installation.
|
•
|
Align the tires in a straight direction.
|
|
•
|
Inspect the tire pressure.
|
|
•
|
Check the wheel alignment.
|
|
•
|
Check the suspension for damage.
|
|
•
|
Check that the radar surface is clean and deformed.
|
|
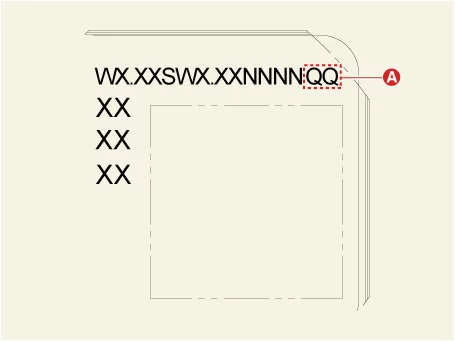
| 1.
|
Before installing the front radar, check the last 2 digits of Lot, No (A).
|
| 2.
|
Install the radar (A) after tightening the nuts.
|
Tightening torque :
9.0 - 11.0 N·m (0.92 - 1.12 kgf·m, 6.7 - 8.1 lb·ft)
|
|
| 3.
|
Connect the radar connector (B).
|
| 4.
|
Perform the order below with the KDS.
(S/W Management → Front Radar → Variant Coding) [When replace
the front
radar]
(S/W Management → Front Radar → Inspection/correction of the front - radar mounting angle)
(S/W Management → FR_RADAR → Software Information)
|
Refer to the KDS screen for operating conditions and details.
|
|
| 5.
|
Check the radar vertical angle by using the digital inclinometer (A).
|
Horizontal angle : -0.8 to 0.8°
Vertical angle : -0.4 to 0.4°
|
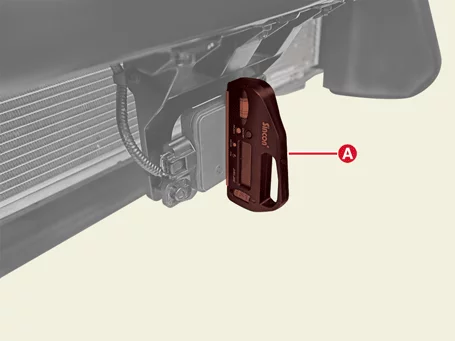
|
•
|
Make sure to perform the zero setting horizontally before using
a digital inclinometer.
|
|
•
|
Note that depending on the display method of the digital
inclinometer, the (+) / (-)
angle may be displayed differently.
|
|
|
| 6.
|
Adjust to vertical installation angle by turning the adjusting screw (A) of the radar.
|
–
|
Turn clockwise : Adjusting (-) angle
|
|
–
|
Turn counterclockwise : Adjusting (+) angle
|
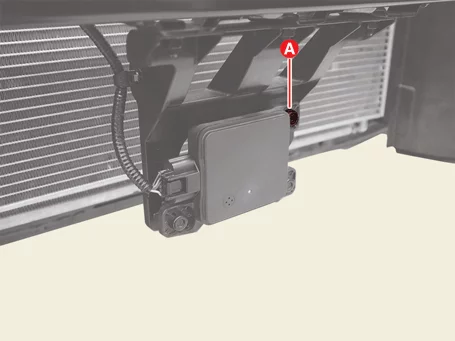
|
| 7.
|
Install the front bumper assembly.
(Refer to Body - "Front Bumper Assembly")
|
Check that the front radar is clean before installing the front bumper
assembly.
|
|
| 8.
|
Perform the front radar inspection, calibration procedure.
(Refer to Front Radar - "Adjustment")
|
Front Radar Adjustment
|
•
|
This video was created using 3D graphics to help understand the vehicle
maintenance manual.
|
|
•
|
There may be some differences from actual vehicles.
|
|
•
|
The location and repair procedures of the parts may vary depending on vehicle
model, model year,
region, and specifications.
|
|
•
|
Check the KDS Guide for detailed information on how to use the KDS.
|
|
•
|
Check the manual for detailed maintenance procedures.
|
|
•
|
Unauthorized reproduction, distribution, or sharing of this video is
prohibited.
|
|
Front Radar Calibration
(Click to play)
Video: Front Radar Mounting Angle Inspection /
Correction
Tool Name / Number
|
Illustration
|
Description
|
SCC setting beam
09964 - C1200
|
|
Used to calibrate the front radar
Used to calibrate the front camera
|
Vertical plumb
09958 - 3T010
|
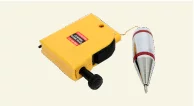
|
Used to calibrate the front radar
|
Front radar setting reflector
09964 - C1100
|
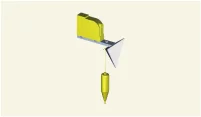
|
Used to calibrate the front radar
|
Calibration reflector
0K964 - J5100
|
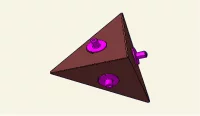
|
Used to calibrate the front radar
|
Front radar setting tripod
09964 - C1300
|
|
Used to calibrate the front radar
|
Front Radar Installation Angle Inspection / Adjustment Overview
|
•
|
The forward radar detects objects in front of the vehicle and measures their speed to recognize
the
distance between the vehicle and the objects.
|
|
•
|
If the forward radar angle is not properly calibrated and adjusted, some functions may
malfunction.
|
The front radar installation angle inspection / adjustment are
needed in
the following cases.
|
•
|
When the front radar is reinstalled.
|
|
•
|
When the front radar is replaced.
|
|
•
|
When DTC occurs for the calibration.
|
|
•
|
In the case of damage to the front radar or its periphery.
|
|
•
|
If there is a problem with the front radar detection and recognition function.
|
|
|
•
|
When driving for above 10 minutes at 65 km/h after performing the stop mode,
correction accuracy
is improved.
(Drive on straight road which has metallic reflector.)
|
|
•
|
When the front radar correction is not available in stop mode, perform the
correction in driving
mode.
|
|
Front Radar Mounting Angle Inspection / Correction - Stop Mode
Check the following below before performing the front radar
mounting
angle inspection / calibration.
|
•
|
Park the vehicle on flat ground.
|
|
•
|
Align the tires in a straight direction.
|
|
•
|
Inspect the tire pressure.
|
|
•
|
Check the wheel alignment.
|
|
•
|
Check the suspension for damage.
|
|
•
|
Check the front bumper or front radar cover bracket is deformed and damaged.
|
|
|
•
|
Perform front radar calibration with the exclusive SST and KDS.
|
|
•
|
Remove objects (metal plates, resins, etc.) that may cause electric signal
interference from the
area where front radar alignment is performed.
|
|
•
|
Install the reflector in the correct position. (A calibration of the front
radar may fail if the
reflector is not installed in the designated area.)
|
|
•
|
Be sure not to move the vehicle when performing the front radar calibration.
|
|
•
|
Perform the front radar calibration during the IG ON state.
|
|
•
|
Perform the inspection/calibration of the front radar mounting angle in the
clearance of 8 m
(26.2 ft.) in front of the front bumper, 4 m (13.2 ft.)in width, and 2 m (6.6
ft.) in height.
|
|
| 1.
|
Park the vehicle in a flat ground.
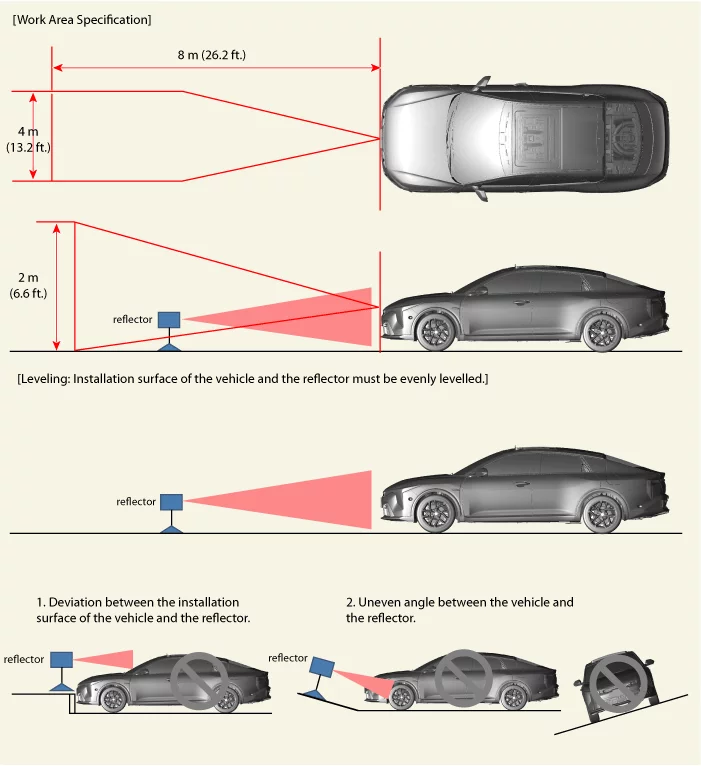
|
| 2.
|
Mark the center point (A) after measuring the distance on top of the windshield glass.
|
| 3.
|
Mark the center point of emblem (B).
|
| 4.
|
Mount the SCC setting beam (09964 - C1200) on the front radar setting tripod (09964 - C1300).
|
| 5.
|
Place the SCC setting beam (09964 - C1200) more than 2.5 m (8.2 ft) away from the front of the
vehicle.
|
| 6.
|
Match the vertical laser line to points (A) and (B) using the SCC setting beam (09964 - C1200).
|
| 7.
|
Mark the point (C) at a distance 2.4 - 2.5 m (7.87 - 8.2 ft) away from (B) point.
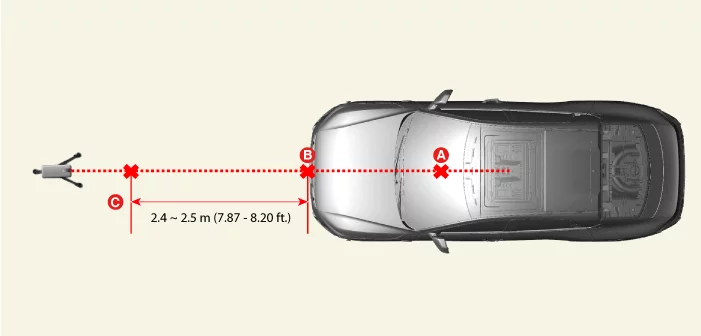
|
| 8.
|
Mark the location as shown below at 6 mm (0.23 in) away from (C).
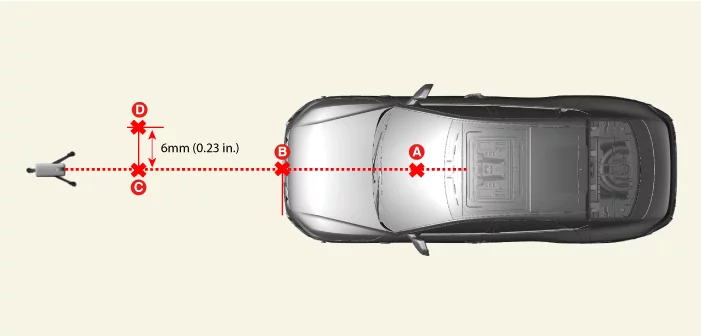
|
| 9.
|
Remove the SCC setting beam (09964 - C1200) from the front radar setting tripod (09964 -
C1300).
|
| 10.
|
Mount the front radar setting reflector (09964 - C1100) to the front radar setting tripod
(09964 -
C1300).
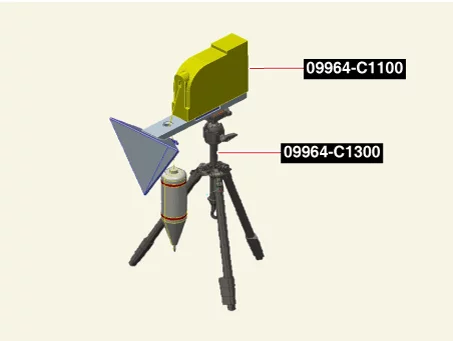
|
| 11.
|
Mount the calibration reflector (0K964 - J5100) to the front radar setting reflector (09964 -
C1100).
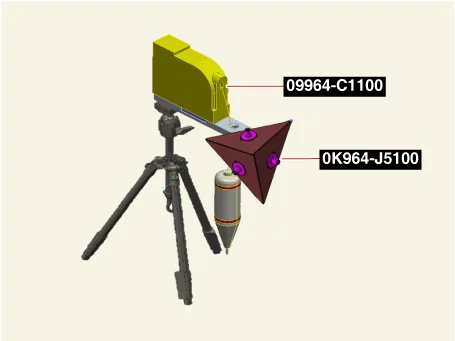
|
| 12.
|
Set the reflector horizontal using the leveler (A) which is built in the front radar setting
tripod
(09964 - C1300).
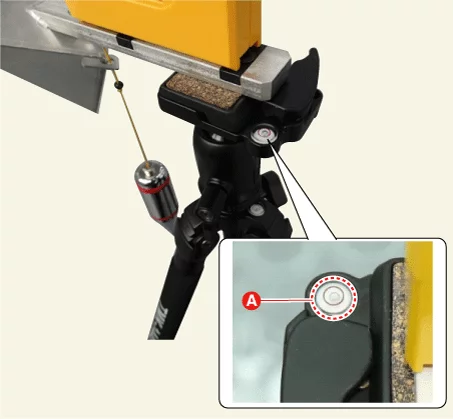
|
| 13.
|
Align the plumb (A) of the front radar setting reflector (09964 - C1100) with point (D).
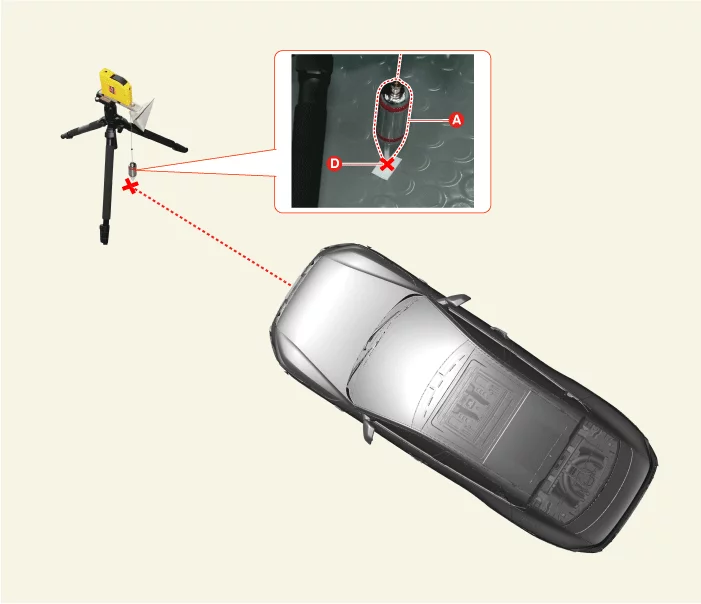
|
| 14.
|
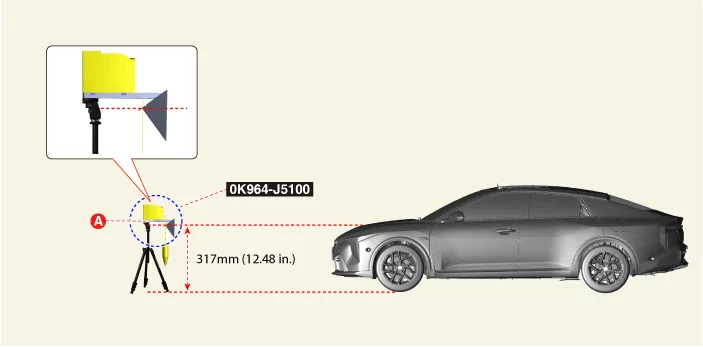
Set the height of the calibration reflector (0K964 - J5100) to 317 mm (12.48 in.). [Standard Type]
|
| 15.
|
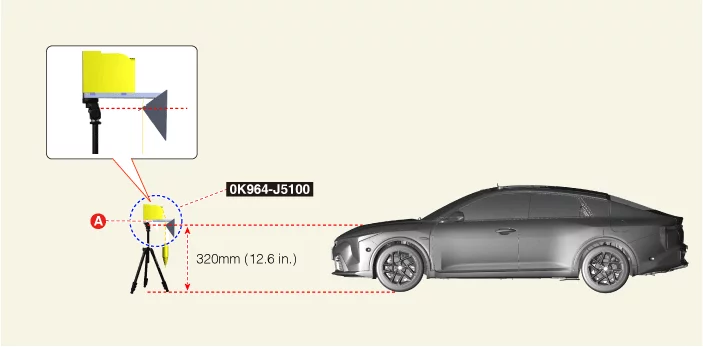
Set the height of the calibration reflector (0K964 - J5100) to 320 mm (12.6 in.). [Option Type]
|
| 16.
|
Remove the plumb bob from the front radar setting reflector (09964 - C1100).
|
The adjustment of the front radar may be failed if the plumb is not removed.
|
|
| 17.
|
Make sure that there is no debris, or reflecting object on the surface of the radar.
|
| 18.
|
Perform the order below with the KDS.
(S/W Management → Front Radar → Inspection/correction of the front - radar mounting angle → C1
(Stop
mode))
|
Refer to the KDS screen for operating conditions and details.
|
|
| 19.
|
In case of failure of the front radar angle inspection or correction, check the front radar and
inspection and correction condition.
|
Front Radar Mounting Angle Inspection / Correction - Driving Mode
Check the following below before performing the front radar
mounting
angle inspection / calibration.
|
•
|
Inspect the tire pressure.
|
|
•
|
Check the wheel alignment.
|
|
•
|
Check the suspension for damage.
|
|
•
|
Check the front bumper or front radar cover bracket is deformed and damaged.
|
|
|
The driving mode (C2) operates the correction through actual road driving.
(Conducted on roads with metallic fixed reflectors such as guardrails.)
|
| 1.
|
Perform the order below with the KDS.
(S/W Management → Front Radar → Inspection/correction of the front - radar mounting angle → C2
(Driving
mode))
|
Refer to the KDS screen for operating conditions and details.
|
|
| 2.
|
In case of front radar inspection / correction failure, check the inspection / correction
conditions.
|
In Cabin Cam Description and Operation
| Description and Operation |
DDMS : Direct Driver Monitoring System
1st Warning
|
2nd Warning
|
3rd Deceleration Control
|
4th Stop Control
|
DDMS warning pop-up occurs
1 beep
|
DDMS warning pop-up occurs
ICC warning light flashing
Continuous beep
Steering vibration
(haptic)
|
ICC warning light flashing
|
-
|
In Cabin Cam Removal and Installation
|
The indication below represents the location of a clip or fastener.
|
In Cabin Cam (ICC) Driver Camera
| 1.
|
Perform in the order below with the KDS before replacing the ICC driver camera.
(S/W Management → In-Cabin Camera → System Identification)
|
Refer to the KDS screen for operating conditions and details.
|
|
| 2.
|
Remove the upper steering column shroud panel.
(Refer to Body - "Steering Column Shroud Panel")
|
| 3.
|
Remove the camera (A).
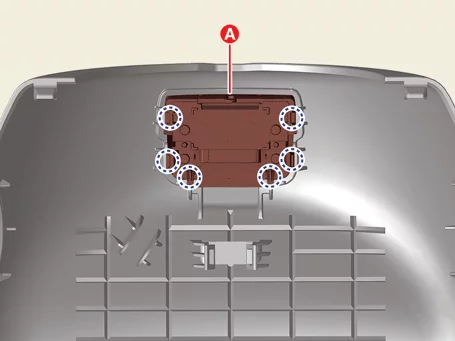
|
In Cabin Cam (ICC) Unit
| 1.
|
Perform in the order below with the KDS before replacing the ICC Unit.
(S/W Management → In-Cabin Camera → System Identification)
|
Refer to the KDS screen for operating conditions and details.
|
|
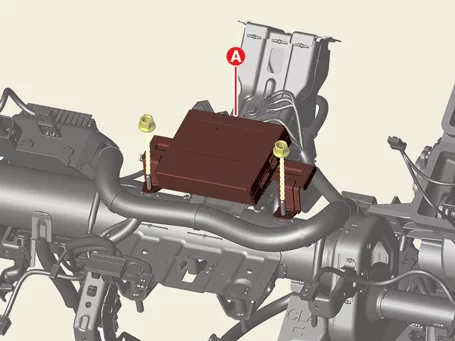
| 2.
|
Remove the crash pad assembly.
(Refer to Body - "Crash Pad Assembly")
|
| 3.
|
Disconnect the unit connectors (A).
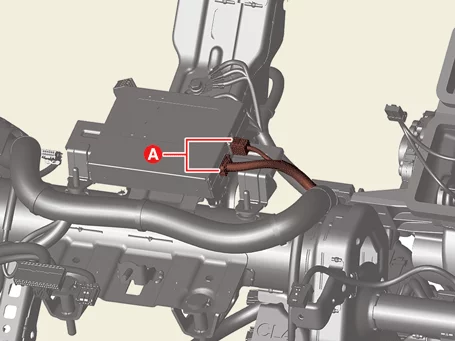
|
| 4.
|
Remove the unit (A) after removing the nuts.
|
Tightening torque:
7.8 - 11.8 N·m (0.8 - 1.2 kgf·m, 5.8 - 8.7 lb·ft)
|
|
| 1.
|
Install in the reverse order of removal.
|
| 2.
|
Perform Over The Air (OTA) controller S/W update with KDS.
(Refer to Body - "Over The Air (OTA)")
|
Rear Corner Radar Specification
Item
|
Specification
|
Rated voltage (V)
|
11.5 - 12.5
|
Operating voltage (V)
|
9.0 - 16.0
|
Quantity
|
2
|
Rear Corner Radar On Vehicle Inspection
Visual Inspection
If the function of BCW/BCA, SEW, RCCW/RCCA, HDA2 not operable check the following below.
| 1.
|
Checking bumper cleanliness: If the bumper is contaminated with snow or dust, performance will
be
reduced.
|
| 2.
|
Check the condition around the bumper : Warning lights may occur if metal stickers or foreign
substances
are attached to the radar.
|
| 3.
|
Checking bumper geometry or mounting status : Warning lights may occur if bumper or radar is
not properly
installed after an accident.
|
| 4.
|
Check the operation status of the switch: Press the switch to check whether the LED works.
|
Diagnosis with KDS
| 1.
|
The advanced driver assistance system (driving) can be more quickly diagnosed for problems by
using the
KDS. (Refer to "DTC guide")
| (1)
|
Self diagnosis : Inspect the Diagnostic Trouble Code (DTC) with the KDS.
(Refer to DTC guide when fault code is found)
|
| (2)
|
S/W Management : Controlling other features including system option setting and
zero point
adjustment.
(S/W Management → Rear Corner Radar → Variant Coding)
(S/W Management → Rear Corner Radar → BCW(BSD) Radar Calibration)
|
|
Refer to the KDS screen for operating conditions and details.
|
|
| 2.
|
Check the bumper, bracket, or radar when a diagnostic trouble code occurs.
|
•
|
Bumper : Installation status, bumper deformation.
|
|
•
|
Radar Bracket : Installation status, radar bracket deformation.
|
|
•
|
Radar : Poor radar nut engagement, radar debris contamination.
|
|
Rear Corner Radar Removal and Installation
|
The indication below represents the location of a clip or fastener.
|
Standard
| 1.
|
Perform the order below with the KDS before replacing the rear corner radar.
(S/W Management → Front Corner/Rear Corner Radar → System Identification)
|
Refer to the KDS screen for operating conditions and details.
|
|
| 2.
|
Remove the rear bumper assembly.
(Refer to Body - "Rear Bumper Assembly")
|
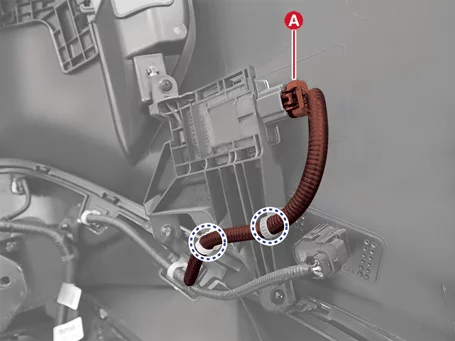
| 3.
|
Disconnect the radar connector (A).
|
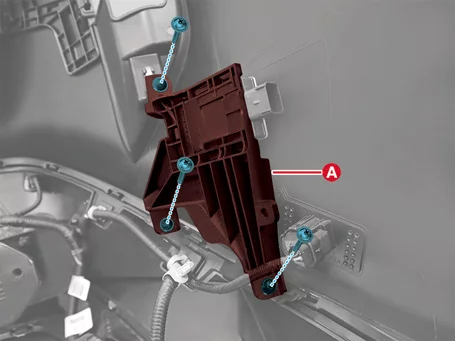
| 4.
|
Remove the radar (A) after removing the screws.
|
If the bracket is deformed or damaged, the rear corner radar will not operate
normally.
|
|
Option
| 1.
|
Perform the order below with the KDS before replacing the rear corner radar.
(S/W Management → Front Corner/Rear Corner Radar → System Identification)
|
Refer to the KDS screen for operating conditions and details.
|
|
| 2.
|
Remove the rear bumper assembly.
(Refer to Body - "Rear Bumper Assembly")
|
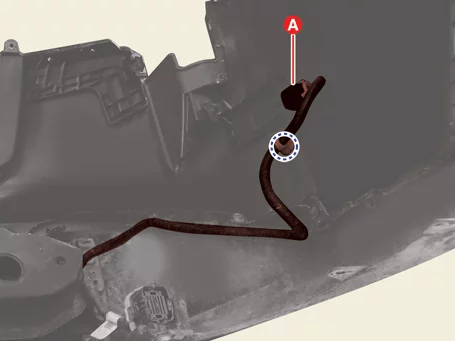
| 3.
|
Disconnect the radar connector (A).
|
| 4.
|
Remove the radar (A) after removing the screws.
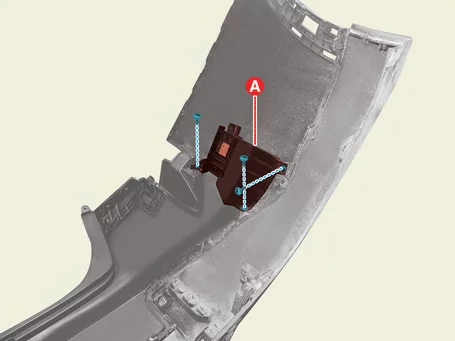
|
If the bracket is deformed or damaged, the rear corner radar will not operate
normally.
|
|
BCW & RCCW Indicator
| 1.
|
Remove the outside mirror.
(Refer to Body - "Outside Mirror")
|
Rear Corner Radar
| 1.
|
Install in the reverse order of removal.
|
1) Parts number
2) FL, FR, RL, RR
|
|
| 2.
|
Perform the order below with the KDS when replacing the rear corner radar.
(S/W Management → Rear Corner Radar → Variant Coding)
(S/W Management → Rear Corner Radar → Software Information)
|
Refer to the KDS screen for operating conditions and details.
|
|
| 3.
|
Perform the order below with the KDS.
(S/W Management → Corner Radar → Rear Corner Radar Calibration)
Check the items below before
performing the rear corner
radar calibration.
|
•
|
Inspect the tire pressure.
|
|
•
|
Check the wheel alignment.
|
|
•
|
Check the suspension for damage.
|
|
•
|
Check the rear bumper is deformed and damaged.
|
|
|
Refer to the KDS screen for operating conditions and details.
|
|
BCW & RCCW indicator
| 1.
|
Install in the reverse order of removal.
|