Contents:
Description and Operation
Electronic Stability Control (ESC) recognizes critical driving conditions, such as panic reactions in dangerous
situations, and stabilizes the vehicle by individual wheel braking and engine control input.
ESC adds an additional function known as Active Yaw Control (AYC) to the ABS, TCS, EBD and ESC functions. On
contrary, the ABS/TCS function controls wheel slip during braking and accelerating, and thus, mainly intervenes
in
the longitudinal dynamics of the vehicle, and the active yaw control stabilizes the vehicle on the vertical
axis.
This is achieved by individual wheel brake intervention and adaptation of momentary engine torque with no need
for any action to be taken by the driver.
ESC essentially consists of three assemblies : the sensors, the electronic control unit and the actuators.
The stability control feature works under all driving and operating conditions. Under certain driving
conditions,
the ABS/TCS function can be activated simultaneously with the ESC function in response to a command by the
driver.
In the event of a failure of the stability control function, the basic safety function, ABS, is still
maintained.
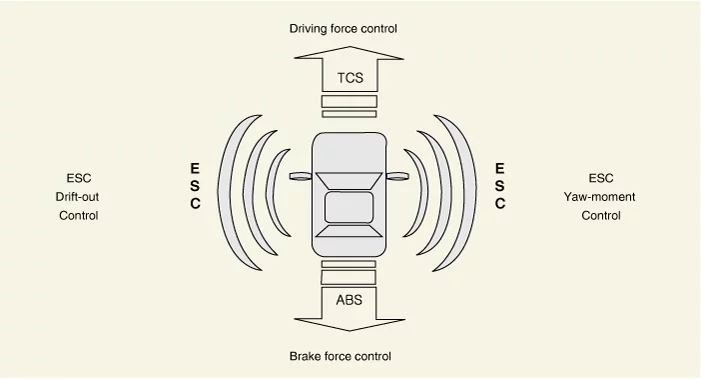
Description of ESC Control
ESC system consists of ABS/EBD, TCS and AYC functions.
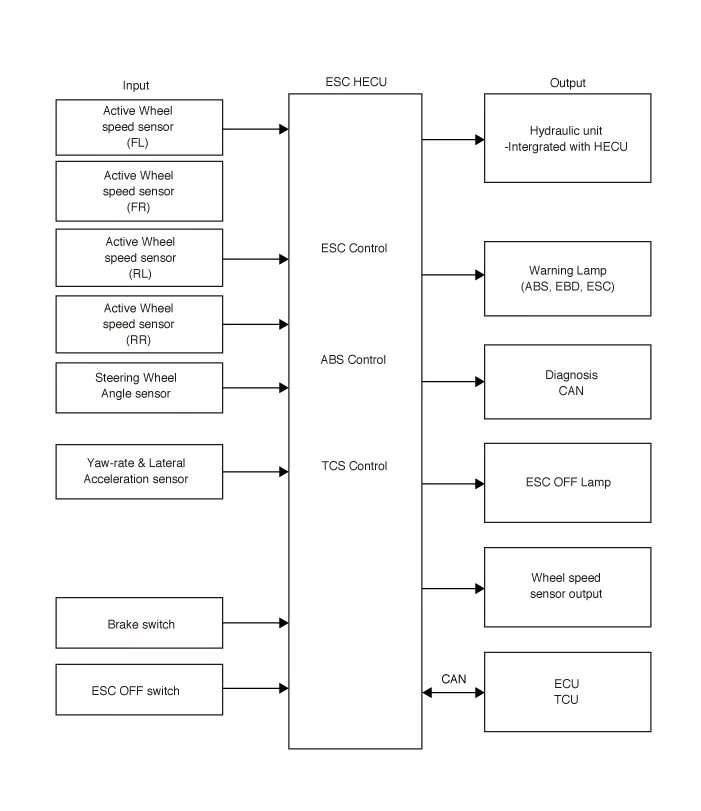
ABS/EBD function : The ECU changes the active sensor signal (current shift) coming from the four wheel sensors
into square waves. By using the input of above signals, the ECU calculates the vehicle speed and the
acceleration
& deceleration of the four wheels. And, the ECU determines whether the ABS/EBD should be actuated or not.
TCS function prevents the wheel slip of drive direction by adding the brake pressure and engine torque
reduction
via CAN communication. TCS function uses the wheel speed sensor signal to determine the wheel slip as far as ABS
function.
AYC function prevents unstable maneuver of the vehicle. To determine the vehicle maneuver, AYC function uses
the
maneuver sensor signals (Yaw Rate Sensor, Lateral Acceleration Sensor, and Steering Wheel Angle Sensor).
If vehicle maneuver is unstable (Over Steer or Under Steer), AYC function applies the brake pressure on certain
wheel, and sends engine torque reduction signal by CAN.
After the ignition on, the ECU continuously diagnoses the system for failures (self-diagnosis). If a system
failure is detected, the ECU informs driver of the system failure through the BRAKE/ABS/ESC warning lamp
(fail-safe
warning).
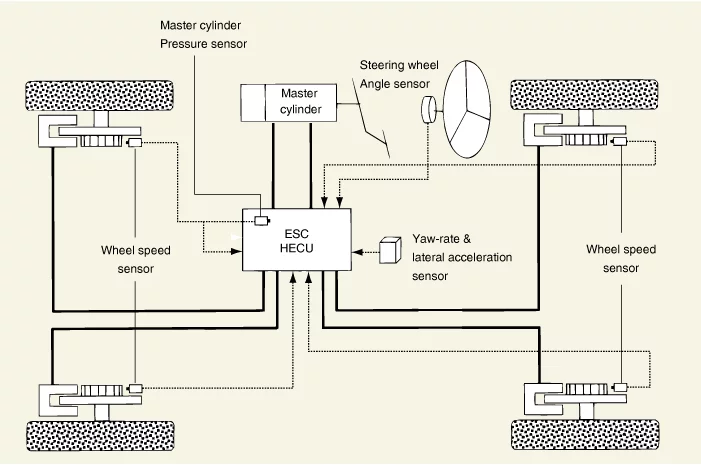
Input and Output Diagram
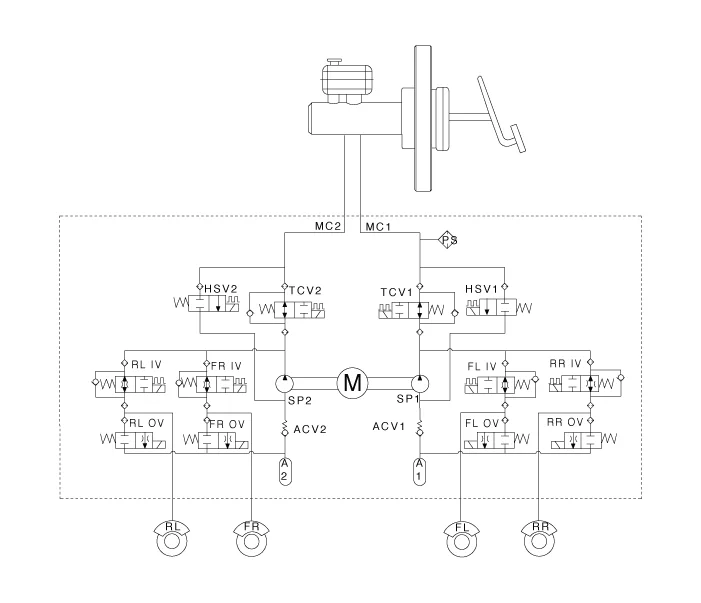
| 1.
|
ESC Non-operation : Normal braking.
Solenoid Valve
|
Continuity
|
Valve
|
Motor Pump
|
TC Valve
|
IN (NO)
|
OFF
|
OPEN
|
OFF
|
OFF
|
OUT (NC)
|
OFF
|
CLOSE
|
|
| 2.
|
ESC operation
Solenoid Valve
|
Continuity
|
Valve
|
Motor Pump
|
TC Valve
|
Understeering
(Only inside of rear wheel)
|
IN (NO)
|
OFF
|
OPEN
|
ON
|
ON
|
OUT (NC)
|
OFF
|
CLOSE
|
Oversteering
(Only outside of front wheel)
|
IN (NO)
|
OFF
|
OPEN
|
OUT (NC)
|
OFF
|
CLOSE
|
|
Warning Lamps
Lamp
|
Name
|
|

|
ABS Warning Lamp
|
|
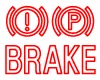
|
EBD / Parking Brake Warning Lamp
|
|
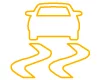
|
ESC Operating / Warning Lamp
|
|
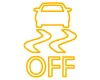
|
ESC OFF Lamp
|
ABS Warning Lamp Module
The active ABS warning lamp module indicates the self-test and failure status of the ABS. The ABS warning lamp
is
turned on under the following conditions:
|
–
|
During the initialization phase after IGN ON. (continuously for 3 seconds).
|
|
–
|
In the event of ABS function failure.
|
|
–
|
During diagnostic mode.
|
|
–
|
When the communication between HECU and PCM has failed.
|
|
–
|
Cluster lamp is ON when communication is impossible with CAN module.
|
EBD / Parking Brake Warning Lamp Module
The active EBD warning lamp module indicates the self-test and failure status of the EBD. However, in case the
Parking Brake Switch is turned on, the EBD warning lamp is always turned on regardless of EBD functions. The EBD
warning lamp is turned on under the following conditions:
|
–
|
During the initialization phase after IGN ON. (continuously for 3 seconds).
|
|
–
|
When the Parking Brake Switch is ON or brake fluid level is low.
|
|
–
|
When the EBD function has a failure.
|
|
–
|
During diagnostic mode.
|
|
–
|
When the communication between HECU and PCM has failed.
|
|
–
|
Cluster lamp is ON when communication is impossible with CAN module.
|
ESC Function / Warning Lamp
The ESC function/warning lamp indicates the self-test and failure status of the ESC.
The ESC function/warning lamp is turned on under the following conditions:
|
–
|
During the initialization phase after IGN ON. (continuously for 3 seconds).
|
|
–
|
When the ESC function is inhibited by system failure.
|
|
–
|
When the ESC control is operating. (Blinking - 2Hz)
|
|
–
|
During diagnostic mode (except standard mode).
|
|
–
|
Cluster lamp is ON when communication is impossible with CAN module.
|
ESC Off Lamp
The ESC Off lamp indicates the self-test and operating status of the ESC.
The ESC Off lamp operates under the following conditions :
|
–
|
During the initialization mode after IGN ON. (continuously for 3 seconds).
|
|
–
|
ESC Off lamp is ON when driver turns OFF ESC switch.
|
ESC On / Off Switch
The ESC On/Off Switch is used to toggle the ESC function between On/Off states based upon driver input.
The On/Off switch is a normally open, is a momentary contact switch.
Initial status of the ESC function is ON.
Troubleshooting
Failure Diagnosis
| 1.
|
In principle, ESC and TCS controls are prohibited in case of ABS failure.
|
| 2.
|
When ESC or TCS fails, only the failed system control is prohibited.
|
| 3.
|
The solenoid valve relay should be turned off in case of ESC failure, refer to the ABS
fail-safe.
|
| 4.
|
Information on ABS fail-safe is identical to the fail-safe in systems where ESC is not
installed.
|
Failure Code Memory
| 1.
|
It keeps the code as far as the backup lamp power is connected.
|
| 2.
|
It stores the code as long as HECU is powered ON.
|
Failure Test
| 1.
|
Initial test is performed immediately after the HECU is powered on.
|
| 2.
|
Valve relay test is performed immediately after switching "ON" the IG2.
|
| 3.
|
Test are performed at all times the ignition (IG2) is ON.
|
| 4.
|
Initial test is performed in the following cases.
| (1)
|
When the failure is not detected momentarily
|
| (2)
|
When ABS and ESC are not in control.
|
| (3)
|
If initial test is not made after supplying power to ECU.
|
| (4)
|
If the vehicle speed is over 5 mph (8 km/h) with the brake lamp switched off.
|
| (5)
|
When the vehicle speed is over 24.8 mph (40 km/h).
|
|
| 5.
|
Test continues even if the brake lamp is switched on.
|
| 6.
|
When performing ABS or ESC control before the initial test, stop the initial test and wait for
the HECU
power input again.
|
| 7.
|
Determining failure in the following cases.
| (1)
|
When the power is normal.
|
| (2)
|
From the point in which the vehicle speed reaches 4.9 mph(8 km/h) after HECU
power on.
|
|
Failure Corrections
| 1.
|
Turn the system down and perform the following actions and wait for HECU to power OFF.
|
| 2.
|
Turn the valve relay off.
|
| 3.
|
Stop the control during the operation and do not execute anything until it recovers to normal
condition.
|
Warning Lamp ON
| 1.
|
ESC warning lamps turns on for 3 seconds after IGN ON.
|
| 2.
|
ESC function lamp blinks when ESC activated.
|
| 3.
|
In case of ESC failure, ESC warning lamp turns ON.
|
| 4.
|
ESC OFF lamp turns on:
– When ESC is switched OFF
–3 seconds after IGN ON
|
Standard Flow of Diagnostic Troubleshooting
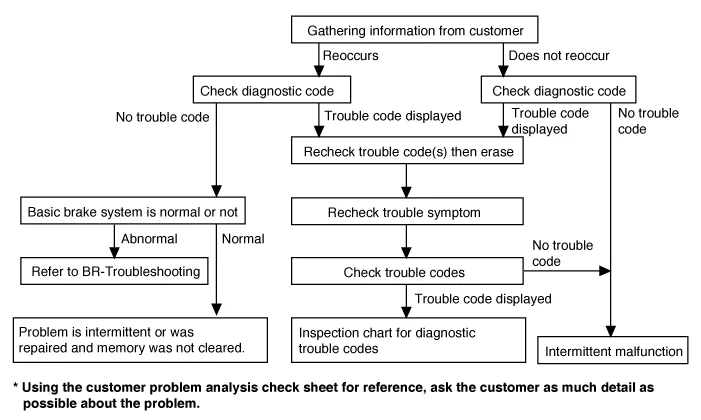
Notes With Regard To Diagnosis
The conditions listed in the following table are not abnormal.
Condition
|
Explanation
|
System check sound
|
When starting the engine, a thudding sound can sometimes be heard coming
from inside the engine
compartment. This is because the system operation
check is being performed.
|
ESC operation sound
|
| 1) |
Sound of the motor inside the ESC hydraulic unit operation (whine).
|
| 2) |
Sound is generated along with vibration of the brake pedal (scraping).
|
| 3) |
When ESC operates, sound is generated from the vehicle chassis due to
repeated brake application and release
(Thump : suspension; squeak: tires)
|
|
ESC operation
(Long braking distance)
|
On snow-covered or gravel roads, the braking distance for vehicles with ABS can sometime be longer
than that
of vehicles without ESC. Accordingly, advise customers to drive safely on such roads by reducing the
vehicle
speed.
|
Diagnostic detection conditions can vary depending on the diagnostic code.
When
checking the
trouble symptom after the diagnostic code has been erased, ensure that the requirements listed in
"Comment"
are met.
|
Checklist for diagnosis of ESC system
Before and after the ESC system test, Do these steps to check the integrity of the warning lamp and ESC system.
| 1.
|
Inspection method
Turn on the IGN and check ABS system: If ABS/BRAKE warning lamp illuminate for 3 seconds,
warning lamp
and ABS system are in normal condition.
| (1)
|
When the warning lamp does not illuminate when the IGN is turned on.
| 1) |
Remove the ABS ECU connector in the engine room.
|
| 3) |
When the ABS / BRAKE warning light does not light up:
This is a warning light related problem, so check the
instrument panel and wiring.
|
| 4) |
When the ABS / BRAKE warning light remains on :
The warning light is normal and determines to be an ESC system
error. Check the ESC
system using KDS.
|
|
| (2)
|
If the warning lamp illuminates and does not turn off.
| 1) |
Do the self test using KDS.
|
| 2) |
Record the fault code after self test.
|
| 3) |
Work with the recorded fault code and self test using KDS.
|
| 4) |
If there are no faults after self test: test the IGN to verify
normal condition.
|
| 5) |
If there are faults after self test: do the inspection using
the fault code check list.
|
|
|
| 2.
|
If there are faults after self-test using KDS even if ESC system and warning lamp are in normal
condition, record the fault code and diagnose it.
| 1) |
Make sure the IGN is switched off when removing or installing
connectors.
|
| 2) |
If a warning lamp illuminates or any abnormalities occurs
during a driving test, perform
and document vehicle inspection.
|
|
|
ESC Check Sheet
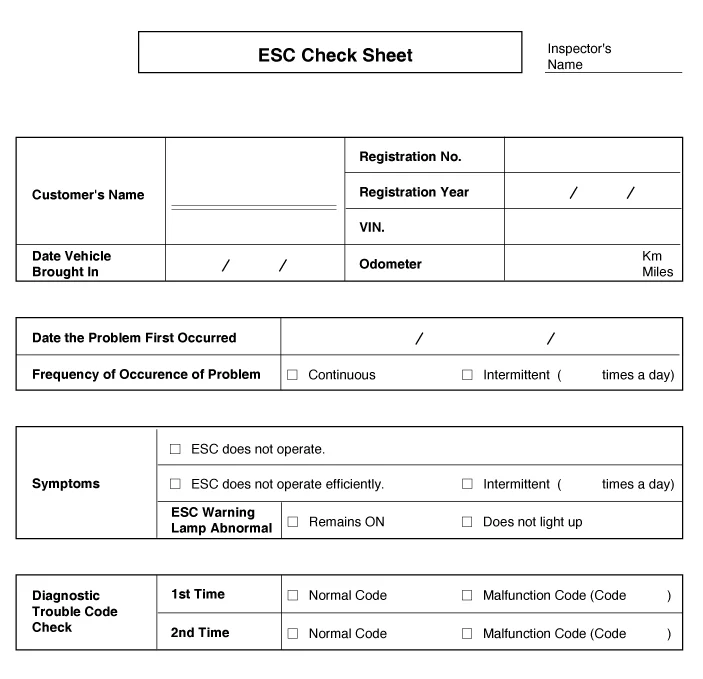
Problem Symptoms Table
Symptom
|
Suspect Area
|
ESC does not operate.
|
Only when 1 - 4 are all normal and the problem is still occurring, replace the HECU.
| 1) |
Check the DTC reconfirming that the normal code is output.
|
| 4) |
Check the hydraulic circuit for leakage.
|
|
ESC does not operate intermittently.
|
Only when 1 - 4 are all normal and the problem is still occurring, replace the ESC actuator
assembly.
| 1) |
Check the DTC reconfirming that the normal code is output.
|
| 2) |
Wheel speed sensor circuit.
|
| 3) |
Stop lamp switch circuit.
|
| 4) |
Check the hydraulic circuit for leakage.
|
|
Communication with KDS
is not possible.
(Communication with any system is
not
possible)
|
|
Communication with KDS
is not possible.
(Communication with ESC only is
not possible)
|
|
When ignition is turned ON
(engine OFF),
the ESC warning lamp does not light up.
|
| 1) |
ESC warning lamp circuit
|
|
Even after the engine is started, the ESC
warning lamp remains ON.
|
| 1) |
ESC warning lamp circuit
|
|
|
During ESC operation, the brake pedal may vibrate or may not be able to be depressed. Such
conditions are
due to intermittent changes in hydraulic pressure inside the brake line to prevent the wheels
from locking
and is not an abnormality.
|
ESC Control Unit Components and Components Location
| Components and Components Location |
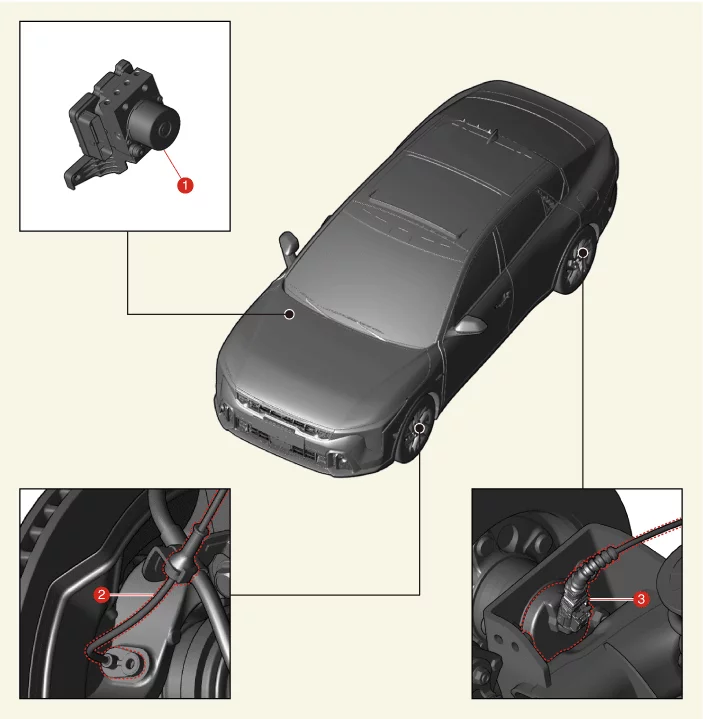
1. ESC Control Unit
2. Front Wheel Speed
Sensor
|
3. Rear Wheel Speed Sensor
|
ESC Control Unit Removal and Installation
When replacing the ESC Control Unit (HECU), extract the variant code from the existing module
and input
it to the new HECU using KDS. (Use one of the following lists.)
|
•
|
Connect the KDS and select the menu "Variant coding (Backup & Input)" and
follow the
on-screen instructions.
|
|
•
|
Connect the KDS and select the menu "System Identification" and note the
existing variant code
and input it to the new HECU using the menu "ESC Variant Coding".
|
|
G 1.6 T-GDI GAMMA II
| 1.
|
Disconnect the battery negative ( - ) terminal.
|
| 2.
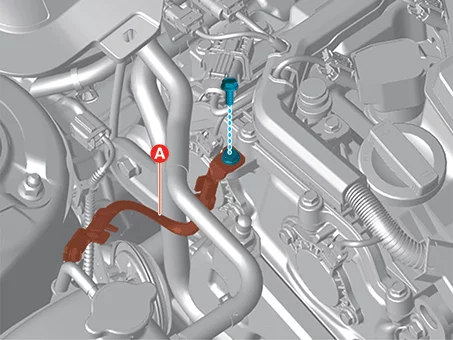
|
Disconnect the engine ground cable (A) after removing the bolt.
|
Tightening torque :
10.8 - 13.7 N·m (1.1 - 1.4 kgf·m, 8.0 - 10.1 lb·ft)
|
|
| 3.
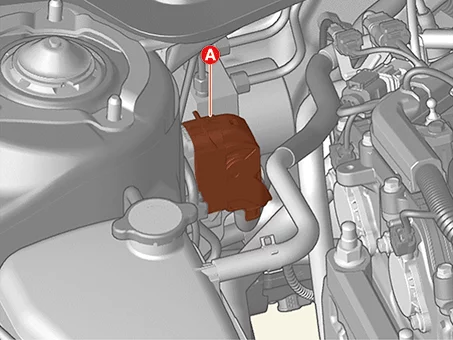
|
Disconnect the ESC control unit connector (A).
|
| 4.
|
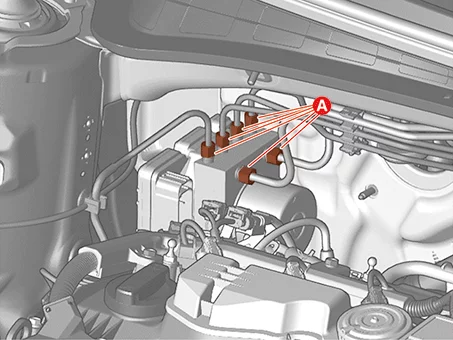
Disconnect the brake tube after removing the flare nuts (A).
|
Tightening torque :
To each calipers : 12.7 - 16.7 N·m (1.3
- 1.7 kgf·m, 9.4 -
12.3 lb·ft)
To master cylinders : 18.6 - 22.6 N·m
(1.9 - 2.3 kgf·m,
13.7 - 16.6 lb·ft)
|
|
| 5.
|
Remove the engine room under cover.
(Refer to Engine and Transaxle Assembly - "Engine Room Under
Cover")
|
| 6.
|
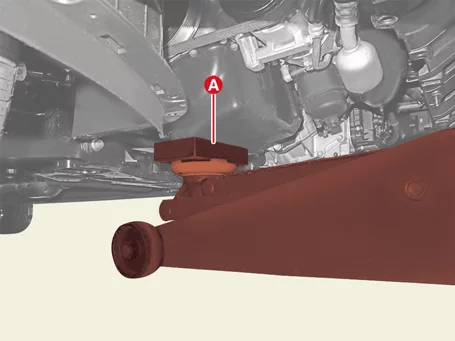
Install the jack (A) to the edge of oil pan to support the engine.
|
Put a rubber pad between the lower oil pan and the jack to prevent damage to
the oil pan.
|
|
| 7.
|
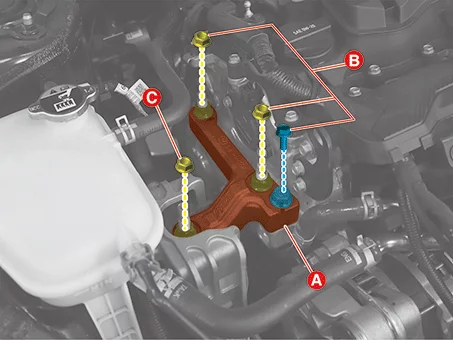
Remove the engine mounting support bracket (A) after removing the bolt and nuts (B, C).
|
Tightening torque :
B : 58.8 - 73.5 N·m (6.0 - 7.5 kgf·m, 43.4 - 54.2 lb·ft)
C : 88.3 - 107.9 N·m (9.0 - 11.0 kgf·m, 65.1 - 79.6 lb·ft)
|
|
| 8.
|
Lower the support jack to create space for ESC unit removal.
|
| 9.
|
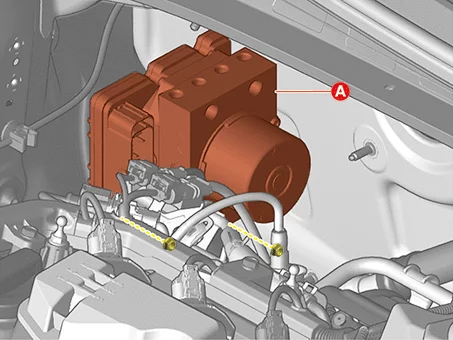
Remove the ESC control unit (A) after removing the nuts.
|
Tightening torque :
16.7 - 25.5 N·m (1.7 - 2.6 kgf·m, 12.3 - 18.8 lb·ft)
|
|
G 2.0 MPI NU(ATKINSON)
| 1.
|
Disconnect the battery negative ( - ) terminal.
|
| 2.
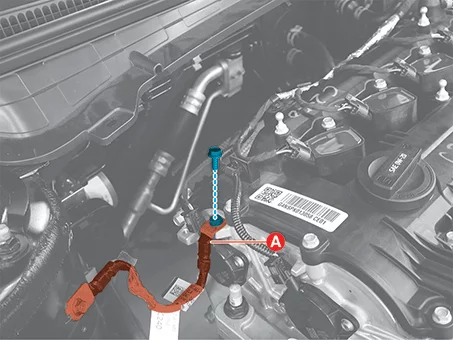
|
Disconnect the engine ground cable (A) after removing the bolt.
|
Tightening torque :
7.8 - 9.8 N·m (0.8 - 1.0 kgf·m, 5.8 - 7.2 lb·ft)
|
|
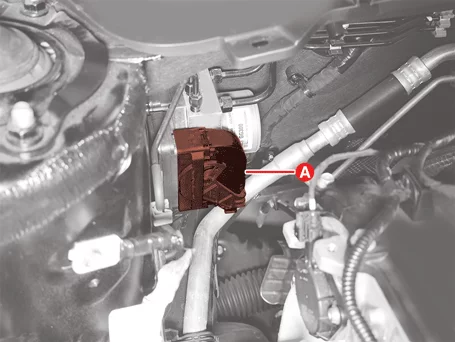
| 3.
|
Disconnect the ESC control unit connector (A).
|
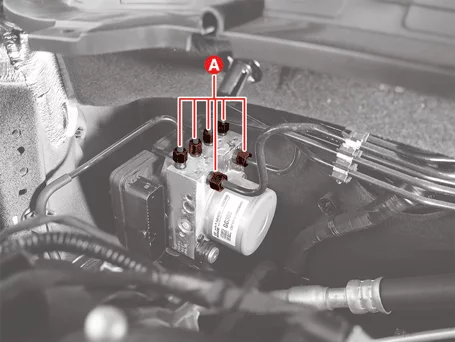
| 4.
|
Disconnect the brake tube after removing the flare nuts (A).
|
Tightening torque :
To each calipers : 12.7 - 16.7 N·m (1.3
- 1.7 kgf·m, 9.4 -
12.3 lb·ft)
To master cylinders : 18.6 - 22.6 N·m
(1.9 - 2.3 kgf·m,
13.7 - 16.6 lb·ft)
|
|
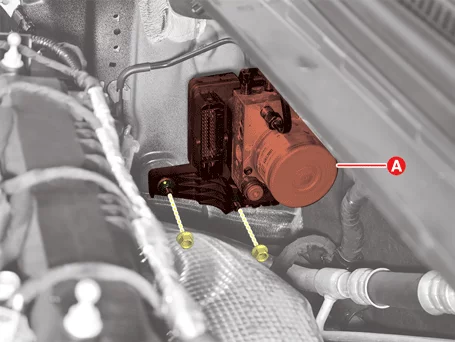
| 5.
|
Remove the ESC control unit (A) after removing the nuts.
|
Tightening torque :
16.7 - 25.5 N·m (1.7 - 2.6 kgf·m, 12.3 - 18.8 lb·ft)
|
|
|
Do not disassemble the ESC Control Unit (HECU). If the HECU is defective, replace it with a new
one.
|
| 1.
|
Install in reverse order of removal.
|
| 2.
|
Perform the brake air bleeding.
(Refer to Brake System - "Brake Bleeding")
|
| 3.
|
Perform in the below procedure with KDS.
(S/W Management → ABS/ESC → Auto Detected Configuration Reset)
(S/W Management → ABS/ESC → Variant Coding)
(S/W Management → ABS/ESC → Longitudinal G Sensor Calibration)
(S/W Management → ABS/ESC → Assembly Check (ECU replacement)) [If
ESC
control unit replaced with a new one]
|
Refer to the KDS screen for operating conditions and details
|
|
ESC OFF Switch Description and Operation
The ESC OFF switch is operated when the driver arbitrarily prohibits ESC control.
Pressing the ESC OFF switch will illuminate the ESC OFF lamp.
ESC OFF Switch Replacement
| 1.
|
If the ESC OFF switch needs to be replaced, replace the crash pad side switch.
(Refer to Body - "Crash Pad Switch")
|
Front Wheel Speed Sensor Removal and Installation
| 1.
|
Disconnect the battery negative ( - ) terminal.
|
| 2.
|
Remove the front wheel and tires.
(Refer to Suspension System - "Wheel")
|
| 3.
|
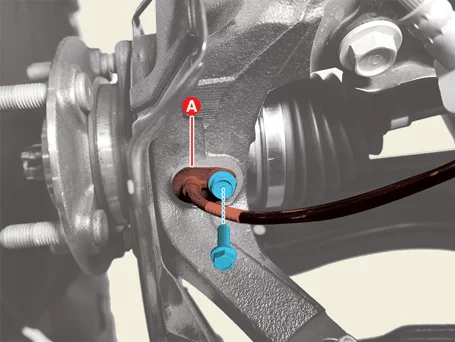
Remove the front wheel speed sensor (A) after removing the bolt.
|
Tightening torque :
8.8 - 13.7 N·m (0.9 - 1.4 kgf·m, 6.5 - 10.1 lb·ft)
|
|
| 4.
|
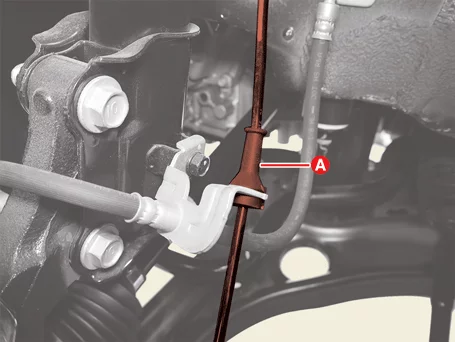
Separate the front wheel speed sensor wiring (A) from the front brake hose bracket.
|
| 5.
|
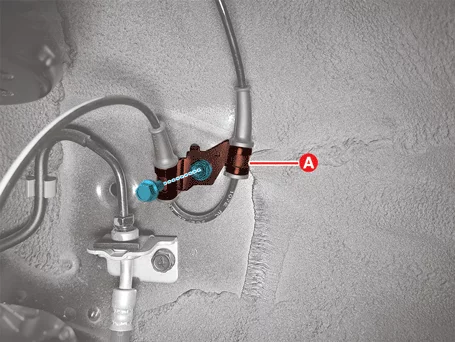
Remove the front wheel speed sensor bracket (A) after removing the bolt.
|
Tightening torque :
8.8 - 13.7 N·m (0.9 - 1.4 kgf·m, 6.5 - 10.1 lb·ft)
|
|
| 6.
|
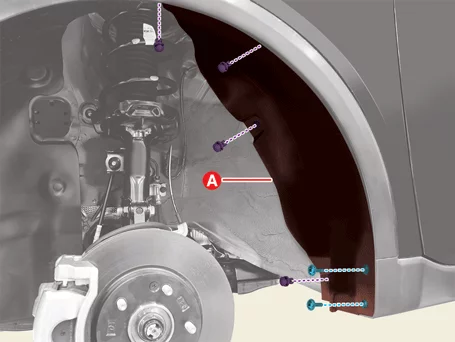
Separate the front wheel dust cover (A) after removing the clip and screws.
|
| 7.
|
Separate the harness clips (A) from the body.
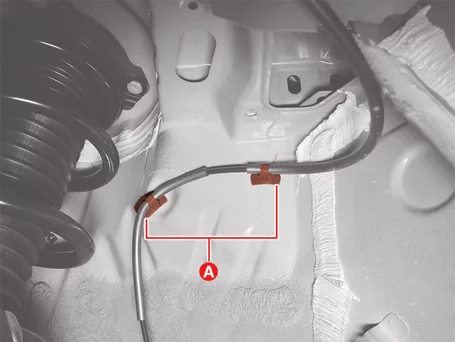
|
| 8.
|
Remove the front wheel speed sensor (A) after disconnecting the connector.
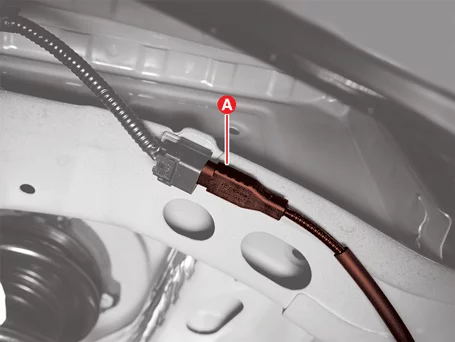
|
| 1.
|
Install in the reverse order of removal.
|
Install to the specified torque.
|
|
Front Wheel Speed Sensor Inspection
| 1.
|
The brake system can quickly diagnosed for problems by using the KDS (Refer to "DTC guide").
| (1)
|
Trouble code diagnosis : Inspection and display trouble code (DTC)
(Refer to DTC guide when fault code is found.)
|
| (2)
|
S/W Management : Controlling other features including system option setting and
zero point
adjustment.
|
Refer to the KDS screen for operating conditions and details
|
|
|
Rear Wheel Speed Sensor Removal and Installation
[Torsion Beam Axle Type]
| 1.
|
Disconnect the battery negative ( - ) terminal.
|
| 2.
|
Remove the rear wheel and tires.
(Refer to Suspension System - "Wheel")
|
| 3.
|
Disconnect the EPB actuator connector (A).
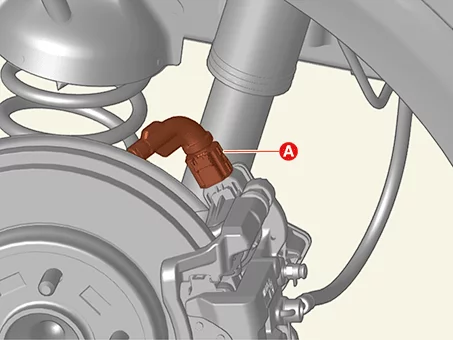
|
| 4.
|
Disconnect the rear wheel speed sensor connector (A).
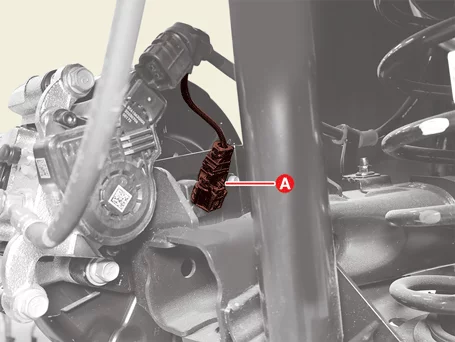
|
| 5.
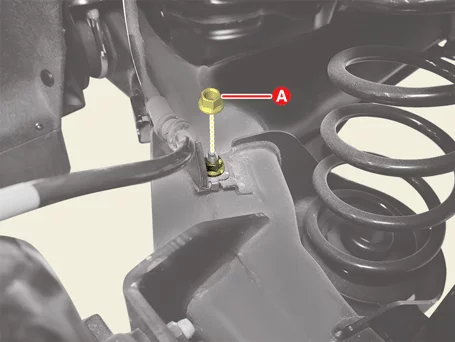
|
Separate the rear wheel speed sensor harness bracket after removing the nut (A).
|
Tightening torque :
8.8 - 13.7 N·m (0.9 - 1.4 kgf·m, 6.5 - 10.1 lb·ft)
|
|
| 6.
|
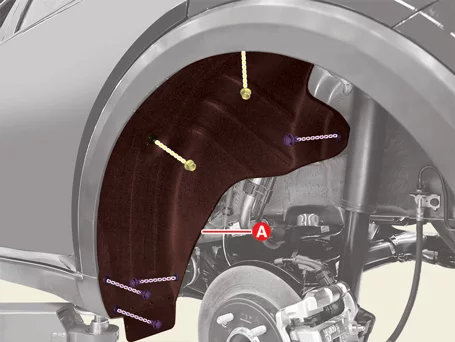
Separate the rear wheel guard (A) after removing the nut and the clips.
|
| 7.
|
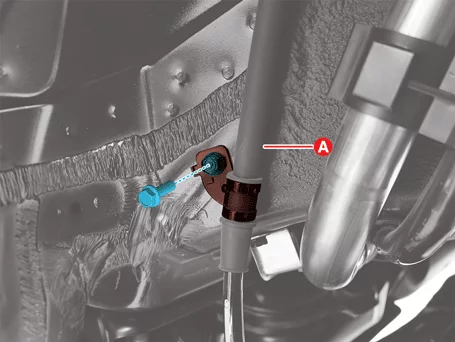
Separate the rear wheel speed sensor harness bracket (A) after removing the bolt.
|
Tightening torque :
8.8 - 13.7 N·m (0.9 - 1.4 kgf·m, 6.5 - 10.1 lb·ft)
|
|
| 8.
|
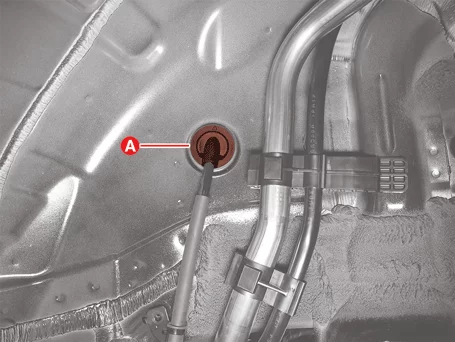
Remove the wiring rubber (A).
|
| 9.
|
Remove the luggage side trim.
(Refer to Body - "Luggage Side Trim")
|
| 10.
|
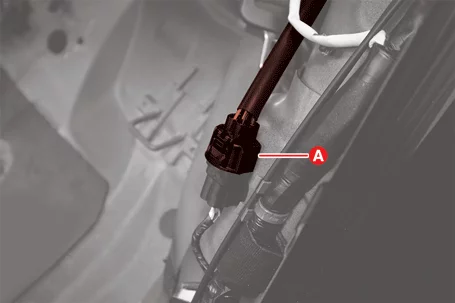
Remove the rear wheel speed sensor (A) after disconnecting the connector.
|
Multi Link Type
| 1.
|
Disconnect the battery negative ( - ) terminal.
|
| 2.
|
Remove the rear wheel and tires.
(Refer to Suspension System - "Wheel")
|
| 3.
|
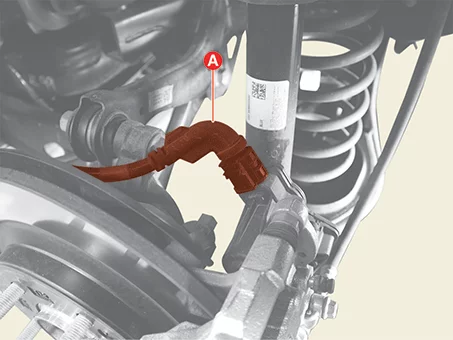
Disconnect the EPB actuator connector (A).
|
| 4.
|
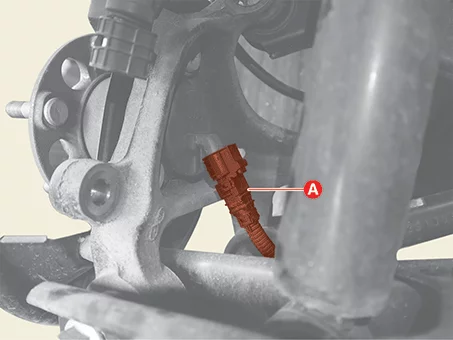
Disconnect the rear wheel speed sensor connector (A).
|
| 5.
|
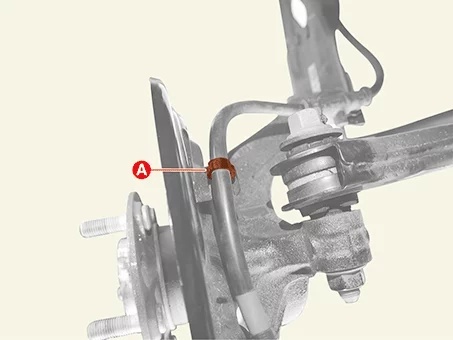
Remove the EPB extension wire clip (A) from the dust cover.
|
| 6.
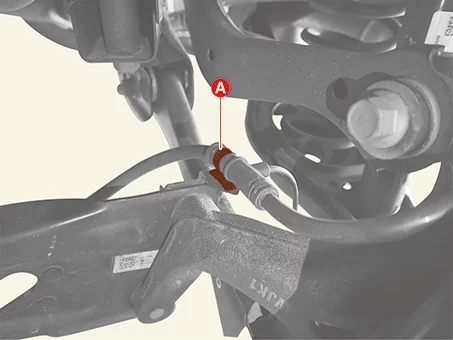
|
Remove the rear wheel speed sensor clip (A) from the trailing arm.
|
| 7.
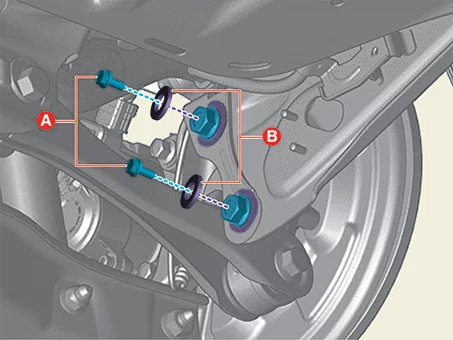
|
Remove the rear trailing arm bolts (A) and washers (B).
|
Tightening torque :
137.3 - 156.9 N·m (14.0 - 16.0 kgf·m, 101.3 - 115.7 lb·ft)
|
|
| 8.
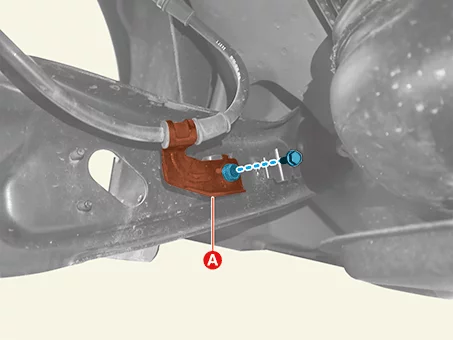
|
Separate the rear wheel speed sensor wiring bracket (A) after removing the bolt.
|
Tightening torque :
8.8 - 13.7 N·m (0.9 - 1.4 kgf·m, 6.5 - 10.1 lb·ft)
|
|
| 9.
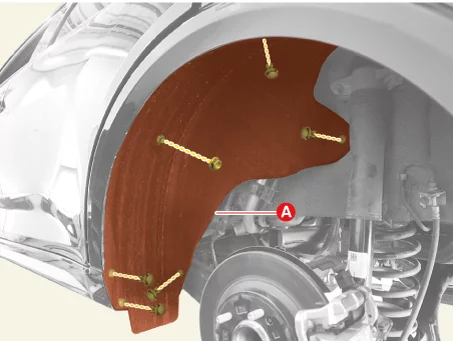
|
Separate the rear wheel guard (A) after removing the nut and the clips.
|
| 10.
|
Separate the rear wheel speed sensor harness bracket (A) after removing the bolt.
|
Tightening torque :
8.8 - 13.7 N·m (0.9 - 1.4 kgf·m, 6.5 - 10.1 lb·ft)
|
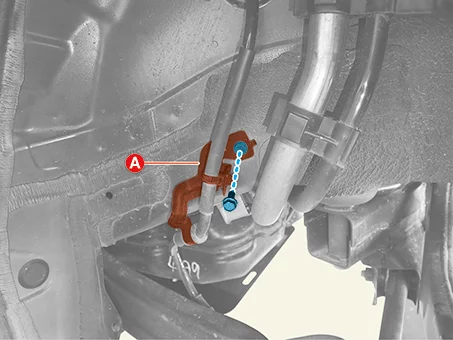
|
| 11.
|
Remove the wiring rubber (A).
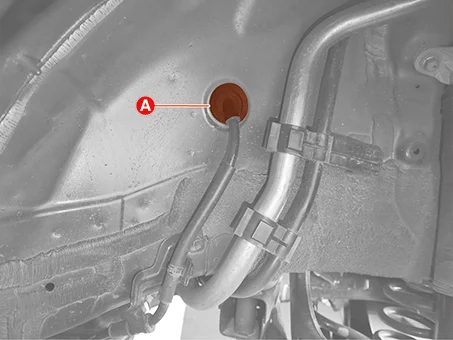
|
| 12.
|
Remove the luggage side trim.
(Refer to Body - "Luggage Side Trim")
|
| 13.
|
Remove the rear wheel speed sensor (A) after disconnecting the connector.
|
| 1.
|
Install in the reverse order of removal.
|
Install to the specified torque.
|
|
Rear Wheel Speed Sensor Replacement
Tool Name / Number
|
Illustration
|
Description
|
Sensor cap remover
0K583 - R0400
|
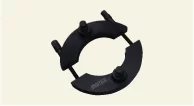
|
Used for removal of wheel sensor cap
|
Sensor cap installer
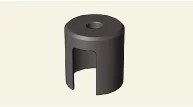
09527 - AL200
|
|
Used for installing of wheel sensor cap (O.D : Φ65.3)
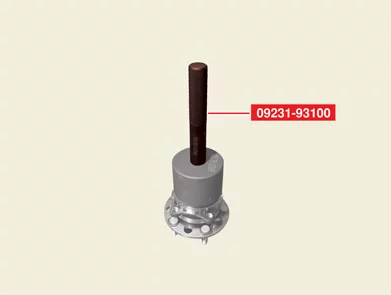
(Used with 09231 - 93100)
|
Handle
09231 - 93100
|
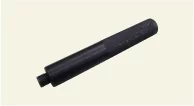
|
Handle
(Used with 09527 - AL200)
|
Rear Wheel Speed Sensor Cap - Torsion Beam Axle Type
| 1.
|
Remove the rear hub assembly.
Torsion Beam Axle Type - (Refer to Driveshaft and Axle - "Rear
Hub
Assembly")
|
| 2.
|
Check the installation direction of the sensor cap (A) connector (B).
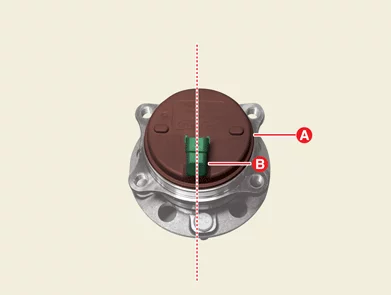
|
If the mounting direction of the sensor cap is different from the initial
installation, the
connector may not be able to be connected at the time of installation, so be
sure to record the
direction of the connection before removal.
|
|
| 3.
|
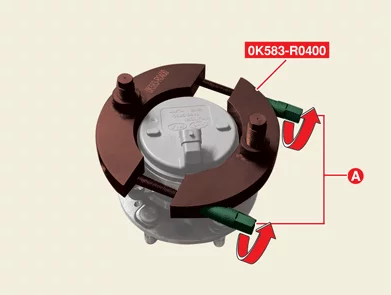
Remove the wheel sensor cap using the SST.
| (1)
|
Install the SST (0K583 - R0400) on the wheel sensor cap, and then rotate the
bolts (A) to fix.
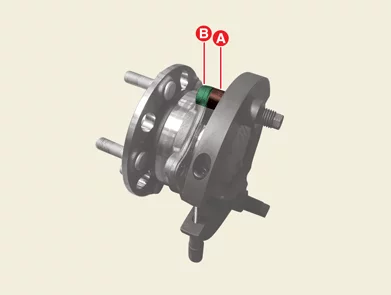
|
Ensure that the bolts (A) and hub bearing mounting surfaces (B)
are in contact when
installing the SST.
|
|
| (2)
|
Remove the wheel sensor cap (B) by rotating upper bolts (A) of the SST (0K583 -
R0400).
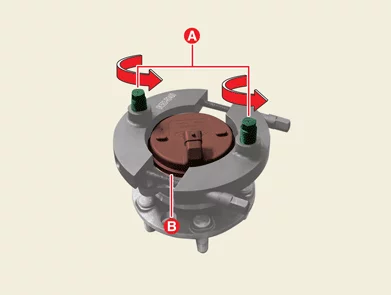
|
|
| 4.
|
Check the encoder (A) for deformation or damage.
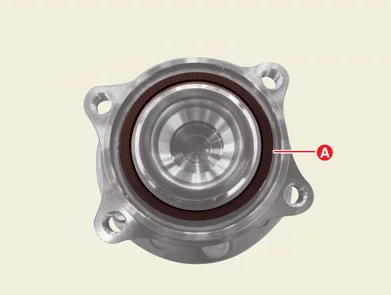
|
•
|
After removing the sensor cap, check for damage to the encoder,
and replace the hub
bearing if the deformation is confirmed.
|
|
•
|
If the encoder is deformed, the warning lamp may illuminates
due to a sensor error.
|
|
|
| 5.
|
Preinstall the sensor cap in the recorded direction when removal.
|
Wipe off foreign substances and other contaminants inside the hub assembly
before installing the
sensor cap.
|
|
| 6.
|
Install the SST (09527 - AL200) to the pre-installed wheel sensor cap.
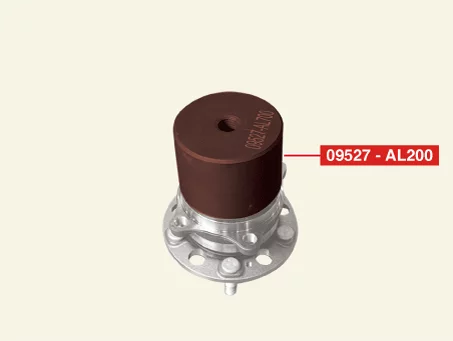
|
Be careful not to interfere with connector (A) when installing special tools.
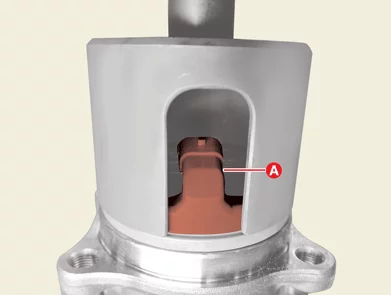
|
|
| 7.
|
Install the SST (09231 - 93100), and then hammer the top of the SST to install it.
|
•
|
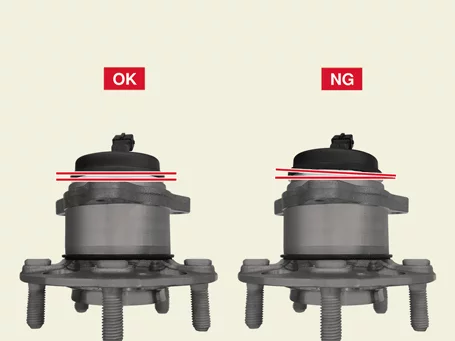
Tilting the sensor cap during installation may damage the
encoder.
|
|
•
|
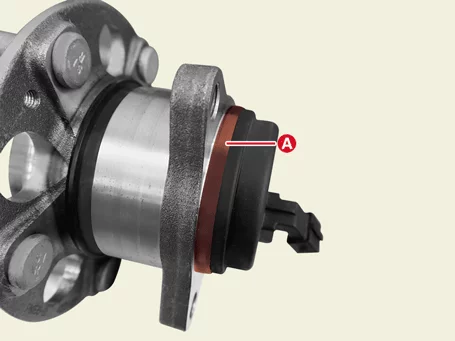
Make sure there is no gap (A) between the sensor cap and rear
hub assembly.
|
|
|
| 8.
|
Install the rear hub assembly.
Torsion Beam Axle Type - (Refer to Driveshaft and Axle - "Rear
Hub
Assembly")
|
Rear Wheel Speed Sensor Cap - Multi Link Type
| 1.
|
Remove the rear hub assembly.
Multi Link Type - (Refer to Driveshaft and alxe - "Rear Hub
Assembly")
|
| 2.
|
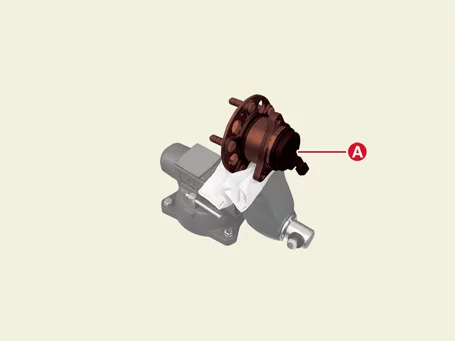
Fix the rear hub assembly (A) with a vise.
|
•
|
Cover the hub assembly using a clean cloth to prevent the
damage to the hub assembly.
|
|
•
|
Be careful not to use excessive force on the vise may damage
the hub bearing assembly.
|
|
|
| 3.
|
Check the sensor cap (A) mounting position.
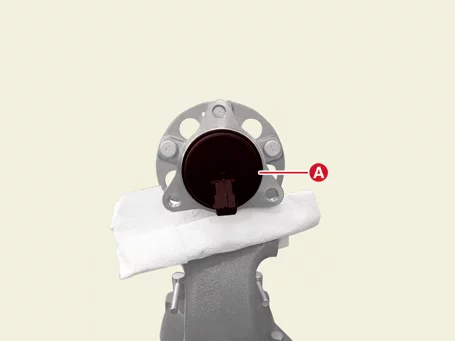
|
Note the sensor cap mounting position before removing it.
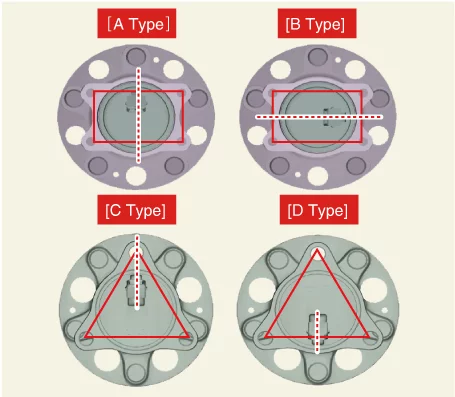
|
|
| 4.
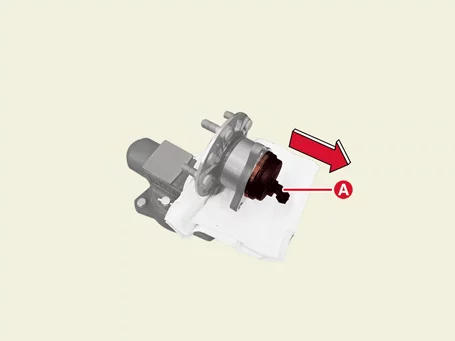
|
Widen the gap between sensor cap (B) and rear hub assembly using a scraper (A) or suitable
tool.
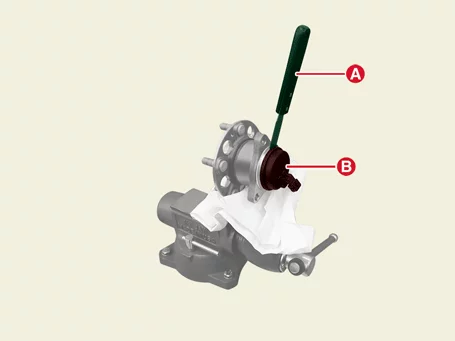
|
•
|
Widen the area around the sensor cap 10 - 20 times to remove
it.
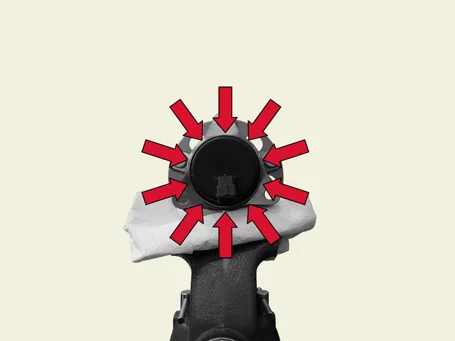
|
|
•
|
When removing the sensor cap, remove it in a straight direction
not to damage the tone
wheel or encoder.
|
|
•
|
Be careful not to damage the hub bearing assembly when using a
hammer.
|
|
|
| 5.
|
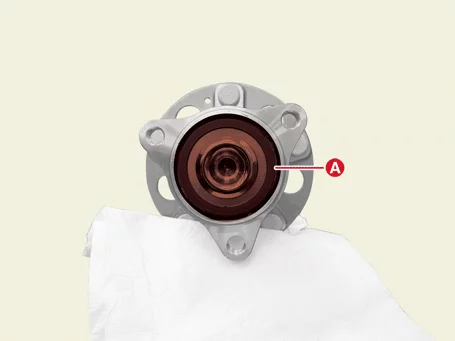
Check for distortion of damage of the tone wheel or encoder (A).
|
•
|
Check if damaged the tone wheel or encoder after removing the
sensor cap and replace the
hub bearing if it was deformed.
|
|
•
|
If the tone wheel is deformed, it may trigger the MIL ON or
other problems.
|
|
|
| 6.
|
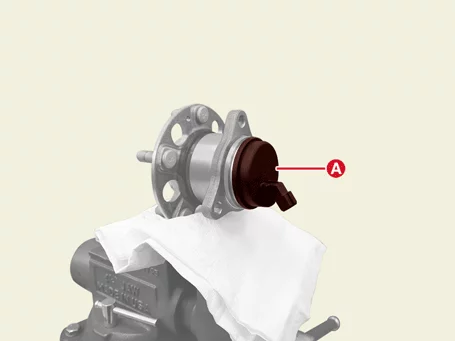
Position the sensor cap to the same direction of sensor cap connector (A) as you checked before
removing.
|
Before installing the sensor cap, do not let any foreign material and
contaminant into the hub
bearing assembly.
|
|
| 7.
|
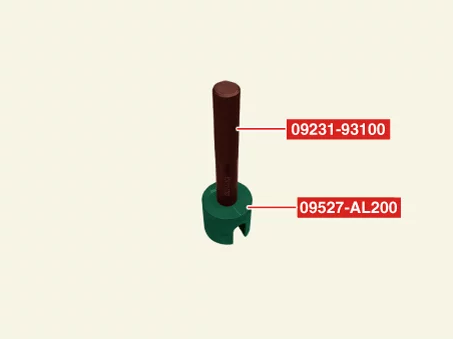
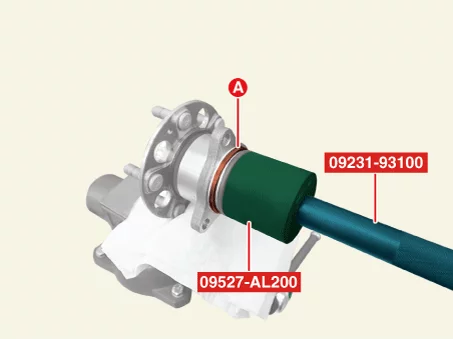
Install the handle (09231 - 93100) on the SST (09527 - AL200).
|
| 8.
|
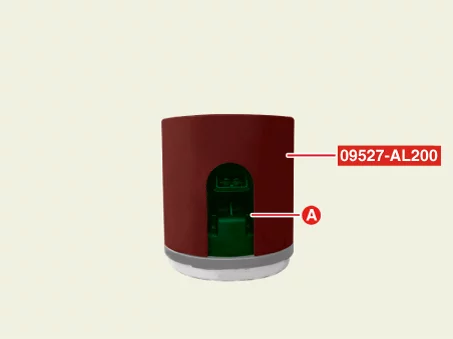
Install the sensor cap (A) using SST (09527 - AL200, 09231 - 93100).
|
•
|
When installing the SST (09527 - AL200), be careful not to
interfere with the sensor cap
connector (A).
|
|
•
|
Be careful not to tilt to one side when installing the sensor
cap as it may damage the
tone wheel or encoder.
|
|
•
|
Make sure there is no gap (A) between the sensor cap and the
rear hub assembly.
|
|
|
| 9.
|
Install the rear hub assembly.
Multi Link Type - (Refer to Driveshaft and alxe - "Rear Hub
Assembly")
|
Rear Wheel Speed Sensor Inspection
| 1.
|
The brake system can quickly diagnosed for problems by using the KDS (Refer to "DTC guide").
| (1)
|
Trouble code diagnosis : Inspection and display trouble code (DTC)
(Refer to DTC guide when fault code is found.)
|
| (2)
|
S/W Management : Controlling other features including system option setting and
zero point
adjustment.
|
Refer to the KDS screen for operating conditions and details
|
|
|
Other information:
Kia K4 (CL4) 2025-2026 Service Manual: Front seat adjustment for power seat:
The Kia K4 features intuitive power-operated driver's seat adjustments, controlled via the switches mounted on the outboard side of the seat cushion. Before operating your Kia K4, always configure your seat to a position that provides effortless access to the steering wheel, foot pedals, and all instrument panel controls to ensure safe and attentive driving.
Kia K4 (CL4) 2025-2026 Service Manual: With the mechanical key
When electronic proximity power is lost due to a dead transmitter battery or vehicle voltage depletion, the secondary backup physical security option allows full manual access. Please note that only the driver’s individual door can be locked or unlocked mechanically using the manual metal key blade assembly hidden inside your proximity transmitter.