Contents:
Description and Operation
|
•
|
This video was created using 3D graphics to help understand the vehicle
maintenance manual.
|
|
•
|
There may be some differences from actual vehicles.
|
|
•
|
The location and repair procedures of the parts may vary depending on vehicle
model, model year,
region, and specifications.
|
|
•
|
Check the KDS Guide for detailed information on how to use the KDS.
|
|
•
|
Check the manual for detailed maintenance procedures.
|
|
•
|
Unauthorized reproduction, distribution, or sharing of this video is
prohibited.
|
|
Evaporative Emission Control System Operation Flow
(Click to play)

Video: Evaporative Emission Control System
|
•
|
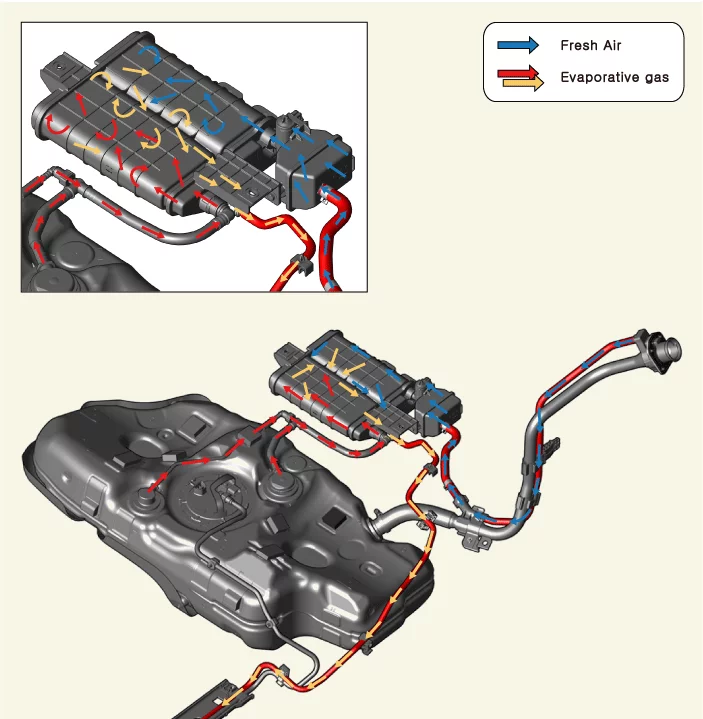
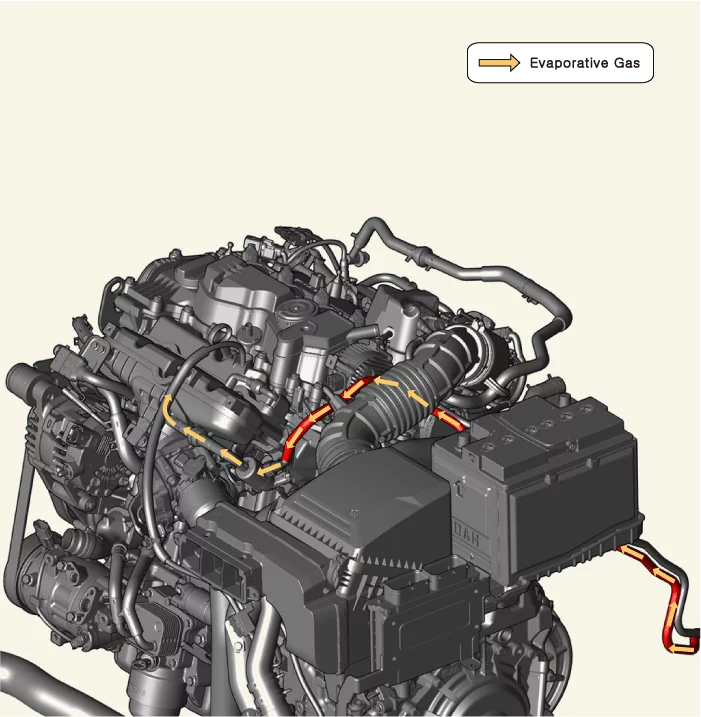
Evaporative emission control system is the system that recirculates and burns evaporative gases
in the
fuel tank to reduce hydrocarbons.
|
|
•
|
The evaporative emission control system comprises a canister to neutralize the evaporative
emissions
using activated carbon, and a purge control solenoid valve to circulate the evaporative
emissions to the
intake manifold.
|
Inspection
| 1.
|
Perform the evaporative gas leakage test with the KDS.
(S/W Management → Engine Control → Evap. Leakage Test)
| 5) |
Engine warm-up [Coolant temperature 80°C (176°F) or higher]
|
|
•
|
Refer to the KDS screen for operating conditions and details.
|
|
|
Canister Components and Components Location
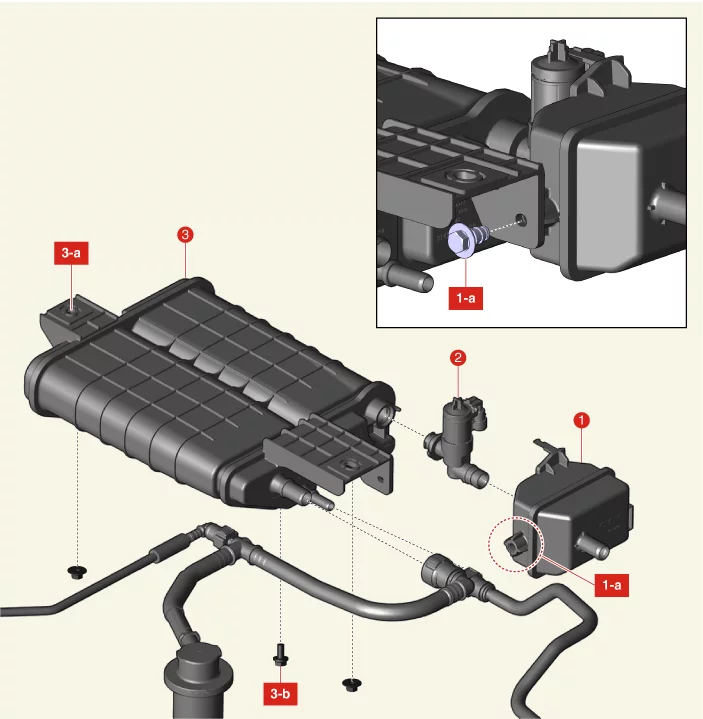
1. Fuel Tank Air Filter
1-a. 3.9 - 5.9 N·m
(0.4 -
0.6 kgf·m, 2.9 - 4.3 lb·ft, 34.7 - 52.1 lb·in)
2. Canister Close Valve (CCV)
|
3. Canister
3-a. 21.6 - 23.5 N·m (2.2 - 2.4
kgf·m,
15.9 - 17.4 lb·ft)
3-b. 19.6 - 29.4 N·m (2.0 - 3.0 kgf·m, 14.5 - 21.7 lb·ft)
|
Canister Removal and Installation
| 1.
|
Remove the Canister Close Valve (CCV) and fuel tank air filter assembly.
(Refer to Evaporative Emission Control System - "Canister Close
Valve
(CCV)")
|
| 2.
|
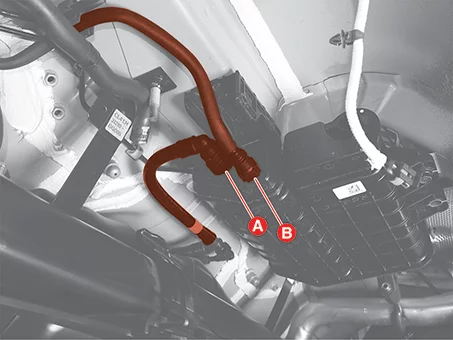
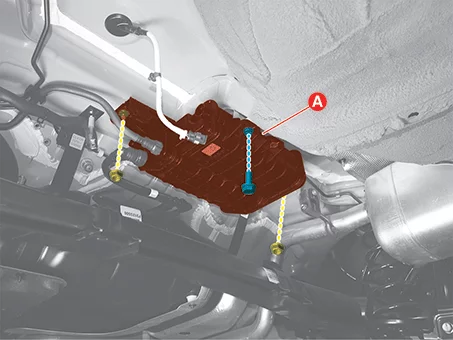
Disconnect the fuel tank vapor hose (A) and purge hose (B).
|
| 3.
|
Remove the canister (A) after removing the bolt and nuts.
|
Tightening torque
Bolt : 19.6 - 29.4 N·m (2.0 - 3.0 kgf·m,
14.5 - 21.7
lb·ft)
Nut : 21.6 - 23.5 N·m (2.2 - 2.4 kgf·m,
15.9 - 17.4 lb·ft)
|
|
| 1.
|
Install in the reverse order of removal.
|
•
|
Install the canister to the specified torque.
|
|
•
|
If the canister is dropped, it may cause internal damage. (Do
not reuse)
|
|
•
|
Be careful not to get foreign matter into the canister.
|
|
|
Canister Inspection
| 1.
|
Visually inspect the following items.
- Crack or leakage of the canister
- Loose connection, distortion, or damage of the vapor hose/tube
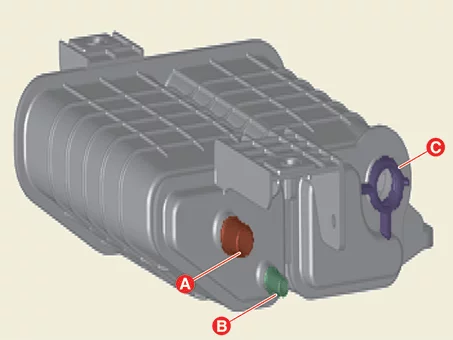
A : Canister ↔ Fuel tank
B : Canister ↔ Intake manifold
C : Canister ↔ Atmosphere
|
Canister Close Valve (CCV) Specifications
Item
|
Specification
|
Rated voltage (V)
|
12
|
Operating voltage (V)
|
9 - 16
|
Resistance (Ω)
|
19 - 22 [15 - 25°C (59 - 77°F)]
|
Canister Close Valve (CCV) Components and Components Location
1. Fuel Tank Air Filter
1-a. 3.9 - 5.9 N·m
(0.4 -
0.6 kgf·m, 2.9 - 4.3 lb·ft, 34.7 - 52.1 lb·in)
2. Canister Close Valve (CCV)
|
3. Canister
3-a. 21.6 - 23.5 N·m (2.2 - 2.4
kgf·m,
15.9 - 17.4 lb·ft)
3-b. 19.6 - 29.4 N·m (2.0 - 3.0 kgf·m, 14.5 - 21.7 lb·ft)
|
Canister Close Valve (CCV) Description and Operation
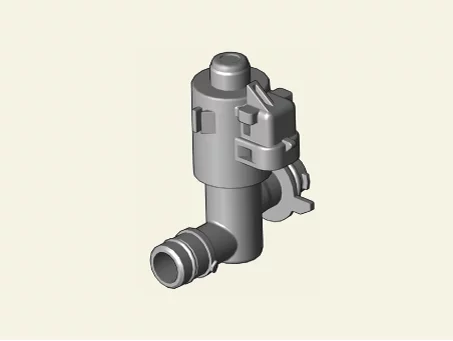
Canister Close Valve (CCV) is installed on the canister ventilation line. It seals evaporative emission control
system by shutting the canister from the atmosphere when leakage detecting system operates.
Canister Close Valve (CCV) Removal and Installation
| 1.
|
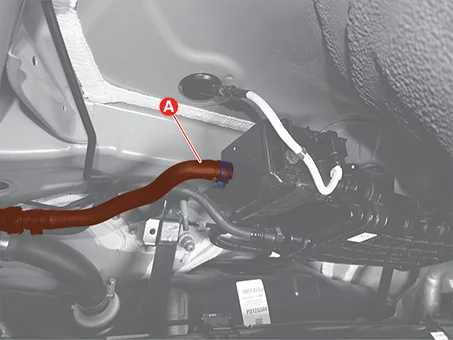
Remove the ventilation hose (A) after releasing the clamp.
|
| 2.
|
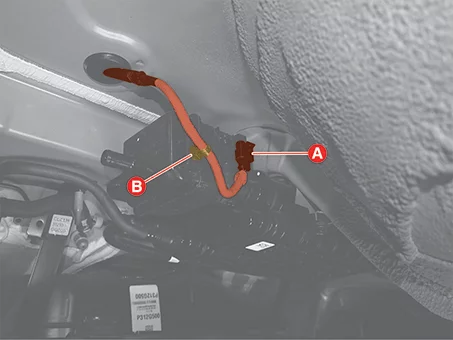
Disconnect the Canister Close Valve (CCV) connector (A) and remove the fastener (B).
|
| 3.
|
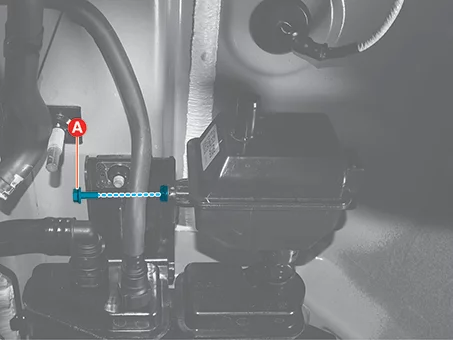
Remove the fuel tank air filter mounting bolt (A).
|
Tightening torque :
3.9 - 5.9 N·m (0.4 - 0.6 kgf·m, 2.9 - 4.3 lb·ft, 34.7 - 52.1 lb·in)
|
|
| 4.
|
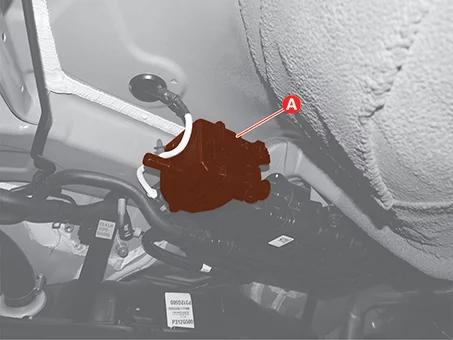
Remove the CCV and fuel tank air filter assembly (A) from the canister.
|
| 5.
|
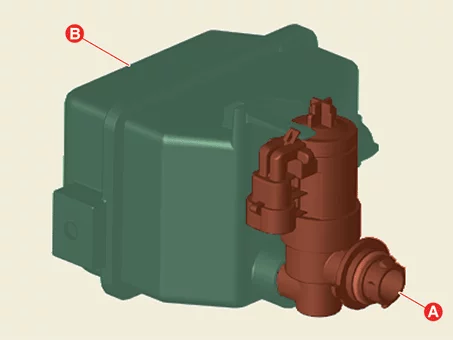
Remove the CCV (A) from the fuel tank air filter (B) after rotating it the clockwise.
|
| 1.
|
Install in the reverse order of removal.
|
•
|
If the Canister Close Valve (CCV) is dropped, it may cause
internal damage. (Do not
reuse)
|
|
•
|
Be careful not to get foreign matter into the CCV.
|
|
|
Ejector Assembly Description and Operation
|
•
|
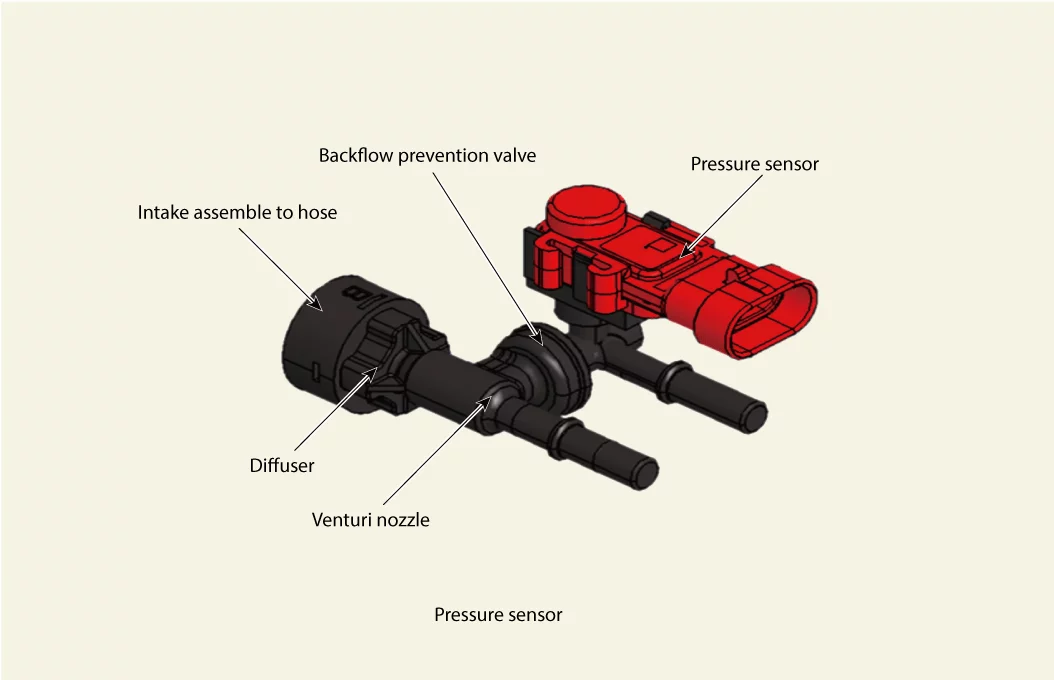
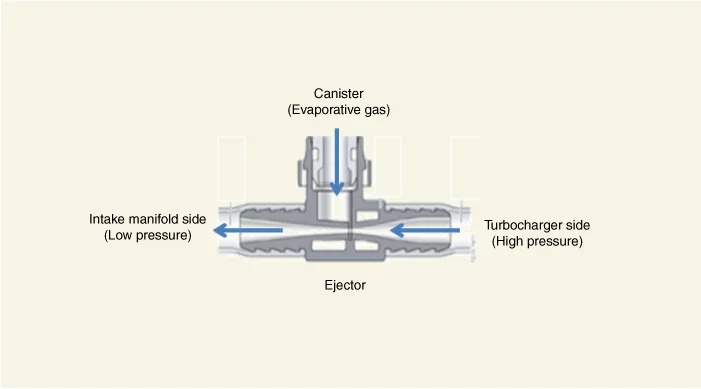
Dual purge system critical function parts.
|
Dual purge system : A system applied to smoothly purge evaporative gas of
gasoline turbo vehicle.
|
|
|
•
|
During turbo charger operation, turbo compressed air passes through the venturi nozzle inside
the ejector
to form negative pressure and purge.
|
Type
|
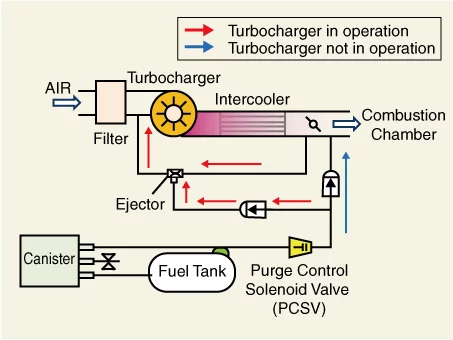
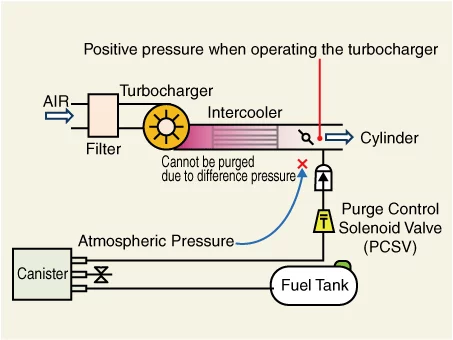
Dual purge system (Not applied)
|
Dual purge system
|
Schematic diagram
|
|
|
When not operating the turbocharger
|
Possible to purge due to negative intake pressure on the intake manifold side
|
When operating the turbocharger
|
It cannot be purged due to positive pressure on the intake manifold side
|
Turbo compressed air passes through the ejector and forms negative pressure, allowing
purging
|
Ejector Assembly Removal and Installation
| 1.
|
Disconnect the battery negative ( - ) terminal.
|
| 2.
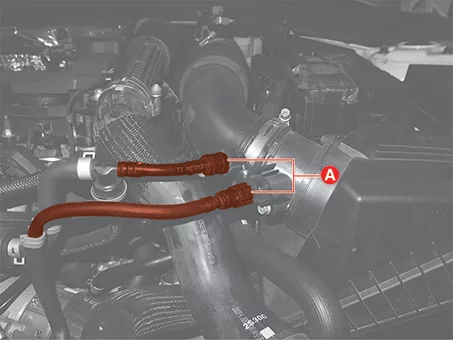
|
Disconnect the quick connectors (A).
|
| 3.
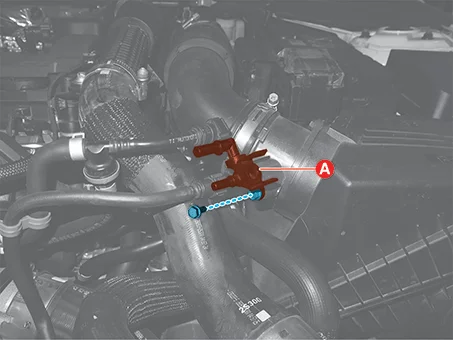
|
Remove the ejector (A) after removing the bolt.
|
Tightening torque :
9.8 - 11.8 N·m (1.0 - 1.2 kgf·m, 7.2 - 8.7 lb·ft)
|
|
| 1.
|
Install in the reverse order of removal.
|
•
|
Install the ejector assembly to the specified torque.
|
|
•
|
If the ejector is dropped, it may cause internal damage. (Do
not reuse)
|
|
•
|
When applying oil to O-ring, Apply only to KF96 or its
equivalent oil.
|
|
|
Fuel Filler Cap Description and Operation
|
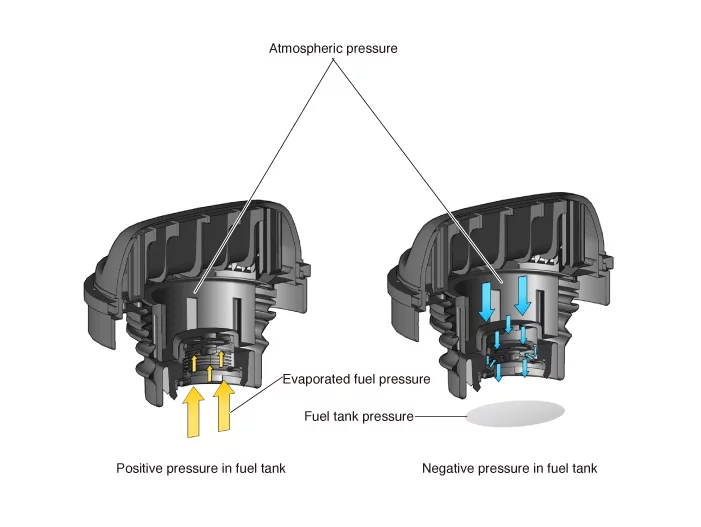
•
|
The fuel filler cap works as a check valve, allowing fluid to flow in only one direction.
|
|
•
|
When the inside of the fuel tank reaches a vacuum state outside air enters to release the
vacuum, and the
evaporative fuel gas inside the fuel tank is prevented from escaping into the atmosphere.
|
Fuel Tank Air Filter Components and Components Location
1. Fuel Tank Air Filter
1-a. 3.9 - 5.9 N·m
(0.4 -
0.6 kgf·m, 2.9 - 4.3 lb·ft, 34.7 - 52.1 lb·in)
2. Canister Close Valve (CCV)
|
3. Canister
3-a. 21.6 - 23.5 N·m (2.2 - 2.4
kgf·m,
15.9 - 17.4 lb·ft)
3-b. 19.6 - 29.4 N·m (2.0 - 3.0 kgf·m, 14.5 - 21.7 lb·ft)
|
Fuel Tank Air Filter Removal and Installation
| 1.
|
Remove the ventilation hose (A) after releasing the clamp.
|
| 2.
|
Disconnect the Canister Close Valve (CCV) connector (A) and remove the fastener (B).
|
| 3.
|
Remove the fuel tank air filter mounting bolt (A).
|
Tightening torque :
3.9 - 5.9 N·m (0.4 - 0.6 kgf·m, 2.9 - 4.3 lb·ft, 34.7 - 52.1 lb·in)
|
|
| 4.
|
Remove the CCV and fuel tank air filter assembly (A) from the canister.
|
| 5.
|
Remove the CCV (A) from the fuel tank air filter (B) after rotating it the clockwise.
|
| 1.
|
Install in the reverse order of removal.
|
•
|
Install the fuel tank air filter to the specified torque.
|
|
•
|
If the fuel tank air filter is dropped, it may cause internal
damage. (Do not reuse)
|
|
•
|
Be careful not to get foreign matter into the fuel tank air
filter.
|
|
|
Fuel Tank Pressure Sensor (FTPS) Specifications
Item
|
Specification
|
Rated voltage (V)
|
5
|
Operating voltage (V)
|
4.75 - 5.25
|
Operating temperature [°C (°F)]
|
-30 to 100 (-22 to 212)
|
Operating pressure (kPa)
|
-6.67 to 6.67
|
Pressure
|
Output Voltage (V)
|
kPa
|
kg/cm²
|
psi
|
-6.67
|
-0.06
|
-0.67
|
0.5
|
0
|
0
|
0
|
2.5
|
6.67
|
0.06
|
0.67
|
4.5
|
Fuel Tank Pressure Sensor (FTPS) Components and Components Location
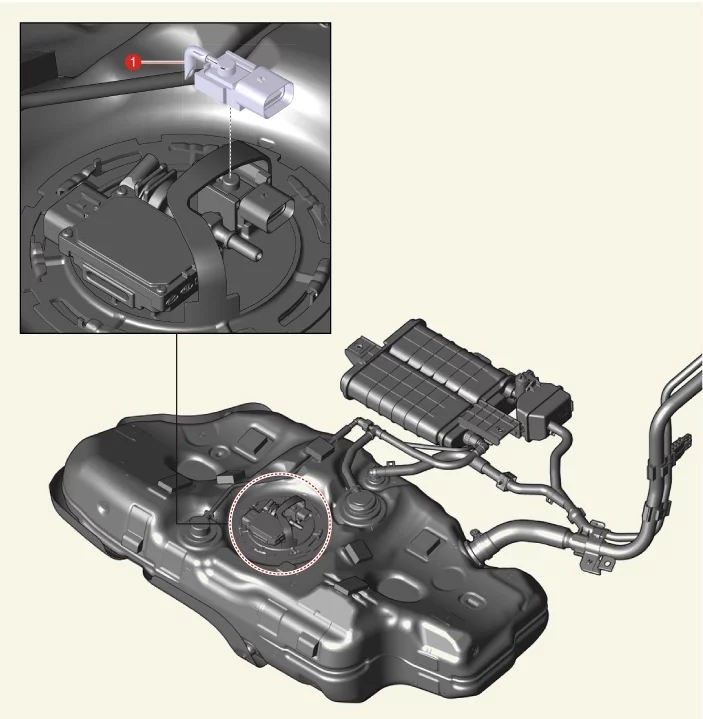
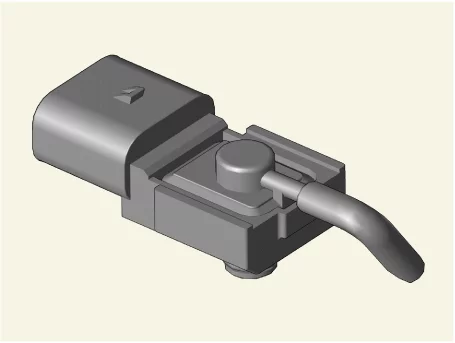
1. Fuel Tank Pressure Sensor (FTPS)
|
|
Fuel Tank Pressure Sensor (FTPS) Description and Operation
|
•
|
The Fuel Tank Pressure Sensor (FTPS) is a component of the evaporative emission control system
and is
installed on the fuel tank.
|
|
•
|
It checks the Purge Control Solenoid Valve (PCSV) operation and detects a leakage of the
system.
|
Fuel Tank Pressure Sensor (FTPS) On Vehicle Inspection
| 1.
|
The evaporative emission control system can be more quickly diagnosed for problems with the
KDS. (Refer
to "DTC guide")
| (1)
|
Self diagnosis : Inspect the Diagnostic Trouble Code (DTC) with the KDS
(Refer to DTC guide when fault code is found)
|
| (2)
|
Data analysis : Check the system input/output values
(Data Analysis → Fuel Tank Pressure)
Pressure
|
Output Voltage
(V)
|
kPa
|
kg/cm²
|
psi
|
-6.67
|
-0.06
|
-0.67
|
0.5
|
0
|
0
|
0
|
2.5
|
6.67
|
0.06
|
0.67
|
4.5
|
|
| (3)
|
S/W Management : Controlling other features including system option setting and
zero point
adjustment
(S/W Management → Engine Control → Evap. Leakage Test)
|
Refer to the KDS screen for operating conditions and details
|
|
|
Fuel Tank Pressure Sensor (FTPS) Removal and Installation
| 1.
|
Remove the rear seat assembly.
(Refer to Body - "Rear Seat Assembly")
|
| 2.
|
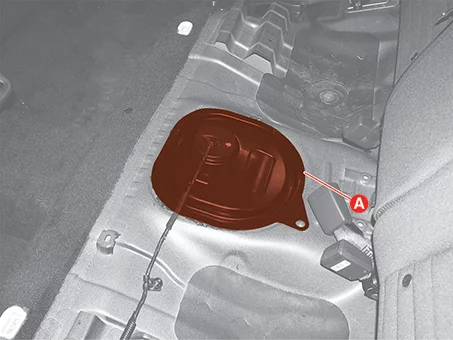
Remove the fuel pump service cover (A).
|
| 3.
|
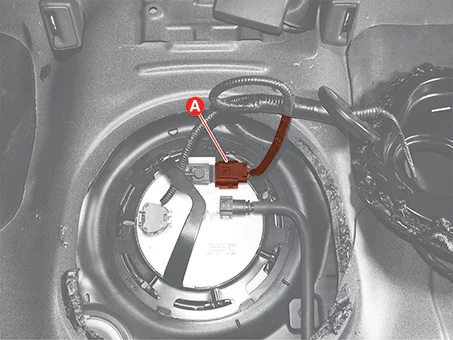
Disconnect the Fuel Tank Pressure Sensor (FTPS) connector (A).
|
| 4.
|
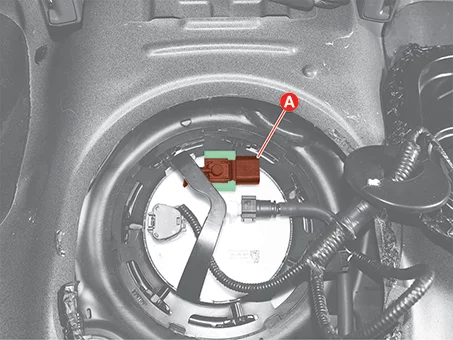
Remove the FTPS (A) by spreading the bracket to the left and right.
|
If the FTPS can't be removed due to the fuel pump plate, release the fuel pump
plate and remove
the FTPS.
|
|
| 1.
|
Install in the reverse order of removal.
|
•
|
If the Fuel Tank Pressure Sensor (FTPS) is dropped, it may
cause internal damage. (Do not
reuse)
|
|
•
|
Be careful not to get foreign matter into the FTPS.
|
|
|
Purge Control Solenoid Valve (PCSV) Specification
Item
|
Specification
|
Rated voltage (V)
|
13.4 - 13.6
|
Operating voltage (V)
|
9 - 16
|
Allowable transient voltage (V)
|
24 (1 min)
|
Operating voltage (V)
|
Minimum 9
|
Deactivation voltage (V)
|
1
|
Resistance (Ω)
|
12.5 - 16.5 [23°C (73.4°F)]
|
Purge Control Solenoid Valve (PCSV) Components and Components Location
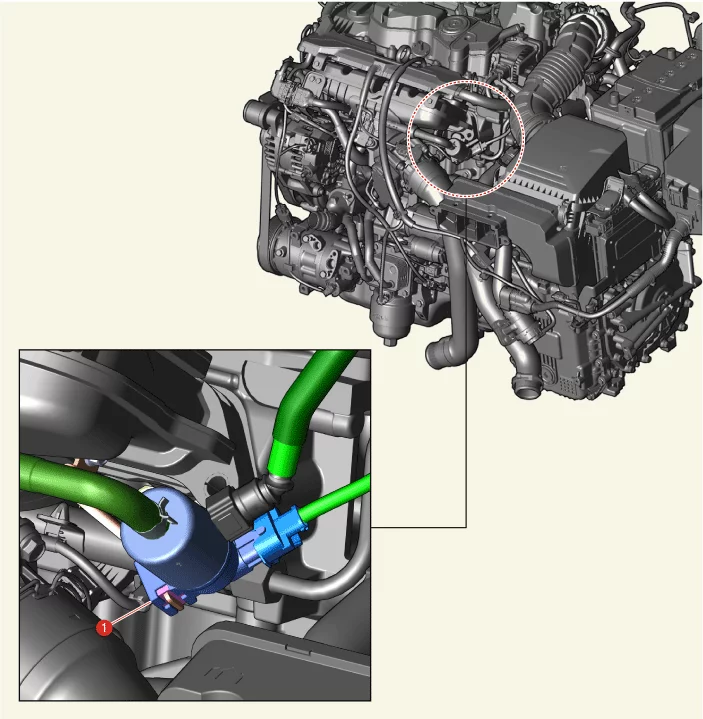
1. Purge Control Solenoid Valve (PCSV)
|
|
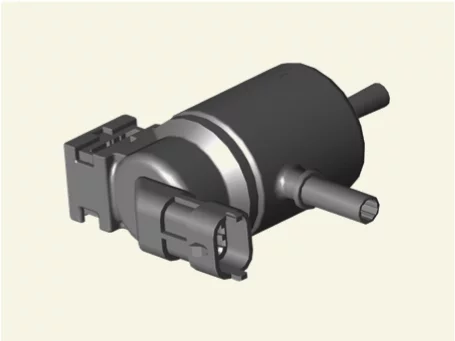
Purge Control Solenoid Valve (PCSV) Description and Operation
|
•
|
Purge Control Solenoid Valve (PCSV) controls the passage between the canister and the intake
manifold.
|
|
•
|
Fuel evaporative gas collected in the canister is supplied to the combustion chamber by the
operation of
the PSCV under Engine Control Module (ECM) control.
|
Purge Control Solenoid Valve (PCSV) On Vehicle Inspection
| 1.
|
The evaporative emission control system can be more quickly diagnosed for problems with the
KDS. (Refer
to "DTC guide")
| (1)
|
Self diagnosis : Inspect the Diagnostic Trouble Code (DTC) with the KDS
(Refer to DTC guide when fault code is found)
|
| (2)
|
Actuation Test : Checking the system operation condition
(Data Analysis → Actuation Test → Canister Purge Valve)
|
Refer to the KDS screen for operating conditions and details
|
|
|
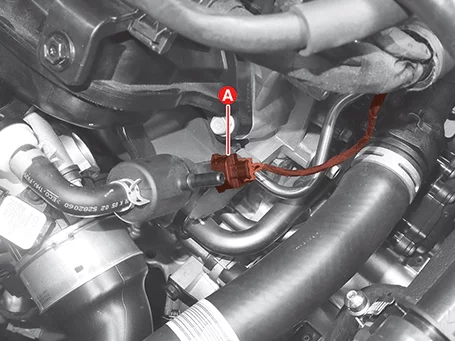
| 2.
|
Disconnect the Purge Control Solenoid Valve (PCSV) connector (A).
|
| 3.
|
Measure the resistance between the PCSV terminals.
Item
|
Specification
|
Resistance (Ω)
|
12.5 - 16.5 [23°C (73.4°F)]
|
|
Purge Control Solenoid Valve (PCSV) Removal and Installation
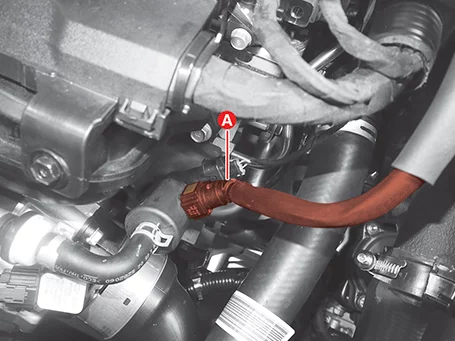
| 1.
|
Disconnect the battery negative ( - ) terminal.
|
| 2.
|
Remove the vapor hose (A).
|
| 3.
|
Disconnect the Purge Control Solenoid Valve (PCSV) connector (A).
|
| 4.
|
Separate the vapor hose (A) by releasing the clamp.
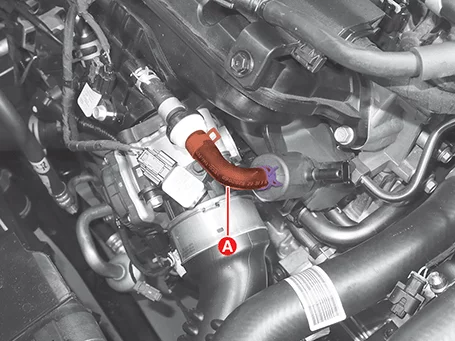
|
| 5.
|
Remove the PCSV (A) by pushing it in the direction of the arrow.
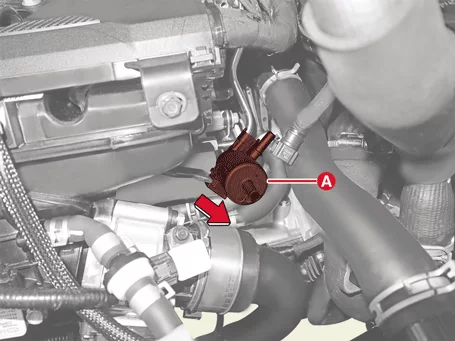
|
| 1.
|
Install in the reverse order of removal.
|
•
|
If the Purge Control Solenoid Valve (PCSV) is dropped, it may
cause internal damage. (Do
not reuse)
|
|
•
|
Be careful not to get foreign matter into the PCSV.
|
|
|