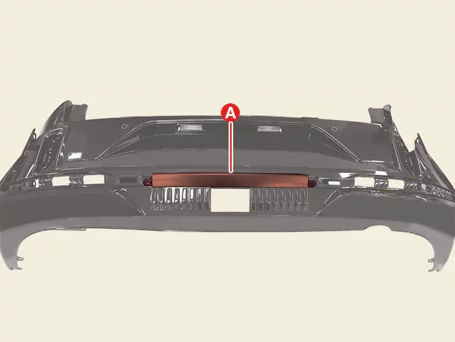
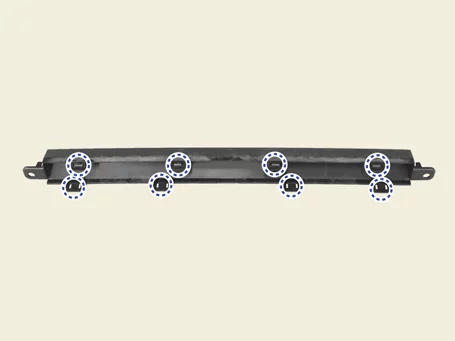
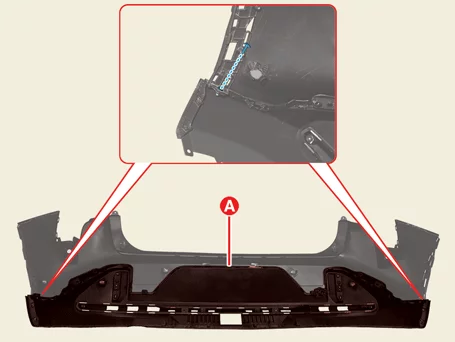
Kia K4: Body (Interior / Exterior / Electrical) / Front & Rear Bumper

Contents:

Bumper Mounting Bracket Removal and Installation

Removal
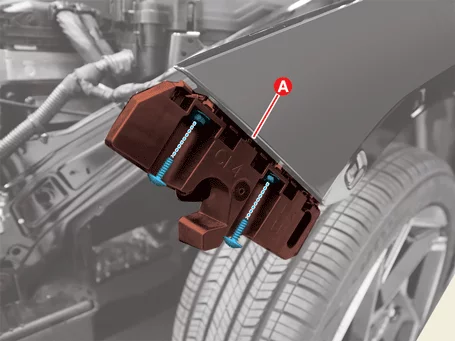
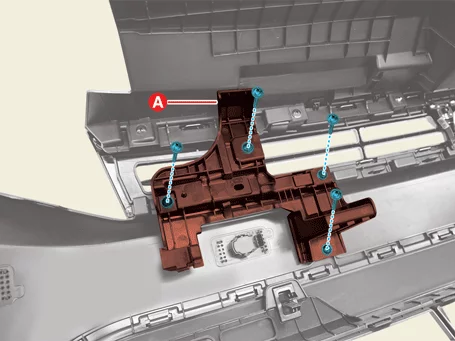
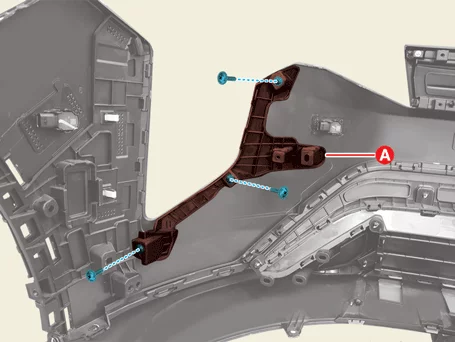
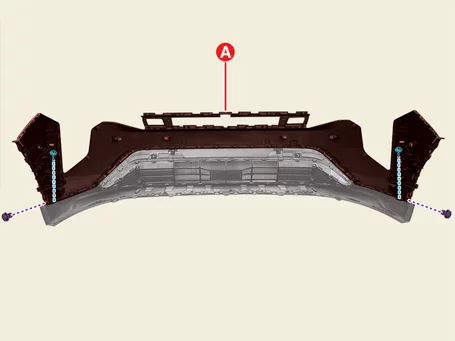
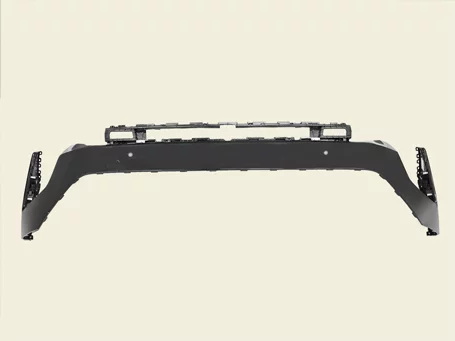
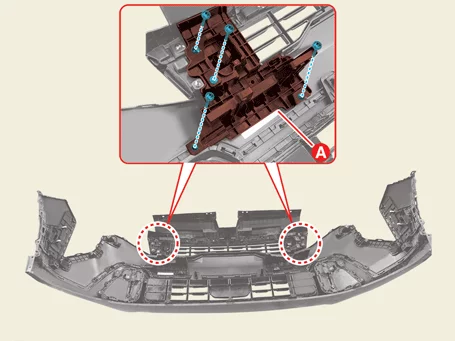
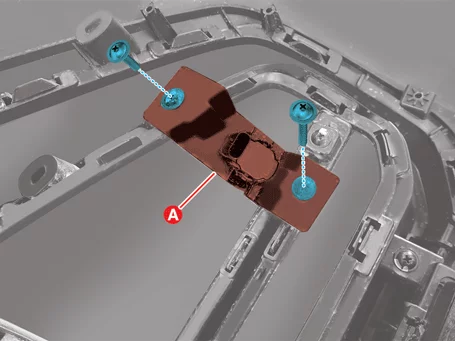
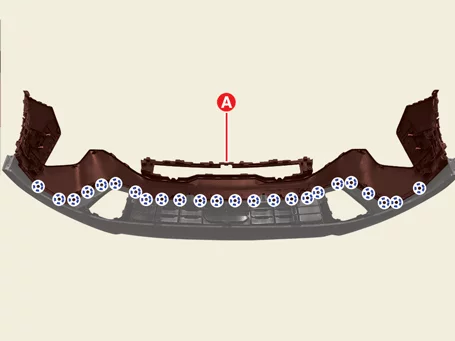
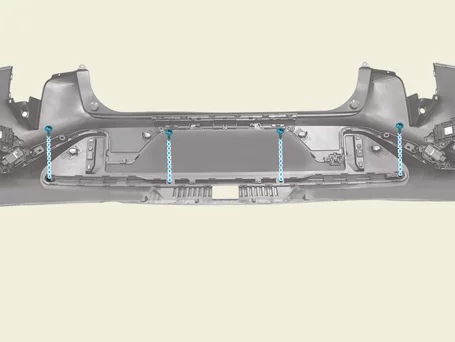
Front Bumper Mounting Bracket
1. Remove the front bumper assembly. (Refer to Front & Rear Bumper - "Front Bumper Assembly")
2. Remove the bracket (A) after removing the screws.

Body (Interior / Exterior / Electrical) — Front & Rear Bumper / Bumper Mounting Bracket / Removal and Installation / Removal illustration

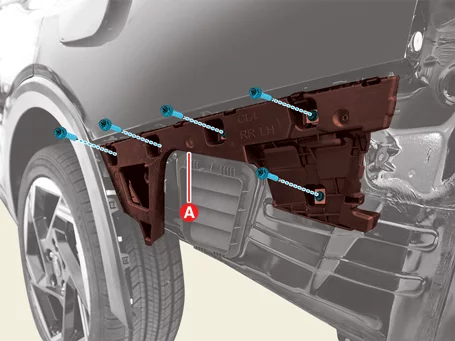
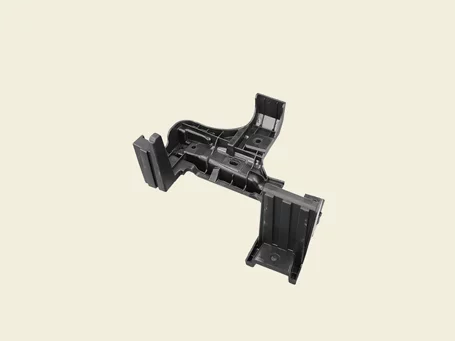
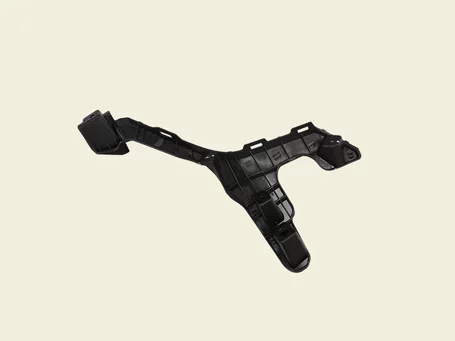
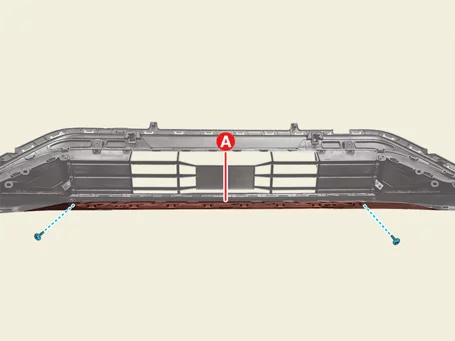
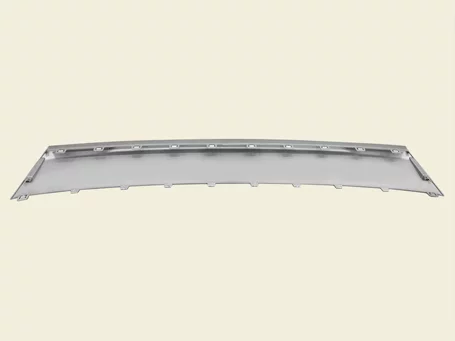
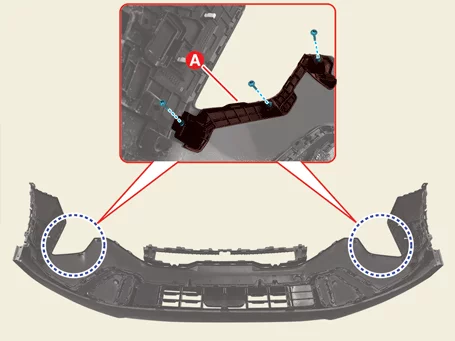
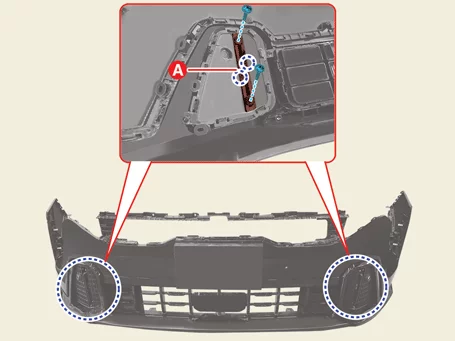
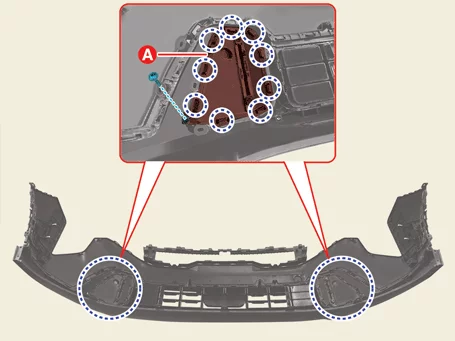
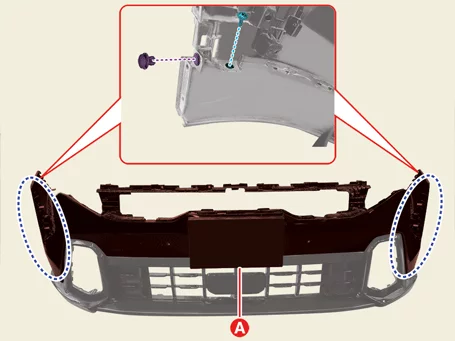
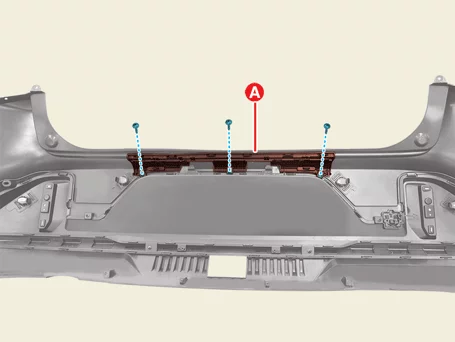
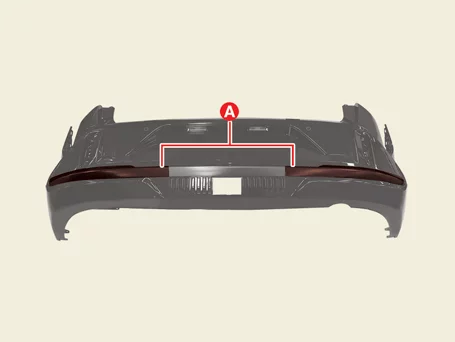
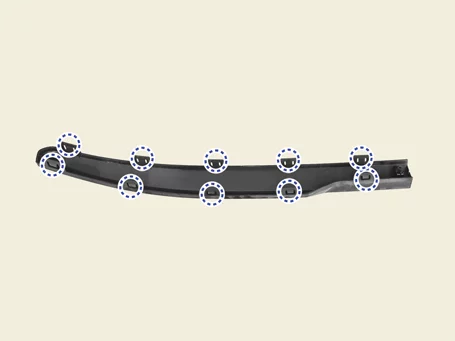
Rear Bumper Mounting Bracket
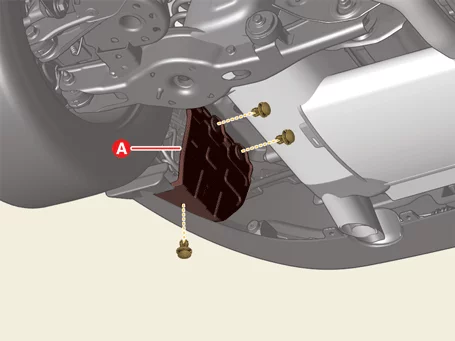
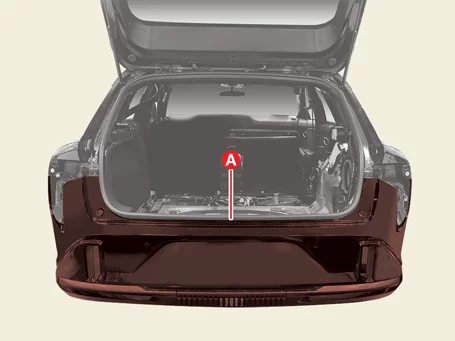
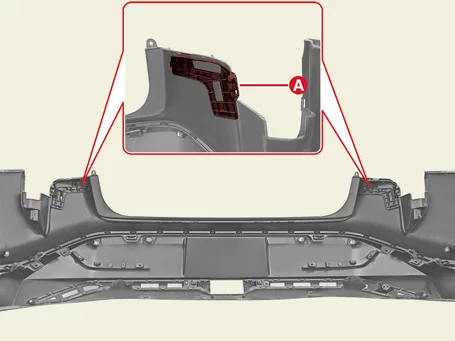
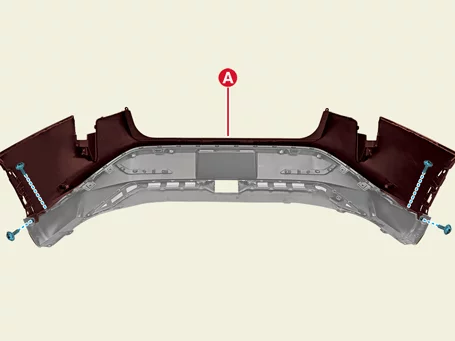
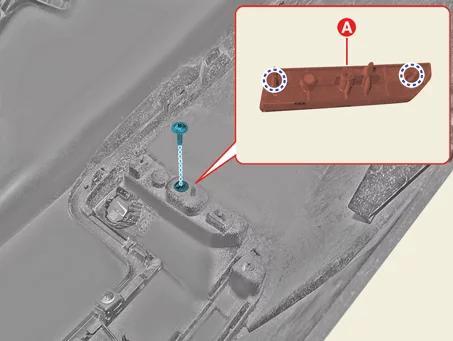
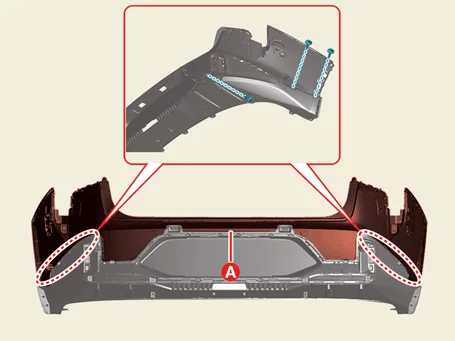
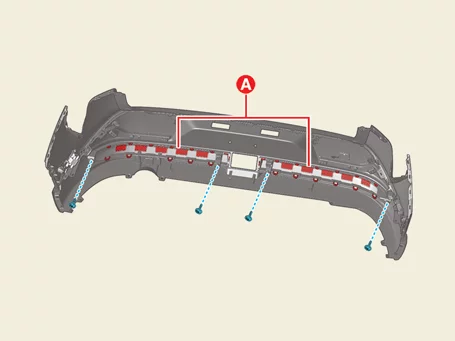
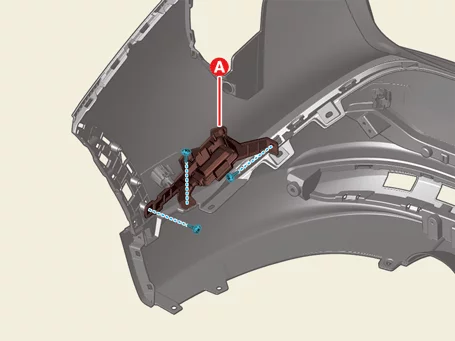
1. Remove the rear bumper assembly. (Refer to Front & Rear Bumper - "Rear Bumper Assembly")
2. Remove the bracket (A) after removing the screws.

Body (Interior / Exterior / Electrical) — Front & Rear Bumper / Bumper Mounting Bracket / Removal and Installation / Removal illustration

Installation
1. Install in the reverse order of removal.

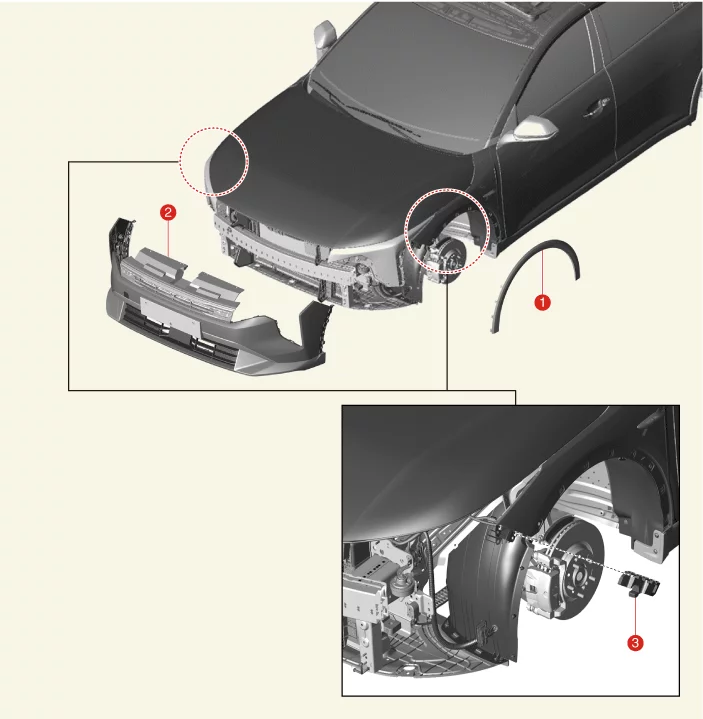
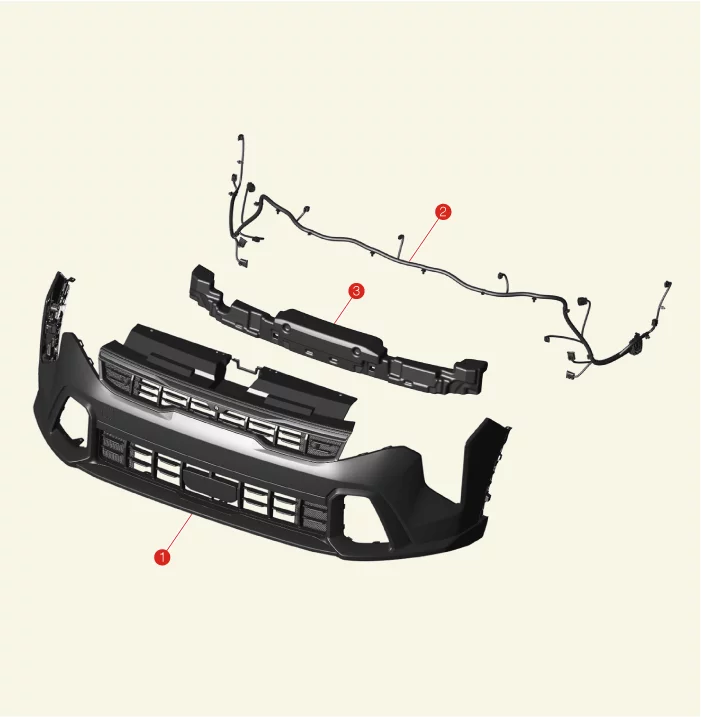
Front Bumper Assembly Components and Components Location

Component
Removal

Body (Interior / Exterior / Electrical) — Front & Rear Bumper / Front Bumper Assembly / Components and Components Location / Component illustration

1. Fender Garnish
2. Front Bumper Assembly
3. Front Bumper Mounting Bracket

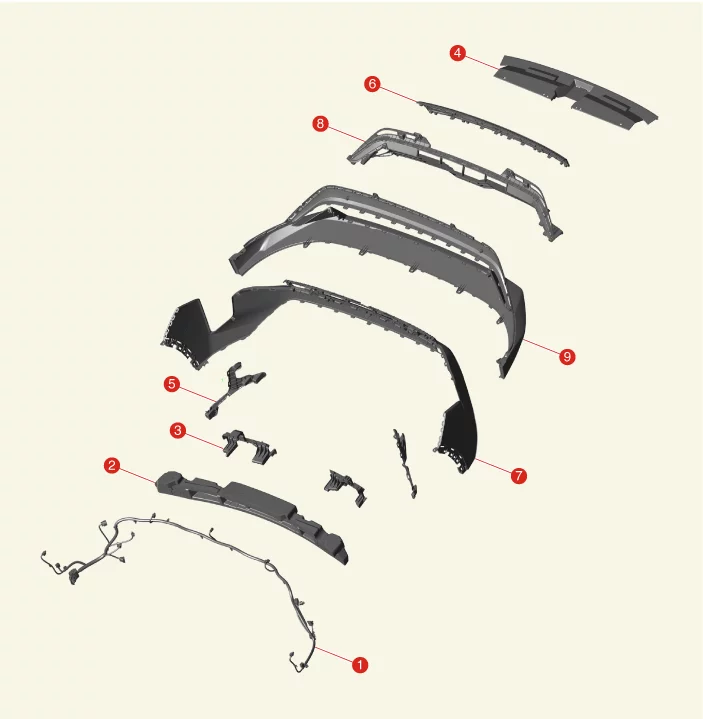
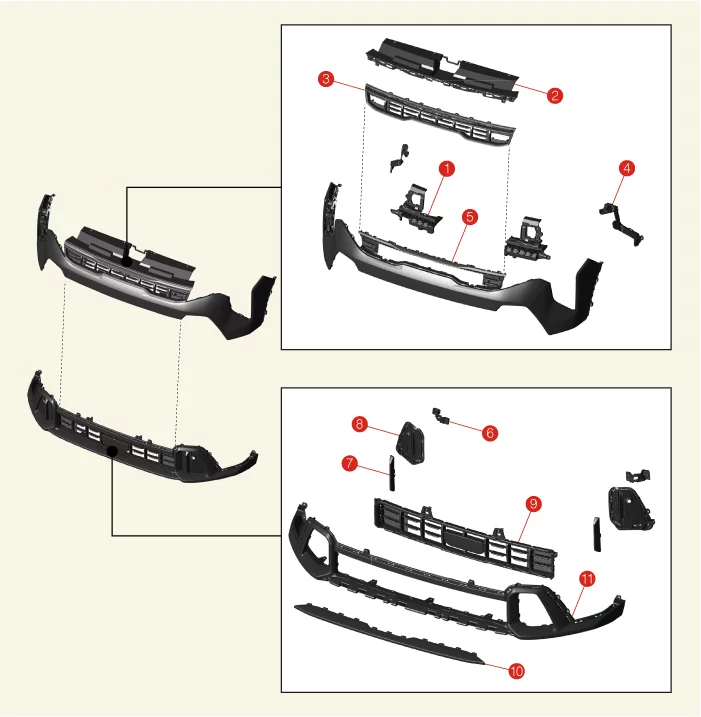
Disassembly Standard

Body (Interior / Exterior / Electrical) — Front & Rear Bumper / Front Bumper Assembly / Components and Components Location / Component illustration

1. Wiring Harness
2. Energy Absorber
3. Side Upper Reinforcement
4. Radiator Upper Cover
5. Center Upper Bracket
6. Radiator Grille
7. Bumper Upper Cover
8. Bumper Grille
9. Bumper Lower Cover

Option

Body (Interior / Exterior / Electrical) — Front & Rear Bumper / Front Bumper Assembly / Components and Components Location / Component illustration

1. Bumper Assembly
2. Bumper Wiring Harness
3. Bumper Energy Absorber

Body (Interior / Exterior / Electrical) — Front & Rear Bumper / Front Bumper Assembly / Components and Components Location / Component illustration

1. Side Upper Reinforcement
2. Radiator Grille Upper Cover
3. Radiator Grille Assembly
4. Bumper Center Upper Bracket
5. Bumper Upper Cover
6. Ultrasonic Holder
7. Bumper Side Piece
8. Bumper Lower Cover
9. Bumper Grille
10. Skid Plate
11. Front Lower Cover

Front Bumper Assembly Removal and Installation

Removal
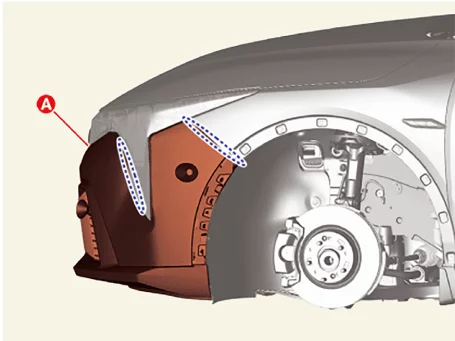
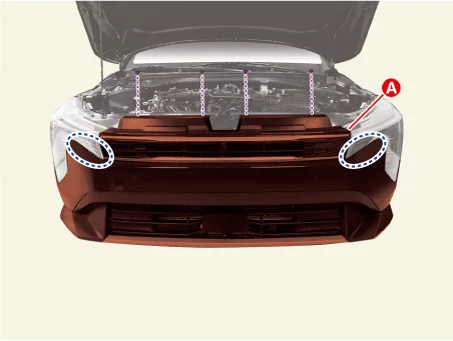
Information    
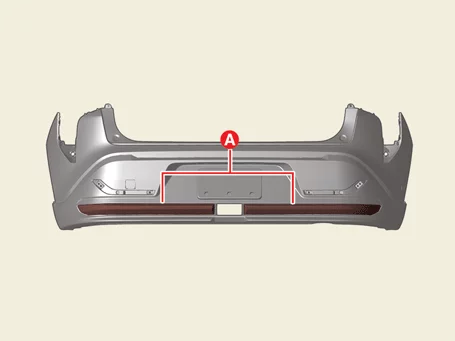
The indication below represents the location of a clip or fastener.

Body (Interior / Exterior / Electrical) — Front & Rear Bumper / Front Bumper Assembly / Removal and Installation / Removal illustration

Front Bumper Assembly
1. Disconnect the battery negative (-) terminal.
2. Remove the fender garnish. (Refer to Body Side Molding - "Fender Garnish")
3. Remove the engine room under cover. (Refer to Engine Mechanical System - "Engine Room Under Cover")
4. Remove the front bumper assembly (A) after removing the screws and fasteners.

Body (Interior / Exterior / Electrical) — Front & Rear Bumper / Front Bumper Assembly / Removal and Installation / Removal illustration

Body (Interior / Exterior / Electrical) — Front & Rear Bumper / Front Bumper Assembly / Removal and Installation / Removal illustration

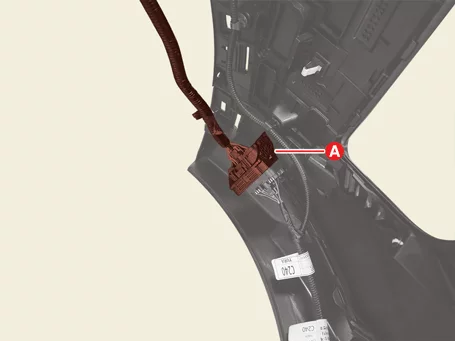
5. Disconnect the bumper main connector (A).

Body (Interior / Exterior / Electrical) — Front & Rear Bumper / Front Bumper Assembly / Removal and Installation / Removal illustration

Front Bumper Stiffener
1. Remove the front bumper assembly.
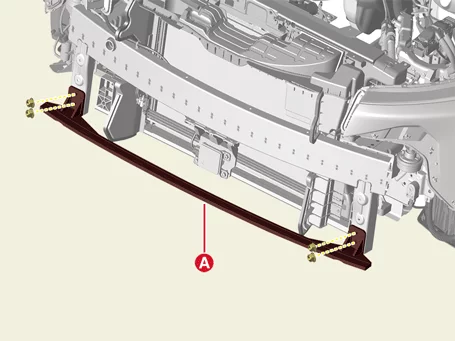
2. Remove the bumper stiffener (A) after removing the nuts.
Tightening torque : 5.8 - 8.6 N·m (0.59 - 0.88 kgf·m, 4.3 - 6.4 lb·ft, 51.2 - 76.4 lb·in)

Body (Interior / Exterior / Electrical) — Front & Rear Bumper / Front Bumper Assembly / Removal and Installation / Removal illustration

Installation
1. Install in the reverse order of removal.

Front Bumper Assembly Disassembly and Reassembly [Standard]

Disassembly
Information    
The indication below represents the location of a clip or fastener.

Body (Interior / Exterior / Electrical) — Front & Rear Bumper / Front Bumper Assembly / Disassembly and Reassembly [Standard] / Disassembly illustration

1. Remove the front bumper assembly. (Refer to Front & Rear Bumper - "Front Bumper Assembly")
2. Remove the front wide angle camera. (Refer to Advanced Driver Assistance System (ADAS) - "Wide Angle Camera")
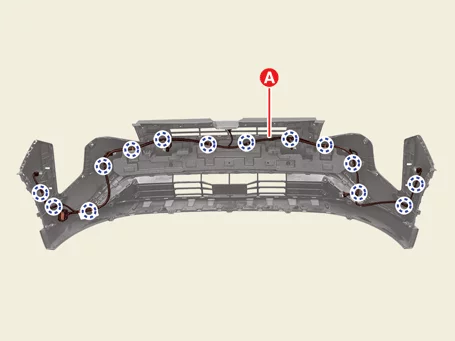
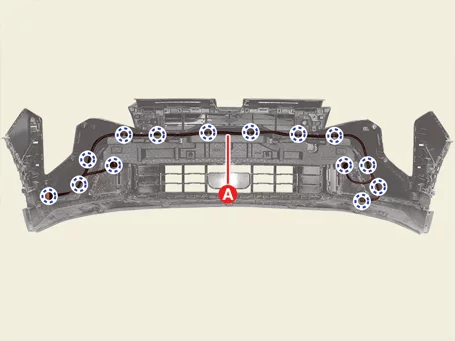
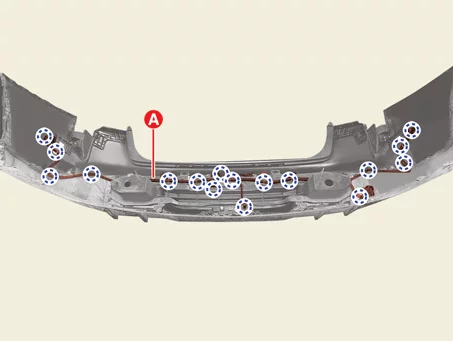
3. Remove the front bumper wiring harness (A).

Body (Interior / Exterior / Electrical) — Front & Rear Bumper / Front Bumper Assembly / Disassembly and Reassembly [Standard] / Disassembly illustration

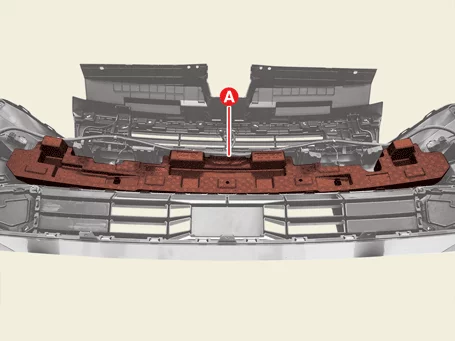
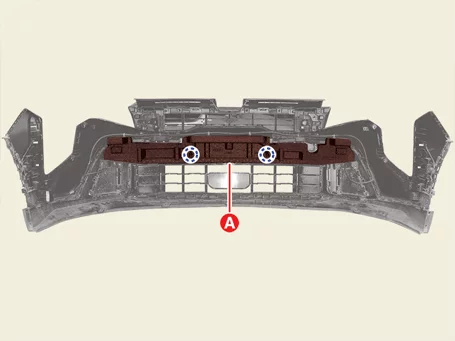
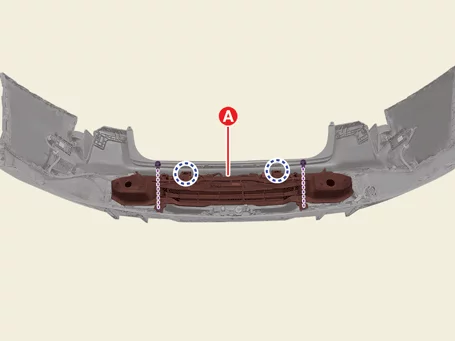
4. Remove the energy absorber (A).

Body (Interior / Exterior / Electrical) — Front & Rear Bumper / Front Bumper Assembly / Disassembly and Reassembly [Standard] / Disassembly illustration

5. Remove the front bumper side upper reinforcement (A) after removing the screws.

Body (Interior / Exterior / Electrical) — Front & Rear Bumper / Front Bumper Assembly / Disassembly and Reassembly [Standard] / Disassembly illustration

Body (Interior / Exterior / Electrical) — Front & Rear Bumper / Front Bumper Assembly / Disassembly and Reassembly [Standard] / Disassembly illustration

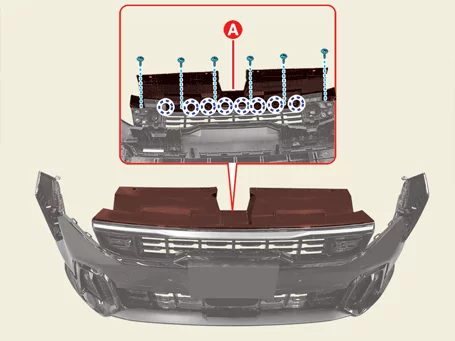
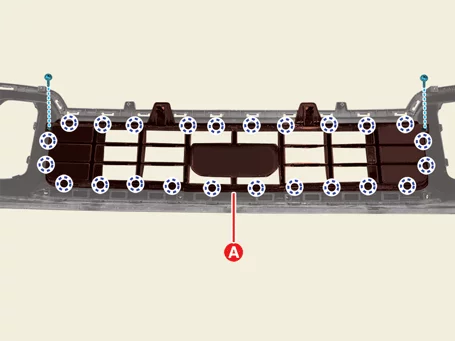
6. Remove the radiator upper cover (A) after removing the screws.

Body (Interior / Exterior / Electrical) — Front & Rear Bumper / Front Bumper Assembly / Disassembly and Reassembly [Standard] / Disassembly illustration

Body (Interior / Exterior / Electrical) — Front & Rear Bumper / Front Bumper Assembly / Disassembly and Reassembly [Standard] / Disassembly illustration

7. Remove the front bumper center upper bracket (A) after removing the screws.

Body (Interior / Exterior / Electrical) — Front & Rear Bumper / Front Bumper Assembly / Disassembly and Reassembly [Standard] / Disassembly illustration

Body (Interior / Exterior / Electrical) — Front & Rear Bumper / Front Bumper Assembly / Disassembly and Reassembly [Standard] / Disassembly illustration

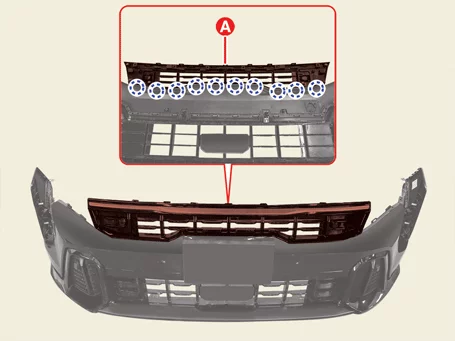
8. Remove the radiator grille (A).

Body (Interior / Exterior / Electrical) — Front & Rear Bumper / Front Bumper Assembly / Disassembly and Reassembly [Standard] / Disassembly illustration

Body (Interior / Exterior / Electrical) — Front & Rear Bumper / Front Bumper Assembly / Disassembly and Reassembly [Standard] / Disassembly illustration

9. Remove the front bumper upper cover (A) after removing the screws and fasteners.

Body (Interior / Exterior / Electrical) — Front & Rear Bumper / Front Bumper Assembly / Disassembly and Reassembly [Standard] / Disassembly illustration

Body (Interior / Exterior / Electrical) — Front & Rear Bumper / Front Bumper Assembly / Disassembly and Reassembly [Standard] / Disassembly illustration

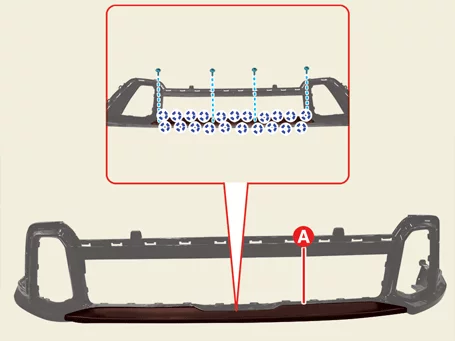
10. Remove the skid plate (A) after removing the screws.

Body (Interior / Exterior / Electrical) — Front & Rear Bumper / Front Bumper Assembly / Disassembly and Reassembly [Standard] / Disassembly illustration

Body (Interior / Exterior / Electrical) — Front & Rear Bumper / Front Bumper Assembly / Disassembly and Reassembly [Standard] / Disassembly illustration

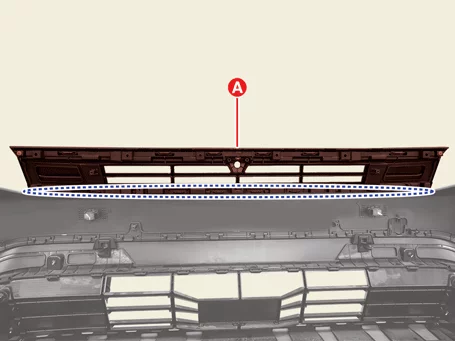
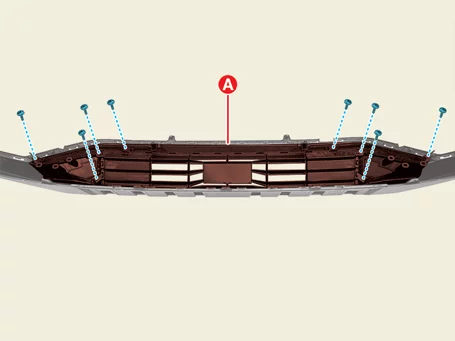
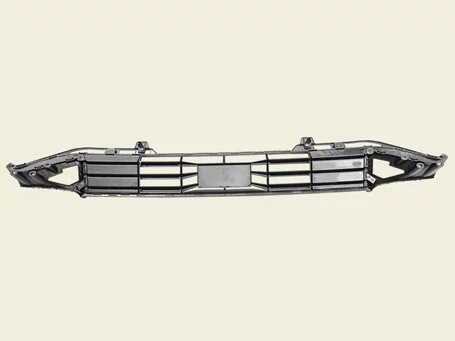
11. Remove the front bumper grille (A) after removing the screws.

Body (Interior / Exterior / Electrical) — Front & Rear Bumper / Front Bumper Assembly / Disassembly and Reassembly [Standard] / Disassembly illustration

Body (Interior / Exterior / Electrical) — Front & Rear Bumper / Front Bumper Assembly / Disassembly and Reassembly [Standard] / Disassembly illustration

Reassembly
1. Reassemble in the reverse order of disassembly.

Front Bumper Assembly Disassembly and Reassembly [Option]

Disassembly
Information    
The indication below represents the location of a clip or fastener.

Body (Interior / Exterior / Electrical) — Front & Rear Bumper / Front Bumper Assembly / Disassembly and Reassembly [Option] / Disassembly illustration

1. Remove the front bumper assembly. (Refer to Front & Rear Bumper - "Front Bumper Assembly")
2. Remove the front wide angle camera. (Refer to Advanced Driver Assistance System (ADAS) - "Wide Angle Camera")
3. Remove the bumper wiring harness (A).

Body (Interior / Exterior / Electrical) — Front & Rear Bumper / Front Bumper Assembly / Disassembly and Reassembly [Option] / Disassembly illustration

4. Remove the energy absorber assembly (A).

Body (Interior / Exterior / Electrical) — Front & Rear Bumper / Front Bumper Assembly / Disassembly and Reassembly [Option] / Disassembly illustration

5. Remove the bumper side upper reinforcement (A) after removing the screws.

Body (Interior / Exterior / Electrical) — Front & Rear Bumper / Front Bumper Assembly / Disassembly and Reassembly [Option] / Disassembly illustration

6. Remove the radiator grille upper cover (A) after removing the screws.

Body (Interior / Exterior / Electrical) — Front & Rear Bumper / Front Bumper Assembly / Disassembly and Reassembly [Option] / Disassembly illustration

7. Remove the radiator grille assembly (A).

Body (Interior / Exterior / Electrical) — Front & Rear Bumper / Front Bumper Assembly / Disassembly and Reassembly [Option] / Disassembly illustration

8. Remove the bumper center upper bracket (A) after removing the screws.

Body (Interior / Exterior / Electrical) — Front & Rear Bumper / Front Bumper Assembly / Disassembly and Reassembly [Option] / Disassembly illustration

9. Remove the ultrasonic holder (A) after removing the screws.

Body (Interior / Exterior / Electrical) — Front & Rear Bumper / Front Bumper Assembly / Disassembly and Reassembly [Option] / Disassembly illustration

10. Remove the bumper side piece (A) after removing the screws.

Body (Interior / Exterior / Electrical) — Front & Rear Bumper / Front Bumper Assembly / Disassembly and Reassembly [Option] / Disassembly illustration

11. Remove the bumper lower cover (A) after removing the screws.

Body (Interior / Exterior / Electrical) — Front & Rear Bumper / Front Bumper Assembly / Disassembly and Reassembly [Option] / Disassembly illustration

12. Remove the bumper upper cover (A) after removing the screws and fasteners.

Body (Interior / Exterior / Electrical) — Front & Rear Bumper / Front Bumper Assembly / Disassembly and Reassembly [Option] / Disassembly illustration

Body (Interior / Exterior / Electrical) — Front & Rear Bumper / Front Bumper Assembly / Disassembly and Reassembly [Option] / Disassembly illustration

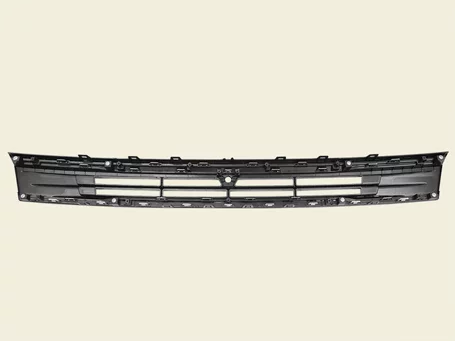
13. Remove the bumper grille (A) after removing the screws.

Body (Interior / Exterior / Electrical) — Front & Rear Bumper / Front Bumper Assembly / Disassembly and Reassembly [Option] / Disassembly illustration

14. Remove the skid plate (A) after removing the screws.

Body (Interior / Exterior / Electrical) — Front & Rear Bumper / Front Bumper Assembly / Disassembly and Reassembly [Option] / Disassembly illustration

Reassembly
1. Reassemble in the reverse order of disassembly.

Rear Bumper Assembly Components and Components Location

Component
Removal

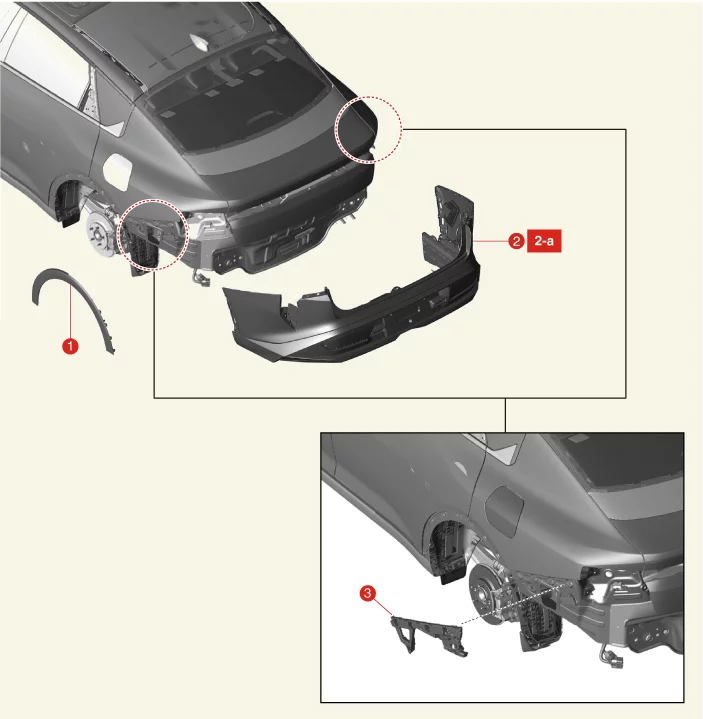
Body (Interior / Exterior / Electrical) — Front & Rear Bumper / Rear Bumper Assembly / Components and Components Location / Component illustration

1. Quarter Garnish
2. Rear Bumper Assembly
2-a. 26.5 - 32.4 N·m (2.7 - 3.3 kgf·m, 19.5 - 23.9 lb·ft)
3. Rear Bumper Bracket

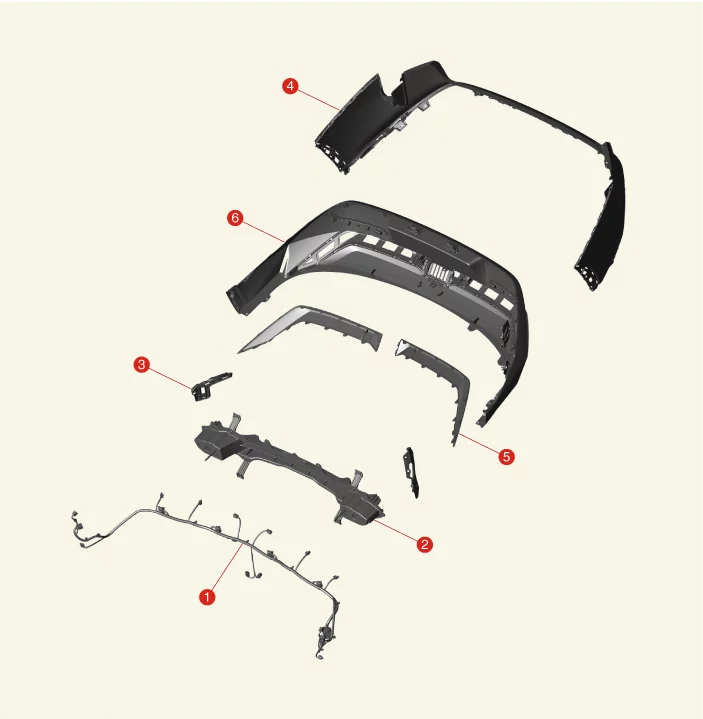
Disassembly [4DR] Standard

Body (Interior / Exterior / Electrical) — Front & Rear Bumper / Rear Bumper Assembly / Components and Components Location / Component illustration

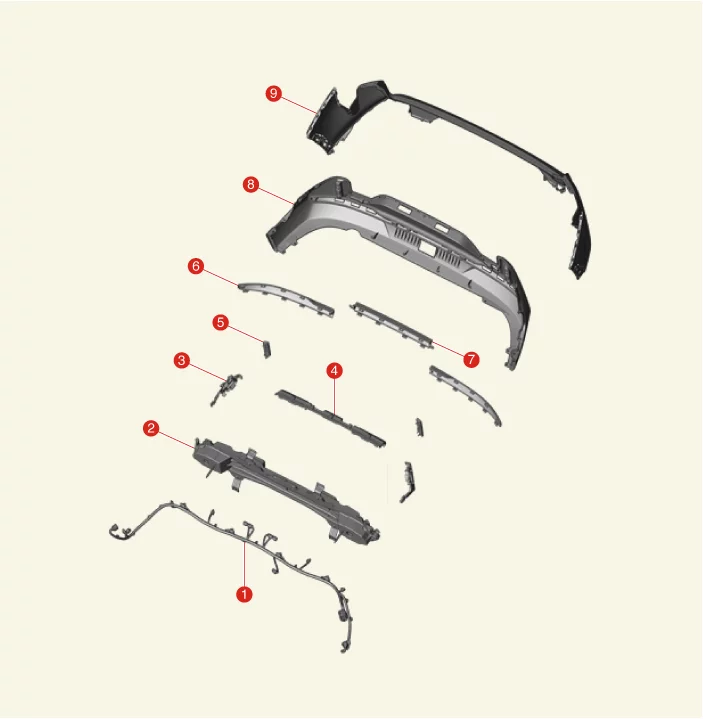
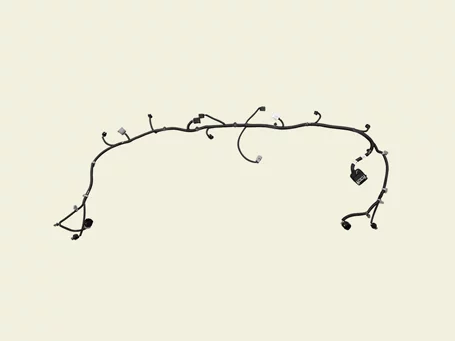
1. Rear Bumper Wiring Harness
2. Rear Bumper Beam Assembly
3. Rear Bumper Bracket
4. Rear Bumper Upper Cover
5. Rear Bumper Side Piece
6. Rear Bumper Lower Cover

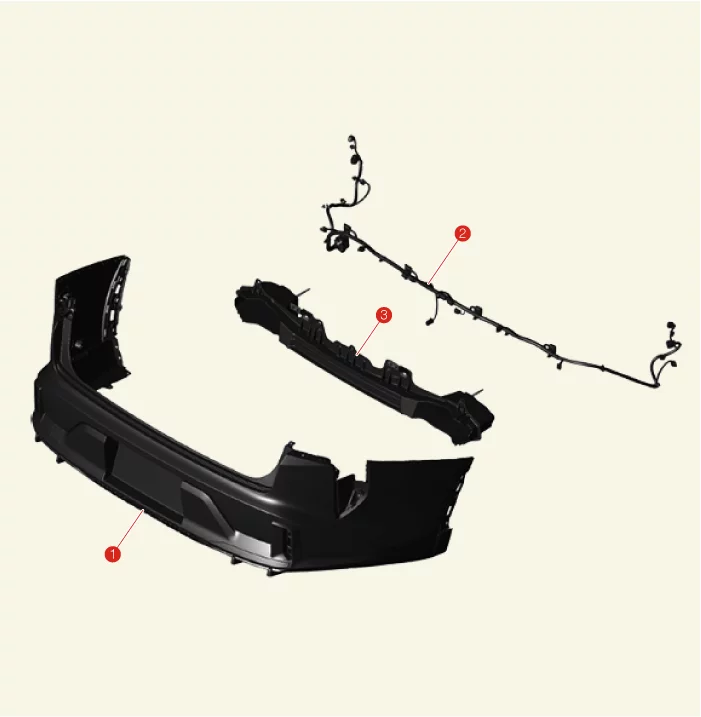
Option

Body (Interior / Exterior / Electrical) — Front & Rear Bumper / Rear Bumper Assembly / Components and Components Location / Component illustration

1. Bumper Assembly
2. Bumper Wiring Harness
3. Bumper Beam Assembly

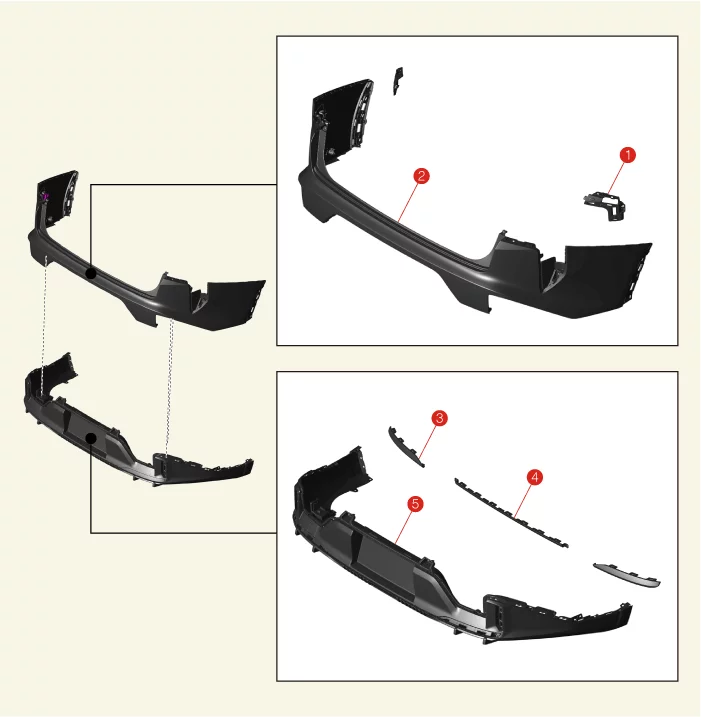
Body (Interior / Exterior / Electrical) — Front & Rear Bumper / Rear Bumper Assembly / Components and Components Location / Component illustration

1. Reflector
2. Bumper Upper Cover
3. Bumper Side Piece
4. Bumper Center Piece
5. Bumper Lower Cover

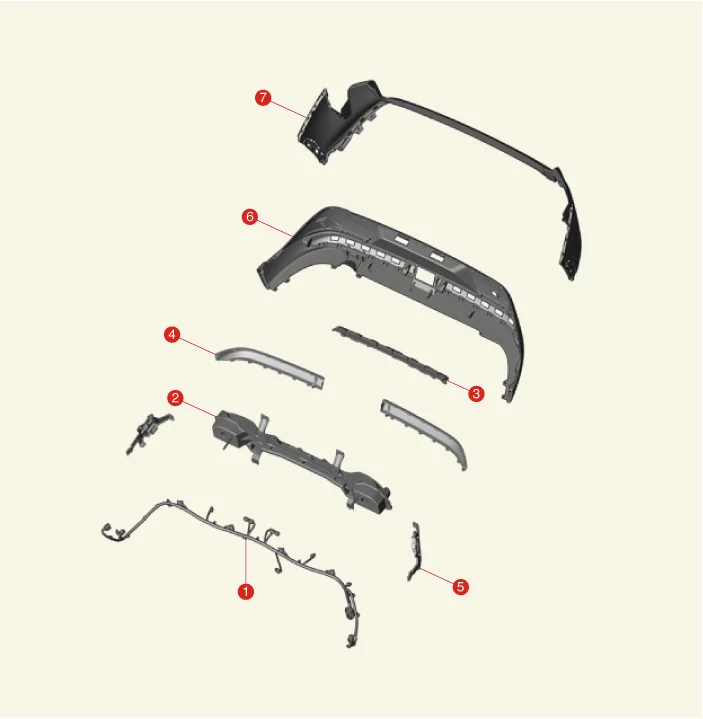
Disassembly [5DR] Standard

Body (Interior / Exterior / Electrical) — Front & Rear Bumper / Rear Bumper Assembly / Components and Components Location / Component illustration

1. Rear Bumper Wiring Harness
2. Rear Bumper Beam Assembly
3. Rear Bumper Bracket
4. Rear Bumper Molding
5. Ultra Wide Band Unit
6. Rear Bumper Lower Cover
7. Rear Bumper Upper Cover

Option

Body (Interior / Exterior / Electrical) — Front & Rear Bumper / Rear Bumper Assembly / Components and Components Location / Component illustration

1. Rear Bumper Wiring Harness
2. Rear Bumper Beam Assembly
3. Ultra Wide Band Unit
4. Rear Bumper Bracket
5. Rear Bumper Reflector
6. Rear Bumper Molding
7. Center Rear Bumper Molding
8. Rear Bumper Lower Cover
9. Rear Bumper Upper Cover

Rear Bumper Assembly Removal and Installation - 4DR

Removal
1. Remove the outside rear combination lamp. (Refer to Light & Vision System - "Rear Combination Lamp")
2. Remove the rear mud guard. (Refer to Body Side Molding - "Mud Guard")
3. Remove the quarter garnish. (Refer to Body Side Molding - "Quarter Garnish")
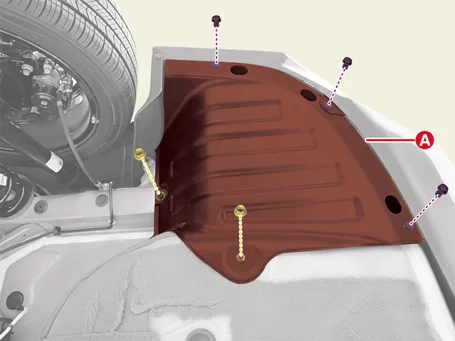
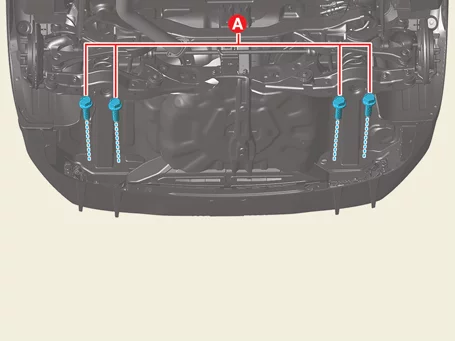
4. Remove the rear under cover (A) after removing the nuts and fasteners.
Tightening torque: 2.4 - 3.6 N·m (0.24 - 0.37 kgf·m, 1.7 - 2.7 lb·ft, 20.8 - 32.1 lb·in)

Body (Interior / Exterior / Electrical) — Front & Rear Bumper / Rear Bumper Assembly / Removal and Installation - 4DR / Removal illustration

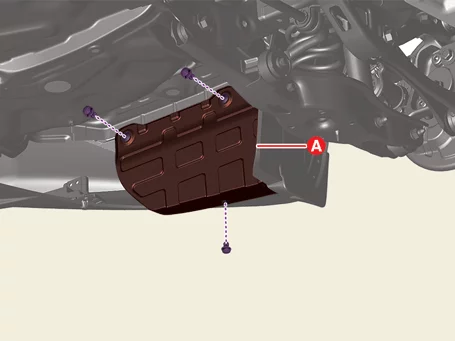
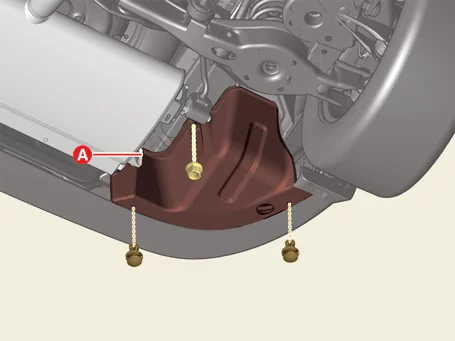
5. Remove the rear under side cover (A) after removing the fasteners.

Body (Interior / Exterior / Electrical) — Front & Rear Bumper / Rear Bumper Assembly / Removal and Installation - 4DR / Removal illustration

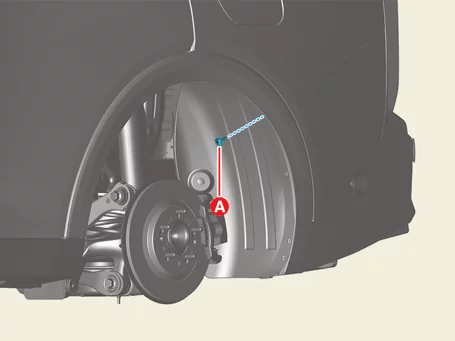
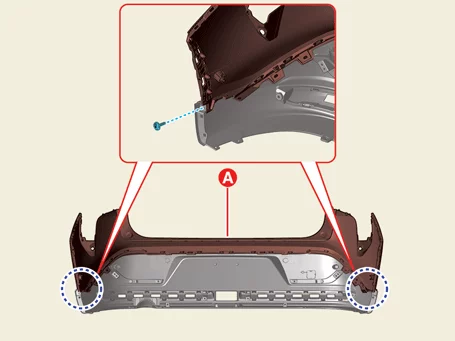
6. Remove the screw (A).

Body (Interior / Exterior / Electrical) — Front & Rear Bumper / Rear Bumper Assembly / Removal and Installation - 4DR / Removal illustration

7. Remove the rear bumper assembly bolts (A).
Tightening torque: 26.5 - 32.4 N·m (2.7 - 3.3 kgf·m, 19.5 - 23.9 lb·ft)

Body (Interior / Exterior / Electrical) — Front & Rear Bumper / Rear Bumper Assembly / Removal and Installation - 4DR / Removal illustration

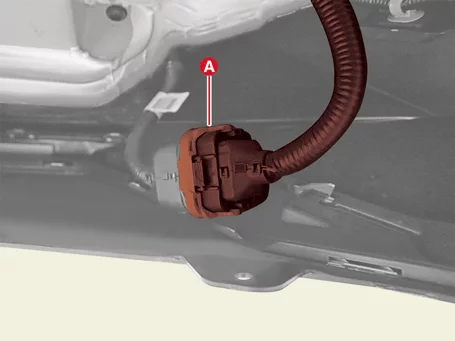
8. Disconnect the bumper main connector (A).

Body (Interior / Exterior / Electrical) — Front & Rear Bumper / Rear Bumper Assembly / Removal and Installation - 4DR / Removal illustration

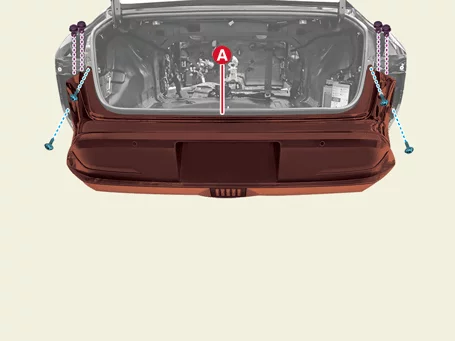
9. Remove the bumper assembly (A) after removing the screws and fasteners.

Body (Interior / Exterior / Electrical) — Front & Rear Bumper / Rear Bumper Assembly / Removal and Installation - 4DR / Removal illustration

Installation
1. Install in the reverse order of removal.

Rear Bumper Assembly Removal and Installation - 5DR

Removal
1. Remove the outside rear combination lamp. (Refer to Light & Vision System - "Rear Combination Lamp")
2. Remove the rear mud guard. (Refer to Body Side Molding - "Mud Guard")
3. Remove the quarter garnish. (Refer to Body Side Molding - "Quarter Garnish")
4. Remove the rear under cover (A) after removing the nuts and fasteners.
Tightening torque: 2.4 - 3.6 N·m (0.24 - 0.37 kgf·m, 1.7 - 2.7 lb·ft, 20.8 - 32.1 lb·in)

Body (Interior / Exterior / Electrical) — Front & Rear Bumper / Rear Bumper Assembly / Removal and Installation - 5DR / Removal illustration

5. Remove the rear under side cover (A) after removing the fasteners.

Body (Interior / Exterior / Electrical) — Front & Rear Bumper / Rear Bumper Assembly / Removal and Installation - 5DR / Removal illustration

6. Remove the screw (A).

Body (Interior / Exterior / Electrical) — Front & Rear Bumper / Rear Bumper Assembly / Removal and Installation - 5DR / Removal illustration

7. Remove the rear bumper assembly bolts (A).
Tightening torque: 26.5 - 32.4 N·m (2.7 - 3.3 kgf·m, 19.5 - 23.9 lb·ft)

Body (Interior / Exterior / Electrical) — Front & Rear Bumper / Rear Bumper Assembly / Removal and Installation - 5DR / Removal illustration

8. Remove the bumper assembly (A) after removing the screws and fasteners.

Body (Interior / Exterior / Electrical) — Front & Rear Bumper / Rear Bumper Assembly / Removal and Installation - 5DR / Removal illustration

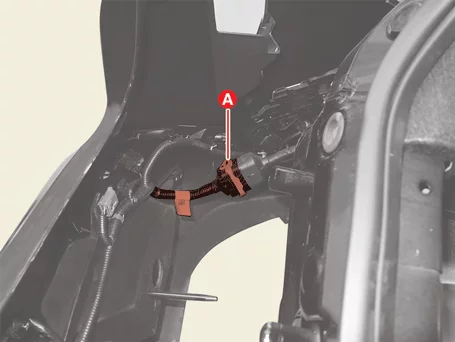
9. Disconnect the bumper main connector (A).

Body (Interior / Exterior / Electrical) — Front & Rear Bumper / Rear Bumper Assembly / Removal and Installation - 5DR / Removal illustration

Installation
1. Install in the reverse order of removal.

Rear Bumper Assembly Disassembly and Reassembly - 4DR

Disassembly
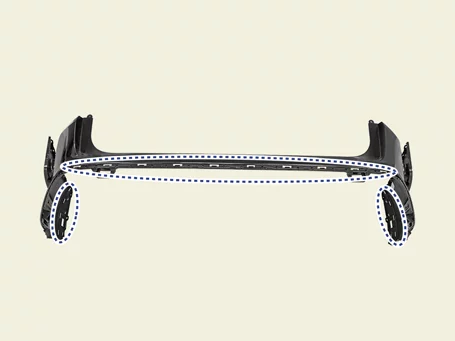
Information    
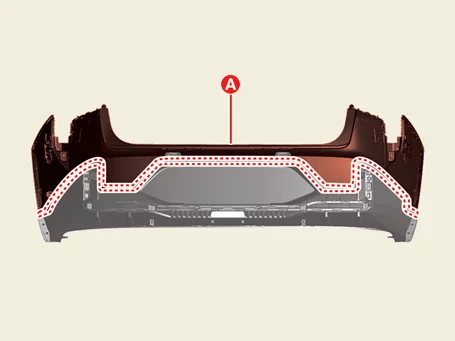
The indication below represents the location of a clip or fastener.

Body (Interior / Exterior / Electrical) — Front & Rear Bumper / Rear Bumper Assembly / Disassembly and Reassembly - 4DR / Disassembly illustration

Rear Bumper Assembly [Standard]
1. Remove the rear bumper assembly. (Refer to Front & Rear Bumper - "Rear Bumper Assembly")
2. Remove the back-up lamp. (Refer to Light & Vision System - "Back-up Lamp")
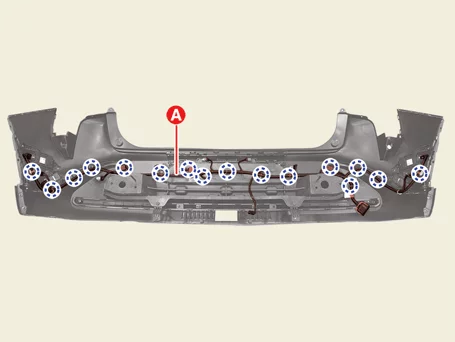
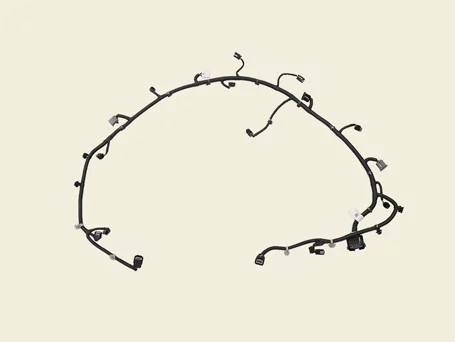
3. Remove the rear bumper wiring harness (A).

Body (Interior / Exterior / Electrical) — Front & Rear Bumper / Rear Bumper Assembly / Disassembly and Reassembly - 4DR / Disassembly illustration

Body (Interior / Exterior / Electrical) — Front & Rear Bumper / Rear Bumper Assembly / Disassembly and Reassembly - 4DR / Disassembly illustration

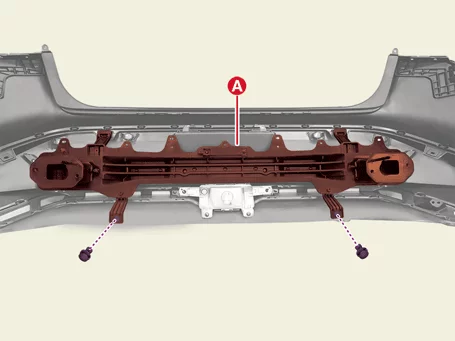
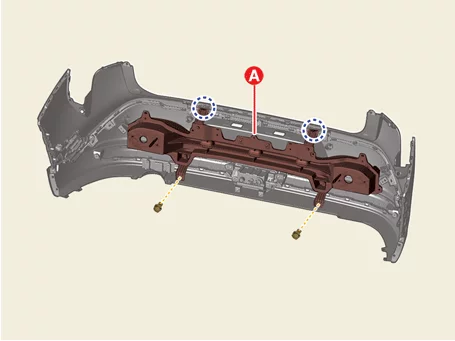
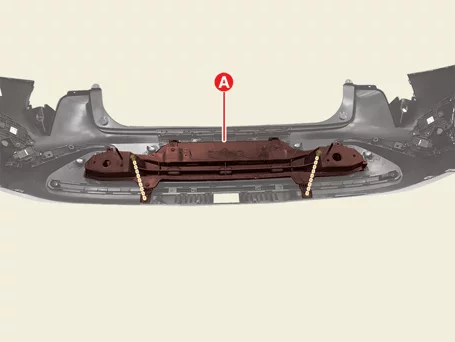
4. Remove the rear bumper beam assembly (A) after removing the fasteners.

Body (Interior / Exterior / Electrical) — Front & Rear Bumper / Rear Bumper Assembly / Disassembly and Reassembly - 4DR / Disassembly illustration

5. Remove the rear bumper bracket (A).

Body (Interior / Exterior / Electrical) — Front & Rear Bumper / Rear Bumper Assembly / Disassembly and Reassembly - 4DR / Disassembly illustration

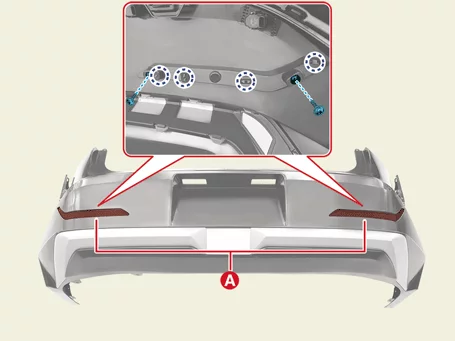
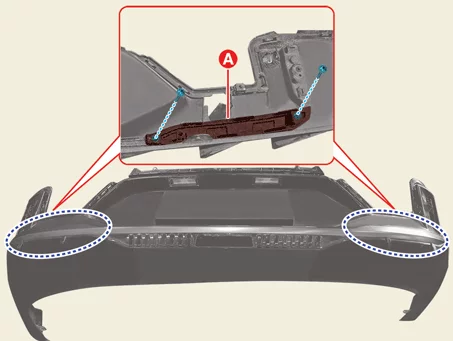
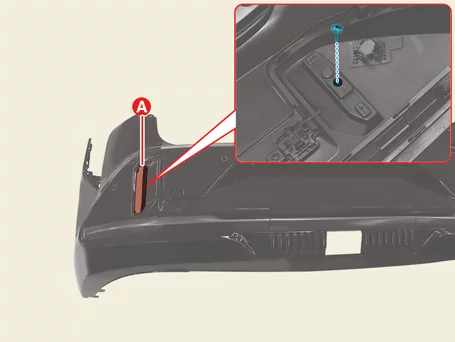
6. Remove the reflector (A) after removing the screws.

Body (Interior / Exterior / Electrical) — Front & Rear Bumper / Rear Bumper Assembly / Disassembly and Reassembly - 4DR / Disassembly illustration

7. Remove the rear bumper upper cover (A) after removing the screws.

Body (Interior / Exterior / Electrical) — Front & Rear Bumper / Rear Bumper Assembly / Disassembly and Reassembly - 4DR / Disassembly illustration

Body (Interior / Exterior / Electrical) — Front & Rear Bumper / Rear Bumper Assembly / Disassembly and Reassembly - 4DR / Disassembly illustration

8. Remove the rear bumper side piece (A).

Body (Interior / Exterior / Electrical) — Front & Rear Bumper / Rear Bumper Assembly / Disassembly and Reassembly - 4DR / Disassembly illustration

Body (Interior / Exterior / Electrical) — Front & Rear Bumper / Rear Bumper Assembly / Disassembly and Reassembly - 4DR / Disassembly illustration

Rear Bumper Assembly [Option]
1. Remove the rear bumper assembly. (Refer to Front & Rear Bumper - "Rear Bumper Assembly")
2. Remove the rear corner radar. (Refer to Advanced Driver Assistance System (Driving) - "Rear Corner Radar")
3. Remove the back-up lamp. (Refer to Light & Vision System - "Back-up Lamp")
4. Remove the bumper wiring harness (A).

Body (Interior / Exterior / Electrical) — Front & Rear Bumper / Rear Bumper Assembly / Disassembly and Reassembly - 4DR / Disassembly illustration

5. Remove the bumper beam assembly (A) after removing the fasteners.

Body (Interior / Exterior / Electrical) — Front & Rear Bumper / Rear Bumper Assembly / Disassembly and Reassembly - 4DR / Disassembly illustration

6. Remove the reflector (A) after removing the screw. [Both Side]

Body (Interior / Exterior / Electrical) — Front & Rear Bumper / Rear Bumper Assembly / Disassembly and Reassembly - 4DR / Disassembly illustration

7. Remove the upper cover (A) after removing the screws.

Body (Interior / Exterior / Electrical) — Front & Rear Bumper / Rear Bumper Assembly / Disassembly and Reassembly - 4DR / Disassembly illustration

Body (Interior / Exterior / Electrical) — Front & Rear Bumper / Rear Bumper Assembly / Disassembly and Reassembly - 4DR / Disassembly illustration

8. Remove the side piece (A) after removing the screws.

Body (Interior / Exterior / Electrical) — Front & Rear Bumper / Rear Bumper Assembly / Disassembly and Reassembly - 4DR / Disassembly illustration

Body (Interior / Exterior / Electrical) — Front & Rear Bumper / Rear Bumper Assembly / Disassembly and Reassembly - 4DR / Disassembly illustration

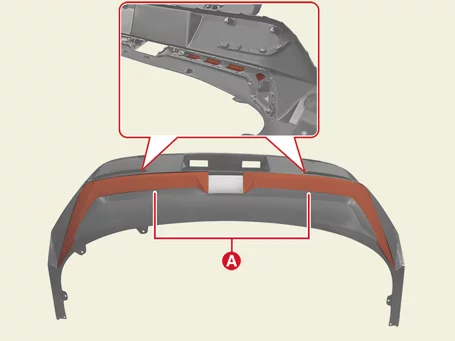
9. Remove the center piece (A).

Body (Interior / Exterior / Electrical) — Front & Rear Bumper / Rear Bumper Assembly / Disassembly and Reassembly - 4DR / Disassembly illustration

Reassembly
1. Reassemble in the reverse order of disassembly.

Rear Bumper Assembly Disassembly and Reassembly - 5DR

Disassembly
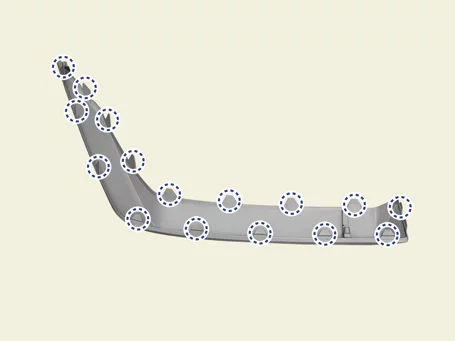
Information    
The indication below represents the location of a clip or fastener.

Body (Interior / Exterior / Electrical) — Front & Rear Bumper / Rear Bumper Assembly / Disassembly and Reassembly - 5DR / Disassembly illustration

Rear Bumper Assembly [Standard]
1. Remove the rear bumper assembly. (Refer to Front & Rear Bumper - "Rear Bumper Assembly")
2. Remove the back-up lamp. (Refer to Light & Vision System - "Back-up Lamp")
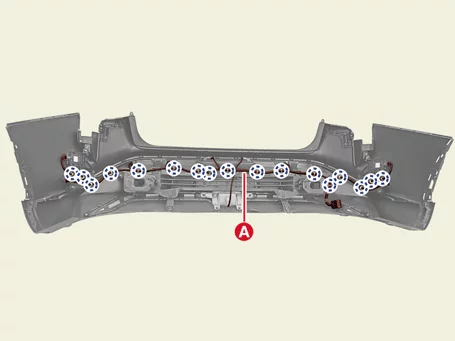
3. Remove the rear bumper wiring harness (A).

Body (Interior / Exterior / Electrical) — Front & Rear Bumper / Rear Bumper Assembly / Disassembly and Reassembly - 5DR / Disassembly illustration

4. Remove the rear bumper beam assembly (A) after removing the fasteners.

Body (Interior / Exterior / Electrical) — Front & Rear Bumper / Rear Bumper Assembly / Disassembly and Reassembly - 5DR / Disassembly illustration

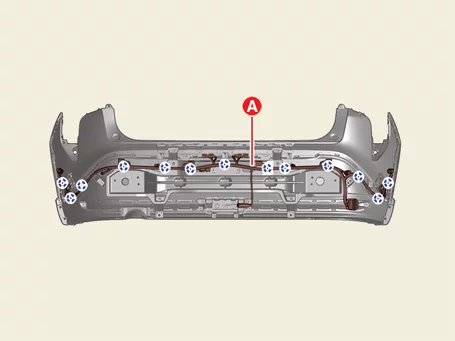
5. Remove the rear bumper bracket (A) after removing the screws.

Body (Interior / Exterior / Electrical) — Front & Rear Bumper / Rear Bumper Assembly / Disassembly and Reassembly - 5DR / Disassembly illustration

6. Remove the reflector (A) after removing the screws.

Body (Interior / Exterior / Electrical) — Front & Rear Bumper / Rear Bumper Assembly / Disassembly and Reassembly - 5DR / Disassembly illustration

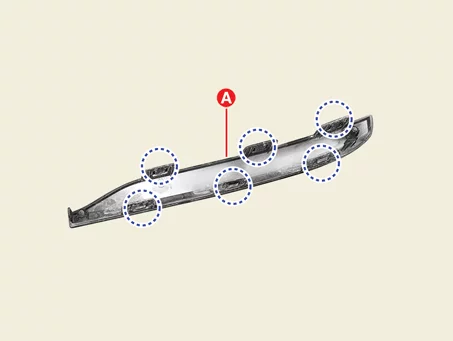
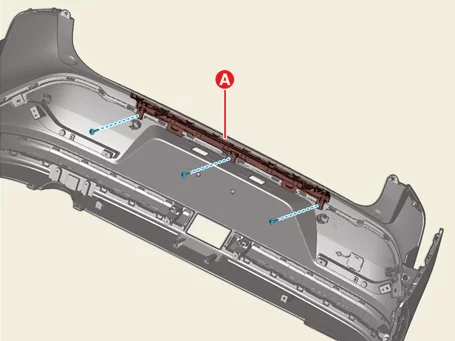
7. Remove the rear bumper molding (A) after removing the screws.

Body (Interior / Exterior / Electrical) — Front & Rear Bumper / Rear Bumper Assembly / Disassembly and Reassembly - 5DR / Disassembly illustration

Body (Interior / Exterior / Electrical) — Front & Rear Bumper / Rear Bumper Assembly / Disassembly and Reassembly - 5DR / Disassembly illustration

8. Remove the ultra wideband unit (A) after removing the screws.

Body (Interior / Exterior / Electrical) — Front & Rear Bumper / Rear Bumper Assembly / Disassembly and Reassembly - 5DR / Disassembly illustration

9. Remove the rear bumper upper cover (A) after removing the screws.

Body (Interior / Exterior / Electrical) — Front & Rear Bumper / Rear Bumper Assembly / Disassembly and Reassembly - 5DR / Disassembly illustration

Rear Bumper Assembly [Option]
1. Remove the rear bumper assembly. (Refer to Front & Rear Bumper - "Rear Bumper Assembly")
2. Remove the back-up lamp. (Refer to Light & Vision System - "Back-up Lamp")
3. Remove the rear bumper wiring harness (A).

Body (Interior / Exterior / Electrical) — Front & Rear Bumper / Rear Bumper Assembly / Disassembly and Reassembly - 5DR / Disassembly illustration

Body (Interior / Exterior / Electrical) — Front & Rear Bumper / Rear Bumper Assembly / Disassembly and Reassembly - 5DR / Disassembly illustration

4. Remove the rear bumper beam assembly (A) after removing the fasteners.

Body (Interior / Exterior / Electrical) — Front & Rear Bumper / Rear Bumper Assembly / Disassembly and Reassembly - 5DR / Disassembly illustration

5. Remove the reflector (A) after removing the screws.

Body (Interior / Exterior / Electrical) — Front & Rear Bumper / Rear Bumper Assembly / Disassembly and Reassembly - 5DR / Disassembly illustration

6. Remove the rear bumper bracket (A) after removing the screws.

Body (Interior / Exterior / Electrical) — Front & Rear Bumper / Rear Bumper Assembly / Disassembly and Reassembly - 5DR / Disassembly illustration

7. Remove the rear bumper molding (A) after removing the screws.

Body (Interior / Exterior / Electrical) — Front & Rear Bumper / Rear Bumper Assembly / Disassembly and Reassembly - 5DR / Disassembly illustration

Body (Interior / Exterior / Electrical) — Front & Rear Bumper / Rear Bumper Assembly / Disassembly and Reassembly - 5DR / Disassembly illustration

Body (Interior / Exterior / Electrical) — Front & Rear Bumper / Rear Bumper Assembly / Disassembly and Reassembly - 5DR / Disassembly illustration

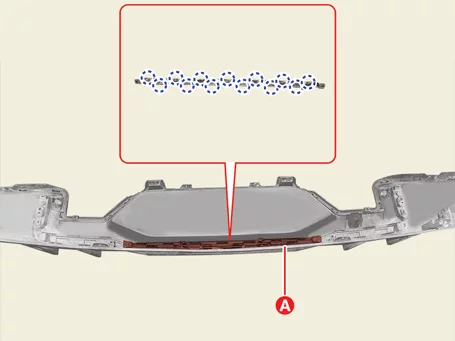
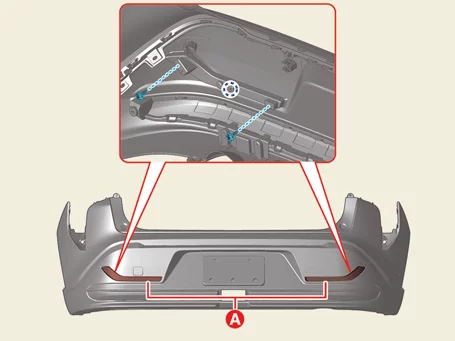
8. Remove the center rear bumper molding (A) after removing the screws.

Body (Interior / Exterior / Electrical) — Front & Rear Bumper / Rear Bumper Assembly / Disassembly and Reassembly - 5DR / Disassembly illustration

Body (Interior / Exterior / Electrical) — Front & Rear Bumper / Rear Bumper Assembly / Disassembly and Reassembly - 5DR / Disassembly illustration

9. Remove the rear bumper lower cover (A) after removing the screws.

Body (Interior / Exterior / Electrical) — Front & Rear Bumper / Rear Bumper Assembly / Disassembly and Reassembly - 5DR / Disassembly illustration

Reassembly
1. Reassemble in the reverse order of disassembly.

Other information:

Kia K4 (CL4) 2025-2026 Service Manual: Windows

The doors of this premium vehicle come integrated with an advanced multi-zone power window system that allows occupants to adjust cabin airflow with tactile master armrest switches. The underlying window motors feature automated thermal protection circuitry to ensure sustained operation under heavy load variations in your Kia K4. Power Window Lock Switch: Grants the driver the ability to completely isolate the signal path, preventing rear seat occupants from independent window operation.

Kia K4 (CL4) 2025-2026 Service Manual: Turbo Manifold Inspection

Inspection Turbocharger Inspection Procedure In case of insufficient power, poor acceleration, noise, or oil leakage, check the turbocharger for abnormalities by following the procedure below. 1.
Copyright © 2026 Kia K4 Manuals ⏱ 0.0196