Contents:
Description and Operation
| 1.
|
Seat Belt Pretensioner
|
•
|
When a collision occurs, the seat belt pretensioner winds the seat belt and
prevents the driver's
and front passenger's body from being leaned forward and collided with the
interior parts of the
vehicle.
|
|
•
|
The seat belt pretensioner operates with airbags.
|
|
The seat belt pretensioner generates heat when activated, so do not touch it
for several minutes
after activation.
|
|
| 2.
|
Seat Belt Reminder
|
•
|
This is a function that informs the driver whether or not a passenger is
wearing a seat belt
while stopping or driving.
|
|
•
|
When the IG is on regardless of whether the seat belt is fastened, the seat
belt warning light
turns on for 3 to 6 seconds and then turns off.
|
|
On Vehicle Inspection
Diagnosis with KDS
| 1.
|
The seat belt system can be more quickly diagnosed for problems with the KDS (Refer to "DTC
guide").
| (1)
|
Self diagnosis : Inspect the Diagnostic Trouble Code (DTC) with the KDS.
(Refer to DTC guide when fault code is found)
|
|
Height Adjust Removal and Installation
| 1.
|
Remove the upper center pillar trim.
(Refer to Body - "Center Pillar Trim")
|
| 2.
|
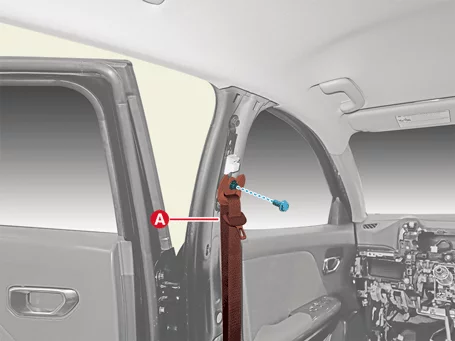
Remove the seat belt (A) after removing the bolt.
|
Tightening torque :
45.0 - 55.0 N·m (4.59 - 5.61 kgf·m, 33.2 - 40.6 lb·ft)
|
|
| 3.
|
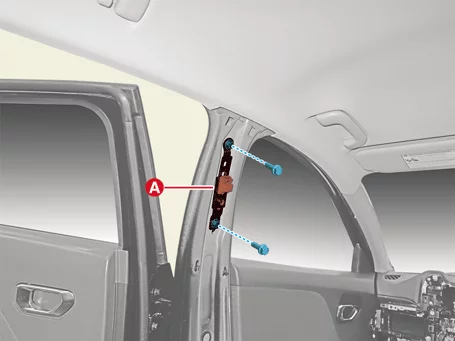
Remove the height adjust (A) after removing the bolts.
|
Tightening torque :
45.0 - 55.0 N·m (4.59 - 5.61 kgf·m, 33.2 - 40.6 lb·ft)
|
|
| 1.
|
Install in the reverse order of removal.
|
Seat Belt Pretensioner (BPT) On Vehicle Inspection
| 1.
|
The seat belt pretensioner can be more quickly diagnosed for problems with the KDS (Refer to
"DTC
guide").
| (1)
|
Self diagnosis : Inspect the Diagnostic Trouble Code (DTC) with the KDS.
(Refer to DTC guide when fault code is found)
|
|
Refer to the KDS screen for operating conditions and details.
|
|
Seat Belt Pretensioner (BPT) Troubleshooting
|
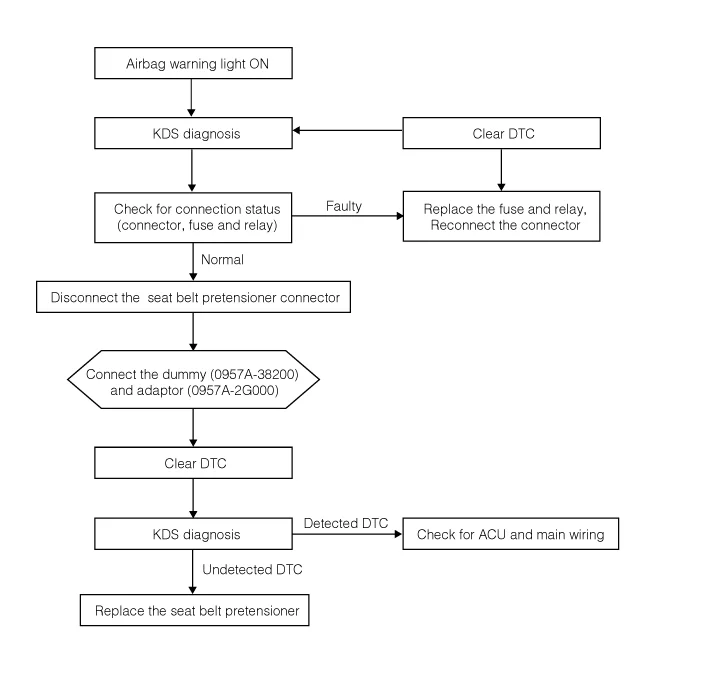
Direct measuring the resistance of the seat belt pretensioner is very dangerous as it can cause
the seat
belt pretensioner to deploy.
|
Seat Belt Pretensioner (BPT) Removal and Installation
|
Use KDS to proceed with fault diagnosis and check that the seat belt operates normally, after a
collision. Replace it with a new one if necessary.
|
Front Seat Belt Pretensioner (BPT)
| 1.
|
Disconnect the battery negative (-) terminal.
|
After disconnecting the battery negative (-) terminal, wait at least 3 minutes
and 30 seconds.
|
|
| 2.
|
Remove the upper center pillar trim.
(Refer to Body - "Center Pillar Trim")
|
| 3.
|
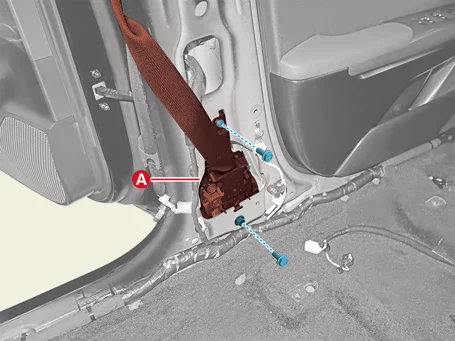
Separate the seat belt (A) after removing the bolt.
|
Tightening torque:
45.0 - 55.0 N·m (4.59 - 5.61 kgf·m, 33.2 - 40.6 lb·ft)
|
|
| 4.
|
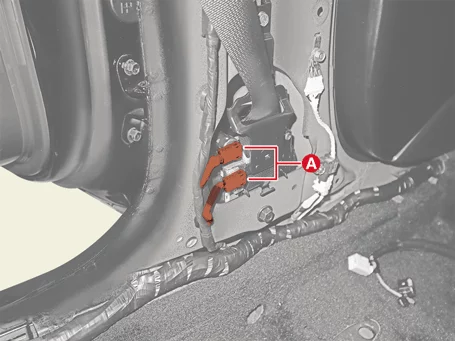
Disconnect the BPT connectors (A).
|
| 5.
|
Remove the BPT (A) after removing the bolts.
|
Tightening torque:
45.0 - 55.0 N·m (4.59 - 5.61 kgf·m, 33.2 - 40.6 lb·ft)
|
|
Rear Seat Belt Retractor [4DR]
|
Use KDS to proceed with fault diagnosis and check that the seat belt operates normally, after a
collision. Replace it with a new one if necessary.
|
| 1.
|
Remove the package tray trim.
(Refer to Body - "Package Tray Trim")
|
| 2.
|
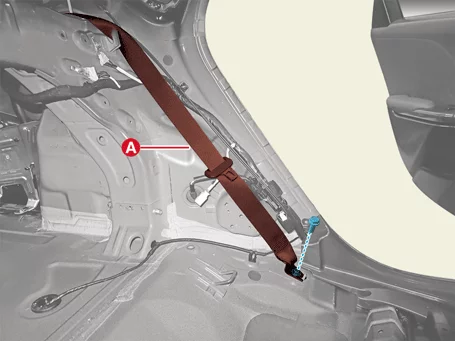
Separate the seat belt (A) after removing the bolt.
|
Tightening torque:
45.0 - 55.0 N·m (4.59 - 5.61 kgf·m, 33.2 - 40.6 lb·ft)
|
|
| 3.
|
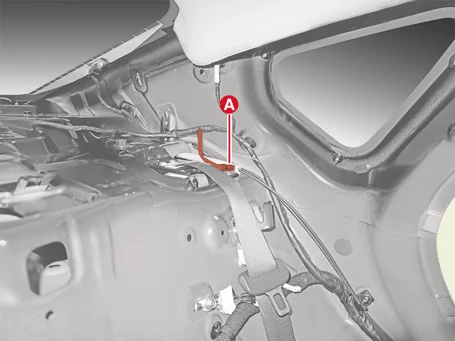
Disconnect the belt retractor connector (A).
|
| 4.
|
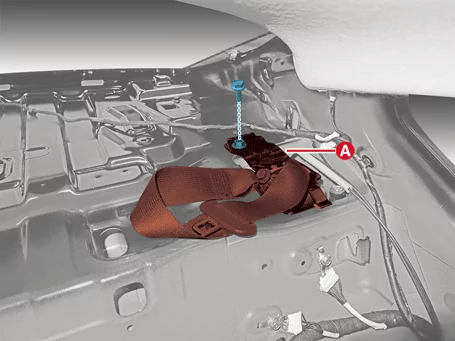
Remove the belt retractor (A) after removing the bolt.
|
Tightening torque:
45.0 - 55.0 N·m (4.59 - 5.61 kgf·m, 33.2 - 40.6 lb·ft)
|
|
Rear Seat Belt Retractor [5DR]
|
Use KDS to proceed with fault diagnosis and check that the seat belt operates normally, after a
collision. Replace it with a new one if necessary.
|
| 1.
|
Remove the rear pillar trim.
(Refer to Body - "Rear Pillar Trim")
|
| 2.
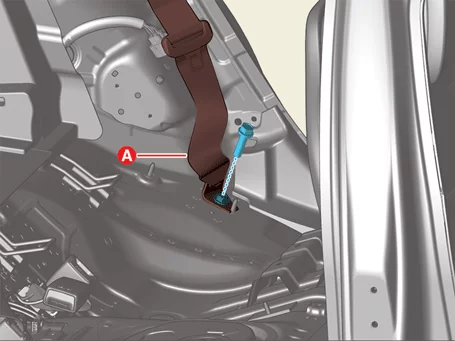
|
Separate the seat belt (A) after removing the bolt.
|
Tightening torque:
45.0 - 55.0 N·m (4.59 - 5.61 kgf·m, 33.2 - 40.6 lb·ft)
|
|
| 3.
|
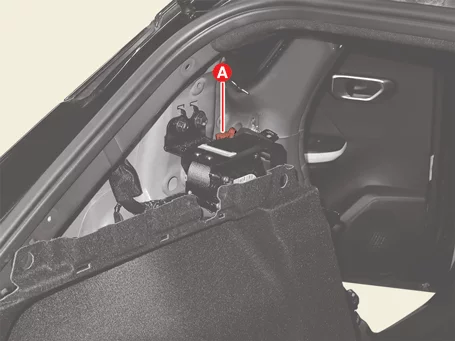
Disconnect the belt retractor connector (A).
|
| 4.
|
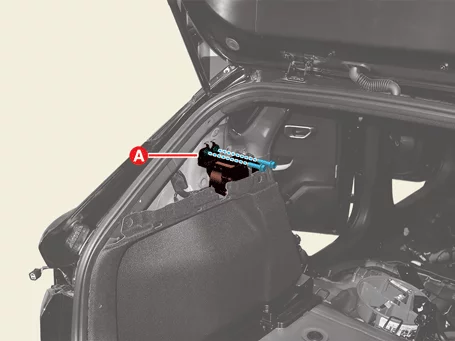
Remove the belt retractor (A) after removing the bolts.
|
Tightening torque:
45.0 - 55.0 N·m (4.59 - 5.61 kgf·m, 33.2 - 40.6 lb·ft)
|
|
Rear Center Seat Belt Retractor [4DR]
|
Use KDS to proceed with fault diagnosis and check that the seat belt operates normally, after a
collision. Replace it with a new one if necessary.
|
| 1.
|
Remove the package tray trim.
(Refer to Body - "Package Tray Trim")
|
| 2.
|
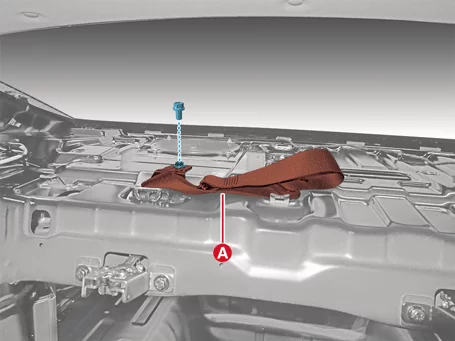
Remove the belt retractor (A) after removing the bolt.
|
Tightening torque:
45.0 - 55.0 N·m (4.59 - 5.61 kgf·m, 33.2 - 40.6 lb·ft)
|
|
Rear Center Seat Belt Retractor [5DR]
|
Use KDS to proceed with fault diagnosis and check that the seat belt operates normally, after a
collision. Replace it with a new one if necessary.
|
| 1.
|
Remove the rear seat back assembly. [Passenger's side]
(Refer to Body - "Rear Seat Assembly")
|
| 2.
|
Remove the belt retractor (A) after removing the bolt.
|
Tightening torque:
45.0 - 55.0 N·m (4.59 - 5.61 kgf·m, 33.2 - 40.6 lb·ft)
|
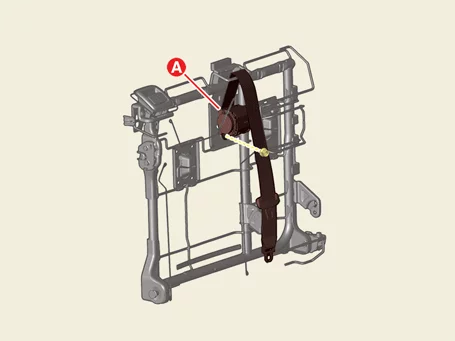
|
| 1.
|
Install in the reverse order of removal.
|
Be sure to keep the torque specifications presented in shop manuals. Otherwise,
it could lead to
the malfunction of airbag system.
|
|
| 2.
|
Check that the airbag system operates normally.
|
When the IG is on, the airbag warning lamp should turns off after turning on
for 3 - 6 seconds.
|
|
Seat Belt Reminder On Vehicle Inspection
| 1.
|
The seat belt reminder can be more quickly diagnosed for problems with the KDS (Refer to "DTC
guide").
| (1)
|
Self diagnosis : Inspect the Diagnostic Trouble Code (DTC) with the KDS.
(Refer to DTC guide when fault code is found)
|
|
Refer to the KDS screen for operating conditions and details.
|
|
Seat Belt Reminder Removal and Installation
|
The indication below represents the location of a clip or fastener.

|
Front Seat Belt Buckle
| 1.
|
Remove the front seat assembly.
(Refer to Body - "Front Seat Assembly")
|
| 2.
|
Separate the buckle connector wiring (A) after removing the fasteners.
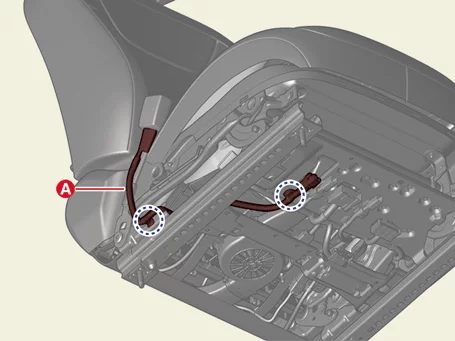
|
| 3.
|
Remove the buckle (A) after removing the bolt.
|
Tightening torque :
45.0 - 55.0 N·m (4.59 - 5.61 kgf·m, 33.2 - 40.6 lb·ft)
|
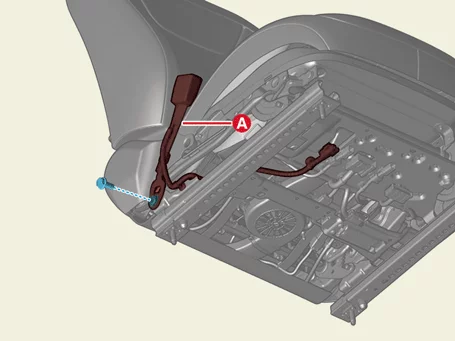
|
Rear Seat Belt Buckle
| 1.
|
Remove the rear seat cushion assembly.
(Refer to Body - "Rear Seat Assembly")
|
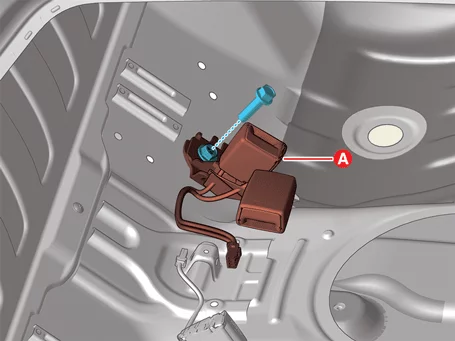
| 2.
|
Disconnect the buckle connector (A).
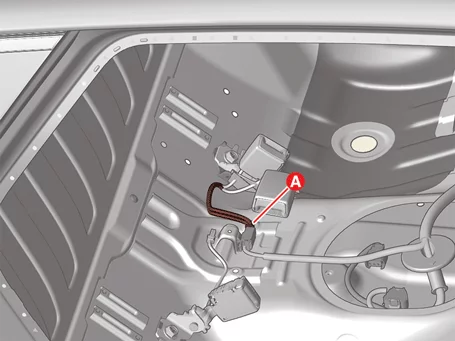
|
| 3.
|
Remove the buckle (A) after removing the bolt.
|
Tightening torque :
45.0 - 55.0 N·m (4.59 - 5.61 kgf·m, 33.2 - 40.6 lb·ft)
|
|
Rear Seat Center Mini Belt
| 1.
|
Remove the rear seat cushion assembly.
(Refer to Body - "Rear Seat Assembly")
|
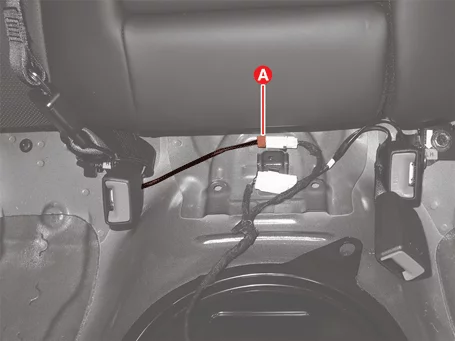
| 2.
|
Disconnect the buckle connector (A).
|
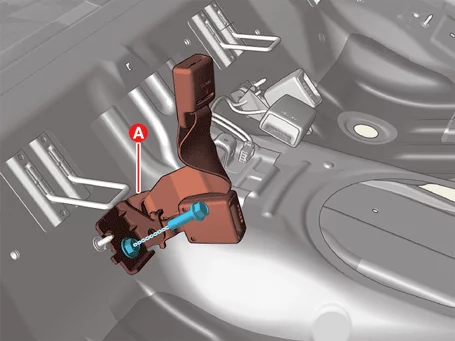
| 3.
|
Remove the buckle (A) after removing the bolt.
|
Tightening torque :
45 - 55 N·m (4.59 - 5.61 kgf·m, 33.2 - 40.6 lb·ft)
|
|
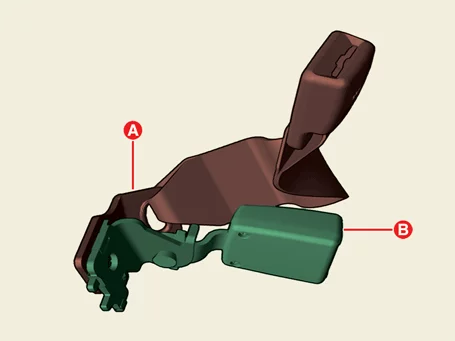
| 4.
|
Separate the center mini belt (A) from the rear seat belt buckle (B).
|
Front Seat Belt Reminder Mat
| 1.
|
Remove the front seat cushion cover. [Passenger's side]
(Refer to Body - "Front Seat Cushion Cover")
|
| 2.
|
Remove the reminder mat (A).
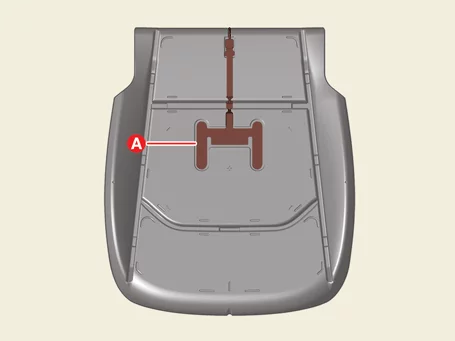
|
| 1.
|
Install in the reverse order of removal.
|
Other information:
Kia K4 (CL4) 2025-2026 Service Manual: Navigation-based Smart Cruise Control limitations
The Navigation-based Smart Cruise Control (NSCC) system is a highly advanced convenience feature; however, its performance relies heavily on accurate real-time data. The system may exhibit abnormal or unexpected behavior under the following circumstances:
The navigation system is experiencing a technical malfunction.
Map data fails to transmit correctly due to glitches in the infotainment system screen.
Kia K4 (CL4) 2025-2026 Service Manual: Smart trunk with auto open:
On vehicle configurations equipped with an advanced factory smart key system, you can seamlessly initiate a hands-free cargo entry sequence using the highly intuitive Smart Liftgate with AUTO Open system. This premium convenience package utilizes proximity sensors to grant access when your hands are full of luggage or groceries, ensuring effortless operation of your Kia K4.