Contents:
Troubleshooting
Water Leaks
Components
|
Suspected Cause
|
Remedy
|
Sunroof glass
|
Defect of gap/flush
|
Adjustment
|
Weatherstrip
|
Incorrect installation and deformation
|
Replacement
|
Wind Noise
Components
|
Suspected Cause
|
Remedy
|
Deflector
|
Deformation and separation
|
Replace or reinstall
|
Sunroof glass
|
Defect of gap/flush
|
Adjust of gap/flush
|
Drive Noise
Components
|
Suspected Cause
|
Remedy
|
Weatherstrip
|
Rubbing noise
|
Apply the silicone oil
|
Hardware
|
Loose or unfastened
|
Hardware re-tighten
|
Cover / Trims
|
Interference noise (rattle/rubbing)
|
Attach the pad to the noise generating area.
|
Operation Noise
Components
|
Suspected Cause
|
Remedy
|
Mechanism rail
|
Foreign matters in the mechanism rail
|
Cleaning the rail and apply the grease
|
Motor
|
Defective coupling of mechanism cable and motor pinion gear
|
Adjust or replace motor position
|
Motor pinion gear worn out or breakage
|
Replacement
|
Malfunctions
Components
|
Suspected Cause
|
Remedy
|
Mechanism rail
|
Increased operating load due to accumulation of foreign matters
|
1. Cleaning the rail and apply the grease
2. Adjust or replace motor position
3.
Replacement
of mechanism rail
|
Motor
|
Defective coupling of mechanism cable and motor pinion gear
|
Adjust or replace motor position
|
Motor position loss and sunroof switch one-touch operation failure due to discharge and replacement
of battery
and fuse
|
Motor Initialization
|
Damage
Components
|
Suspected Cause
|
Remedy
|
Sunroof glass
|
Damage due to external impact
|
Replacement
|
Adjustment
|
•
|
This video was created using 3D graphics to help understand the vehicle
maintenance manual.
|
|
•
|
There may be some differences from actual vehicles.
|
|
•
|
The location and repair procedures of the parts may vary depending on vehicle
model, model year,
region, and specifications.
|
|
•
|
Check the KDS Guide for detailed information on how to use the KDS.
|
|
•
|
Check the manual for detailed maintenance procedures.
|
|
•
|
Unauthorized reproduction, distribution, or sharing of this video is
prohibited.
|
|
Sunroof Adjustment and Initialization
(Click to play)

Video: Sunroof Adjustment and
Initialization
Glass Adjustment
| 1.
|
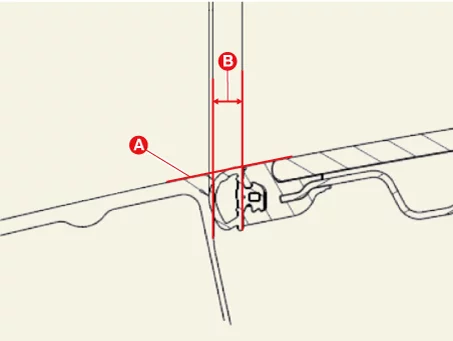
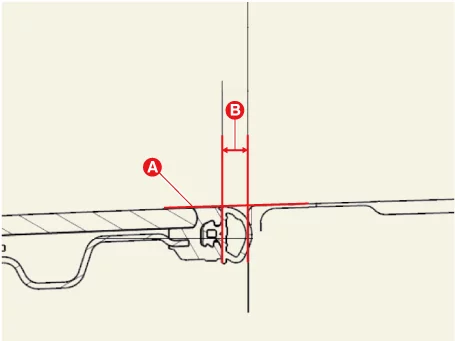
Check the gap (B) and height (A) of the roof panel and glass.
Windshield Glass - Front Glass
|
Gap (B) [mm (in.)]
|
Height (A) [mm (in.)]
|
|
|
4.3 - 6.3
(0.17 - 0.25)
|
0.7 - 2.7
(0.02 - 0.1)
|
Front Glass - Moving Glass
|
Gap (B) [mm (in.)]
|
Height (A) [mm (in.)]
|
|
|
4.2 - 6.2
(0.17 - 0.24)
|
-1.0 to 0.5
(-0.04 to 0.02)
|
Moving Glass - Roof panel
|
Gap (B) [mm (in.)]
|
Height (A) [mm (in.)]
|
|
|
3.5 - 5.5
(0.14 - 0.22)
|
-1.0 to 1.0
(-0.04 to 0.04)
|
|
| 2.
|
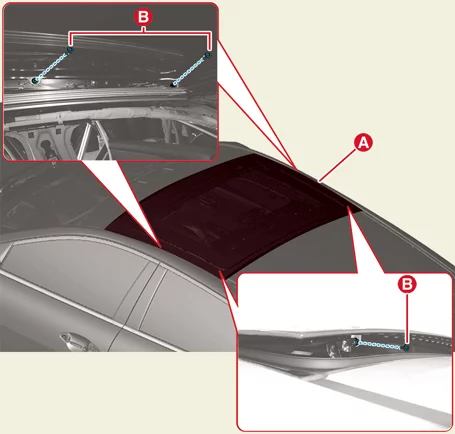
If it is necessary to adjust the glass (A), slightly loosen the glass height adjustment screws
(B) and
tighten the screws.
|
Initialize Sunroof
If necessary, initialize the sunroof according to the initialization method.
The sunroof and blind are initialized using the sunroof switch.
| 1.
|
IG ON or start the vehicle.
|
| 2.
|
Close the sunroof completely if opened
|
| 3.
|
Release the sunroof control lever.
|
| 4.
|
With the sunroof glass or rear blind closed, lightly press the switch forward until it moves
once, then
release your hand.
|
| 5.
|
Keep pressing the sunroof switch forward until the sunroof glass or rear blind opens and closes
completely.
|
•
|
Do not release the lever until the operation is completed.
|
|
•
|
If you release the switch during operation, it will try again
from the beginning.
|
|
|
| 6.
|
Release the sunroof control lever after all operation has completed.
(The sunroof system been reset.)
|
Sunroof Assembly Removal and Installation
| 1.
|
Remove the moving glass.
(Refer to Sunroof - "Sunroof Glass")
|
| 2.
|
Remove the front glass.
(Refer to Sunroof - "Sunroof Glass")
|
| 3.
|
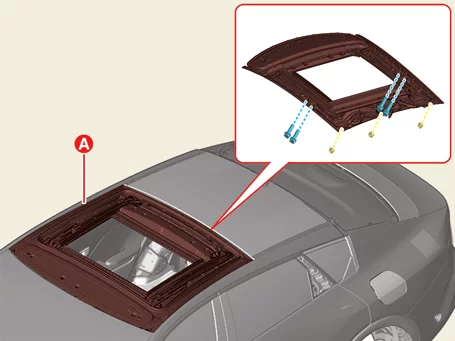
Separate the sunroof assembly (A) after removing the bolts and nuts.
|
Tightening torque:
7.8 - 11.8 N·m (0.8 - 1.2 kgf·m, 5.8 - 8.7 lb·ft)
|
|
| 4.
|
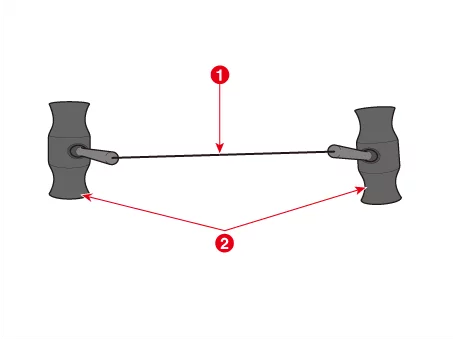
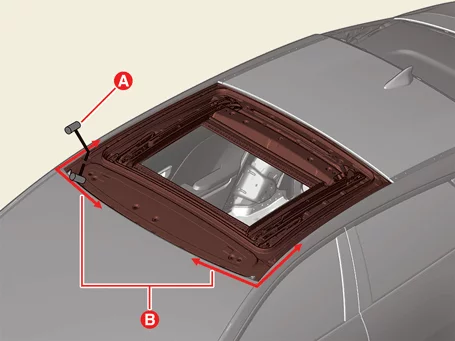
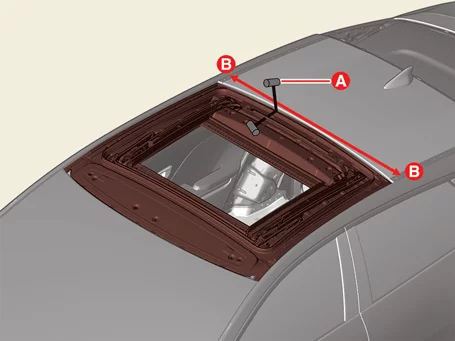
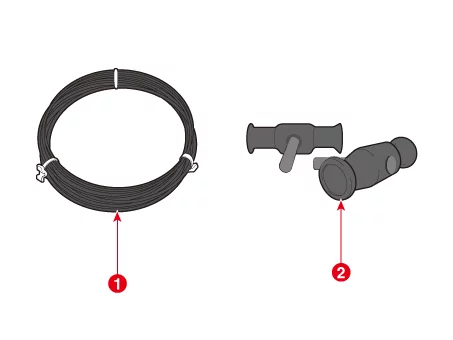
Cut off the sealant of forward edge area (B) by pulling the wire (A) to the left and right.
|
•
|
Put on gloves to prevent hand injuries.
|
|
•
|
Be careful not to burn hands as the excessive heat may be
generated while using the wire.
|
|
|
Be careful not to damage the body surface.
|
|
When using the wires, work at least the two or more people together.
|
|
| 5.
|
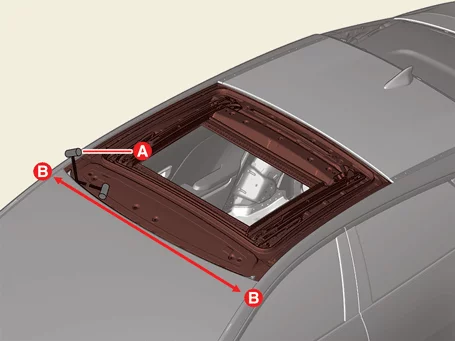
Cut off the sealant on the front sealant area (B - B) while pulling the wire (A) to the left
and right.
|
•
|
Put on gloves to prevent hand injuries.
|
|
•
|
Be careful not to burn hands as the excessive heat may be
generated while using the wire.
|
|
|
Be careful not to damage the body surface.
|
|
When using the wires, work at least the two or more people together.
|
|
| 6.
|
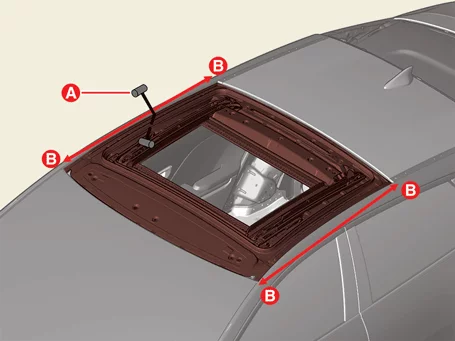
Cut off the sealant on the side area (B - B), while pulling the wire (A) to the left and right.
|
•
|
Put on gloves to prevent hand injuries.
|
|
•
|
Be careful not to burn hands as the excessive heat may be
generated while using the wire.
|
|
|
Be careful not to damage the body surface.
|
|
When using the wires, work at least the two or more people together.
|
|
| 7.
|
Cut off the sealant on the rear sealant area (B - B), while pulling the wire (A) to the left
and right.
|
•
|
Put on gloves to prevent hand injuries.
|
|
•
|
Be careful not to burn hands as the excessive heat may be
generated while using the wire.
|
|
|
Be careful not to damage the body surface.
|
|
When using the wires, work at least the two or more people together.
|
|
| 8.
|
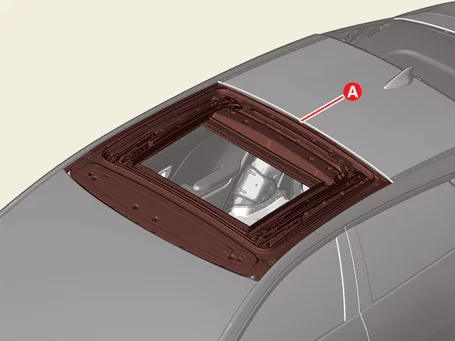
Remove the sunroof assembly (A) after cutting the sealant on all sides.
|
Be careful not to damage the sunroof assembly when removing it.
|
|
| 9.
|
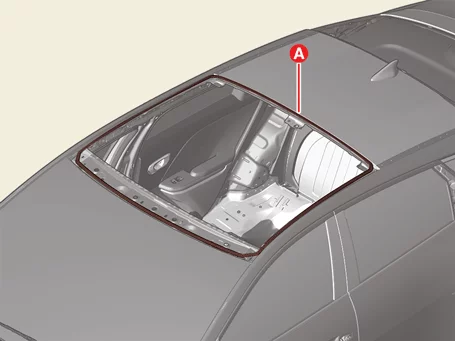
Cut off the remaining sealant (A) around the body panel by using the knife blade.
|
•
|
When cutting off the remaining sealant of the frame, leave it 2
mm thick on the working
surface and cut.
|
|
•
|
Be careful not to damage the body painting surface.
|
|
•
|
If the body painting surface is damaged, apply the repair paint
or anti-corrosion agent.
|
|
|
| 1.
|
Clean the edges of the body panel and the sunroof assembly with alcohol, etc.
|
| 2.
|
Apply the body primer to the edge of the body panel and wide frame.
|
•
|
Be careful not to touch the primed surface with your hands, as
water leakage may occur
after the sunroof assembly is installed.
|
|
•
|
Do not smear the primer-covered surface to any foreign
materials.
|
|
|
| 3.
|
Apply the sealant (A) around the body panel after applying the primer.
|
| 4.
|
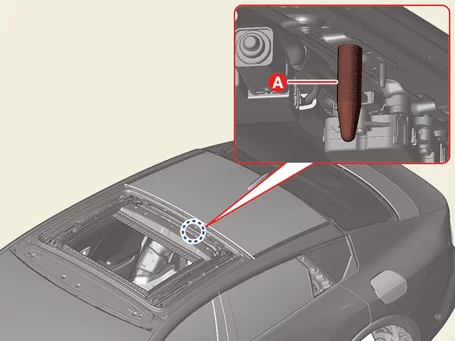
Align to the centering device hole (A) on the body and carefully mount the sunroof on the body
flange
surface.
|
| 5.
|
Install the sunroof assembly completely after checking the flush and gap.
Windshield Glass - Front Glass
|
Gap (B) [mm (in.)]
|
Height (A) [mm (in.)
|
|
|
5.7 - 5.9
(0.22 - 0.23)
|
1.4 - 1.6
(0.05 - 0.06)
|
Moving Glass - Roof panel
|
Gap (B) [mm (in.)]
|
Height (A) [mm (in.)]
|
|
|
4 - 5
(0.16 - 0.20)
|
-1 to 1
(-0.04 to 0.04)
|
|
| 6.
|
Perform a water leak test at least 3 to 4 hours later after installing the sunroof assembly.
|
Keep the water stream away from directly touching the newly installed adhesive
surface and let
the water fall on the side of the glass.
|
|
| 7.
|
When a leak occurs, apply the additional sealant to the leaking area.
|
•
|
Allow the vehicle to stand flat for at least 4hours after
installing the sunroof
assembly.
|
|
•
|
If the vehicle needs to be used, drive slowly at least for 8
hours.
|
|
•
|
The driver should be careful to drive the vehicle aggressively
or avoid uneven road
driving for 2-3 days.
|
|
|
| 8.
|
Install in the reverse order of removal.
|
Sunroof Deflector Removal and Installation
|
The indication below represents the location of a clip or fastener.

|
| 1.
|
Press the sunroof switch to open the sunroof glass completely.
|
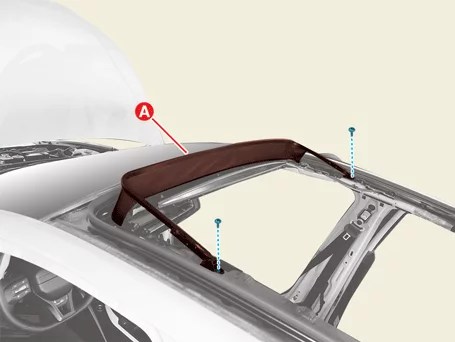
| 2.
|
Remove the sunroof deflector (A) after removing the screws.
|
| 1.
|
Install in the reverse order of removal.
|
Sunroof Glass Removal and Installation
Moving Glass
| 1.
|
Press the sunroof switch to the tilt state of the moving glass.
|
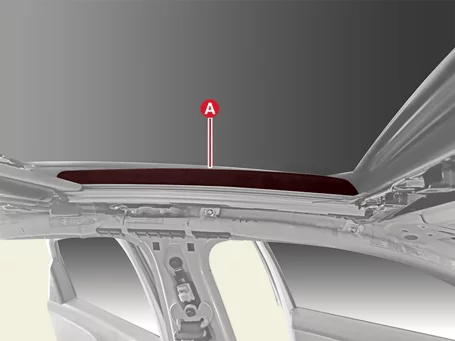
| 2.
|
Remove the decoration cover (A).
|
| 3.
|
Remove the glass (A) after removing the screws (B).
|
Front Glass
| 1.
|
Fully open the moving glass by pressing the sunroof switch.
|
| 2.
|
Remove the roof trim assembly.
(Refer to Roof Trim - "Roof Trim Assembly")
|
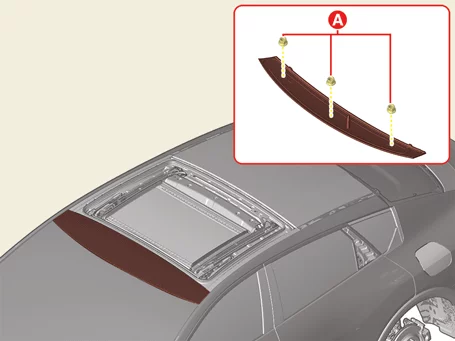
| 3.
|
Remove the glass nuts (A).
|
Tightening torque:
7.8 - 11.8 N·m (0.8 - 1.2 kgf·m, 5.8 - 8.7 lb·ft)
|
|
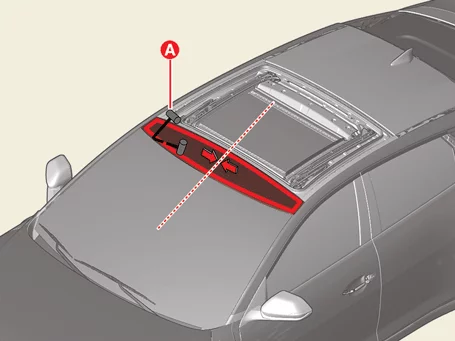
| 4.
|
Cut the sealant by applying force in the direction of the arrow while pulling the square wire
(A) to the
left and right.
|
•
|
Be careful as the wire may break when working.
|
|
•
|
Be careful not to damage the body surface.
|
|
•
|
Be careful not to damage the front glass assembly when removing
it.
|
|
|
| 5.
|
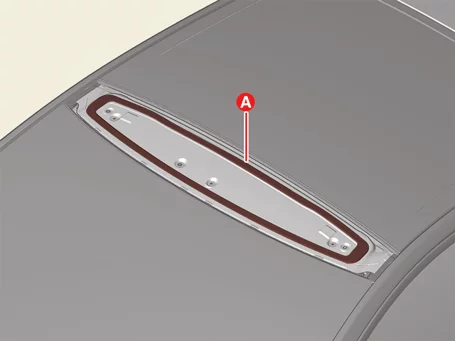
Cut off the remaining sealant (A) around the sunroof frame windshield installing surface after
using a
knife blade.
|
•
|
When cutting off the remaining sealant of the frame, leave it 2
mm thick on the working
surface and cut.
|
|
•
|
Be careful not to damage the frame painted surface.
|
|
•
|
If the body painting surface is damaged, apply the repair paint
or anti-corrosion agent.
|
|
|
Moving Glass
| 1.
|
Install in the reverse order of removal.
|
Front Glass
| 1.
|
Wipe the edge of the sunroof frame and front glass with alcohol, etc.
|
| 2.
|
Apply the primer around the sunroof frame.
|
| 3.
|
Apply the sealant (A) around the sunroof frame.
|
Be careful not to leak or break the sealant when applying the sealant by using
a sealant gun.
|
|
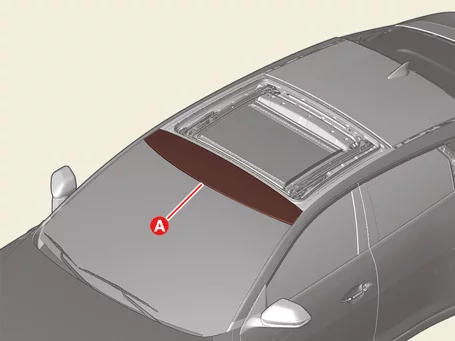
| 4.
|
Attach the front glass (A) to the sunroof frame.
|
| 5.
|
Install the front glass completely after checking the flush and gap.
Windshield Glass - Front Glass
|
Gap (B) [mm (in.)]
|
Height (A) [mm (in.)
|
|
|
5.7 - 5.9
(0.22 - 0.23)
|
1.4 - 1.6
(0.05 - 0.06)
|
|
| 6.
|
Tape around the front glass so that it does not float.
|
•
|
If the sealant is over-applied and the sealant is visible
outside the vehicle, clean it
with alcohol or a cleaning agent.
|
|
•
|
After installing the front glass, leave the vehicle on level
ground at least for 4 hours.
|
|
•
|
If the vehicle needs to be used, drive slowly at least for 8
hours.
|
|
•
|
The driver should be careful to drive the vehicle aggressively
or avoid uneven road
driving for 2 - 3 days.
|
|
|
Sunroof Mechanism Assembly Removal and Installation
Sunroof Mechanism Assembly
| 1.
|
Remove the roof trim assembly.
(Refer to Roof Trim - "Roof Trim Assembly")
|
| 2.
|
Remove the moving glass.
(Refer to Sunroof - "Moving Glass")
|
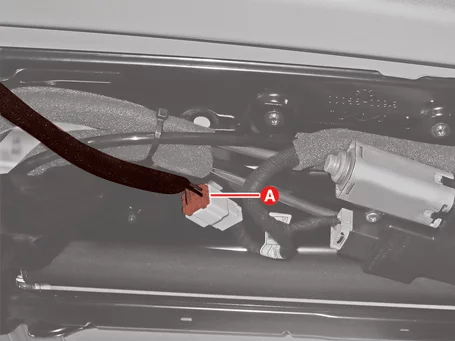
| 3.
|
Disconnect the sunroof extension wiring connector (A).
|
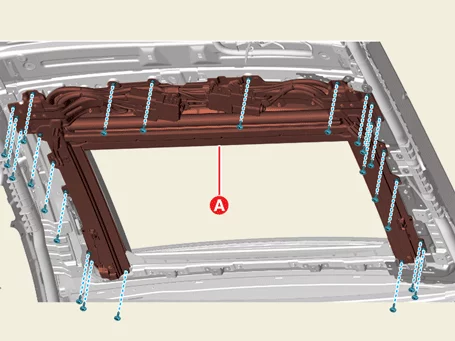
| 4.
|
Remove the mechanism assembly (A) after removing the screws.
|
| 1.
|
Install in the reverse order of removal.
|
Sunroof Motor Removal and Installation
Sunroof Motor
| 1.
|
Remove the roof trim assembly.
(Refer to Roof Trim - "Roof Trim Assembly")
|
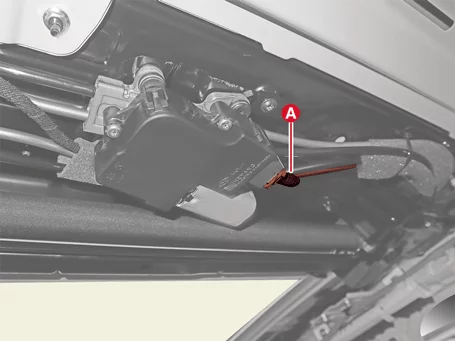
| 2.
|
Disconnect the motor connector (A).
|
| 3.
|
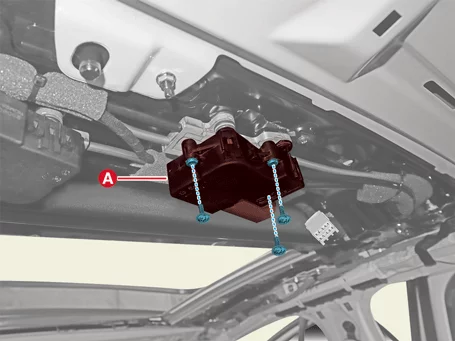
Remove the motor (A) after removing the screws.
|
Blind Motor
| 1.
|
Remove the roof trim assembly.
(Refer to Roof Trim - "Roof Trim Assembly")
|
| 2.
|
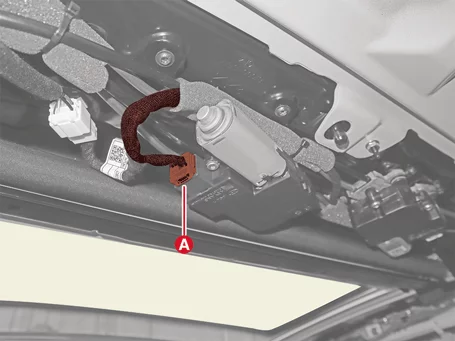
Disconnect the motor connector (A).
|
| 3.
|
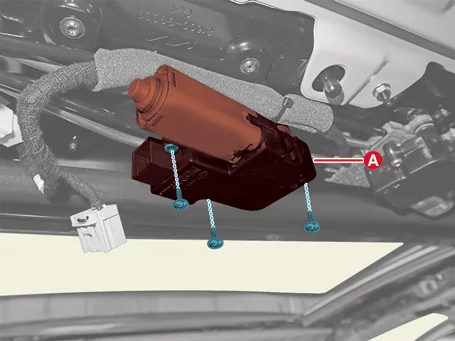
Remove the motor (A) after removing the screws.
|
| 1.
|
Install in the reverse order of removal.
|
Sunroof Switch Inspection
| 1.
|
Remove the overhead console lamp.
(Refer to Light & Vision System - "Overhead Console
Lamp")
|
| 2.
|
Check for continuity between the terminals.
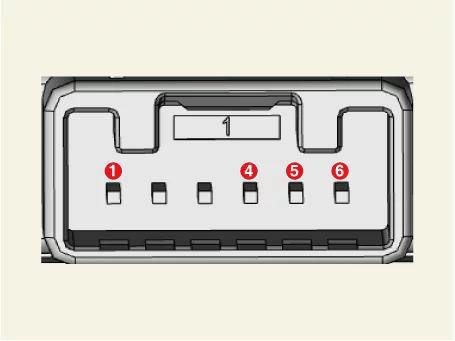
|
Open 1st
|
Open 2nd
|
Close 1st
|
Close 2nd
|
Tilt up
|
Tilt down
|
Signal
(Pin
No.)
|
Manual open
|
Auto Open
|
Manual close
|
Auto Close
|
Signal A
(4)
|
O
|
O
|
|
|
|
|
Signal B
(5)
|
|
O
|
O
|
O
|
|
|
Signal C
(6)
|
|
|
|
O
|
O
|
O
|
Ground
(1)
|
O
|
O
|
O
|
O
|
O
|
O
|
|
Sunroof Weather Strip Removal and Installation
Frame Weatherstrip
| 1.
|
Remove the moving glass.
(Refer to Sunroof - "Moving Glass")
|
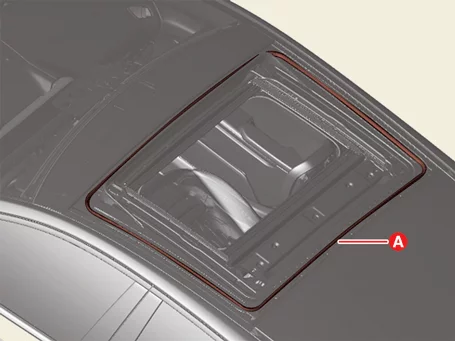
| 2.
|
Remove the weatherstrip (A).
|
Front Glass Weatherstrip
| 1.
|
Fully open the moving glass.
|
| 2.
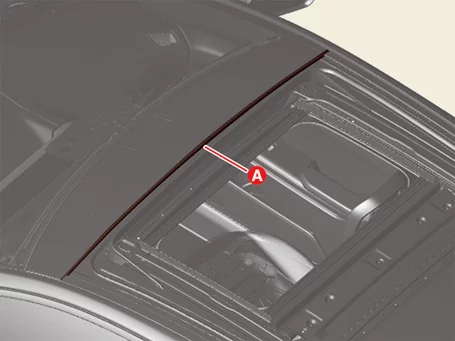
|
Remove the weatherstrip (A).
|
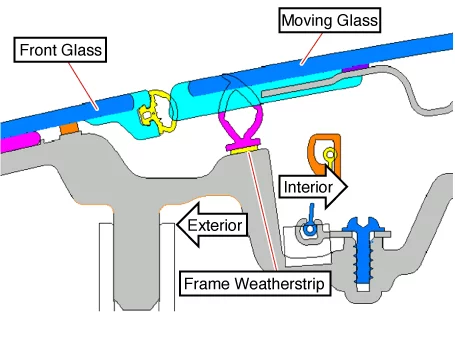
Frame Weatherstrip
| 1.
|
After removing the double-sided tape remaining on the wide sunroof frame, apply the primer.
|
| 2.
|
After installing the frame weather strip, press the installing area.
|
| 3.
|
Install the moving glass.
(Refer to Sunroof - "Moving Glass")
|
|
•
|
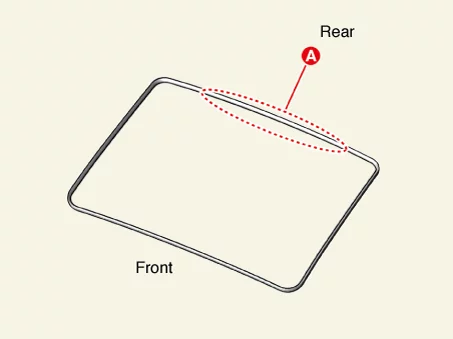
Place the air vent hole (A) in the rear part, and install it in the order of
front part → side
part → rear part.
|
|
•
|
Since the cross-section is not symmetrical, check the inside and outside and
then install the
frame weatherstrip.
|
|
•
|
Since the frame weatherstrip cannot be reused, it must be replaced with a new
one when removed or
replaced.
|
|
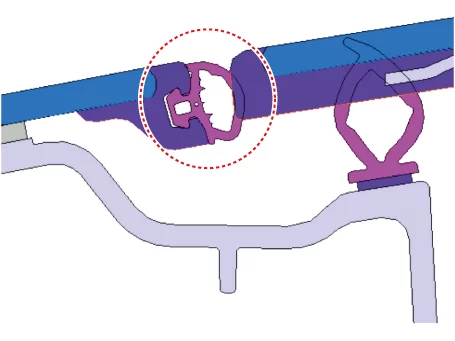
Front Glass Weatherstrip
| 1.
|
Install in the reverse order of removal.
|
Be careful not to install the weatherstrip in reverse by referring to the
cross-section below.
|
|
Other information:
Kia K4 (CL4) 2025-2026 Service Manual: Cylinder Head Installation
Video Guide
•
This video was created using 3D graphics to help understand the vehicle
maintenance manual.
Kia K4 (CL4) 2025-2026 Service Manual: Lane Following Assist (LFA)
The Lane Following Assist (LFA) system is a sophisticated driver-assistance feature designed to enhance your comfort and safety. By utilizing advanced sensor technology, the Kia K4 can actively detect lane markings or the position of a vehicle traveling directly ahead. The system then provides subtle steering support to help keep your Kia K4 centered within its lane, significantly reducing driver fatigue during long journeys or highway driving.



 Square wire
 Insert-type wire grip